Last modified: 2023-03-29
White Hat Hacker's book
These are my notes, that help me to organize the accumulated knowledge and to congregate it in one place. Intended to be offline source.
![]()
What is a hacker?
For me, a hacker is skilled computer expert that uses their technical knowledge to overcome a problem by creative means.
The hacker culture is a subculture of individuals who enjoy - often in collective effort - the intellectual challenge of creatively overcoming the limitations of software systems or electronic hardware (mostly digital electronics), to achieve novel and clever outcomes
A hacker is a person skilled in information technology who uses their technical knowledge to achieve a goal or overcome an obstacle, within a computerized system by non-standard means.
Hackers have a mind that is optimized for figuring out what is possible. When presented with some random new gadget, your mom will ask what it can do, hacker will ask what can I make this do.
The term is, unfortunately, more often being associated with a person who uses computers to gain unauthorized access to data.
A hacker is a person who breaks into a computer system.
Without hackers, we would not have computers. Look at Steve Wozniak for example.
Here is a great example what skilled person / hacker can do: Using My Python Skills To Punish Credit Card Scammers.
Personally, I do not approve of black-hat-hacking, however I do encourage white-hat-hacking. White-hat-hackers are very important for security and freedom of all of us.
I am happy that times change and hackers are gaining a better reputation. I am also happy that the obsolete trend of threatening hackers for finding a flaws in systems is dying out. Not long ago it was common practice for companies to threat with legal actions or even have police raid homes if anyone tried to let them know of discovered problem.
Imagine a physical bank building. And imagine that on your way to said bank you notice somebody forgot to close a door into the vault. White-hat-hacker would go to the front desk and report such problem, a noble thing to do. Unfortunately for a long time the bank would threaten to call police instead of thanking you and fixing the issue. How would you like that?

Thankfully this mentality is dying out and hackers and security researchers are in some cases even being rewarded for reporting a security flaws.
Background
This document has been evolving for a long time now. On my way to become a white-hat-hacker I have learned a lot, and I am still learning.
Back in 2020, I started writing these notes in LaTeX, but eventually hit a wall with long compile times and huge PDF document (over 400 pages). Not to mention portability and accessibility problems.
Links
- Main repository, issue tracker and so on at git.sr.ht/~atomicfs
- Mirror repository at gitlab.com
Hosted static web-pages

white-hat-book.white-hat-hacker.icu

Last modified: 2023-03-29
Constants
| Quantity | Symbol | Value | Units |
|---|---|---|---|
| Speed of Light | 299792458 | ||
| Speed of Sound | 340.29 | ||
| Pi | 3.141592653589793 | ||
| Euler's number | e | 2.718281828459045 | |
| Gravity of Earth | g | 9.780327 |
Last modified: 2023-03-29
Abbreviations
| Acronym | Full name |
|---|---|
| ACPI | Advanced Configuration and Power Interface |
| AP | Access Point |
| BS | Bull Shit |
| BSoD | Blue Screen of Death |
| CD | Compact Disc |
| CPI | Cycles Per Second |
| DDoS | Distributed Denial of Service |
| DIY | Do It Yourself |
| DVD | Digital Versatile Disc |
| DoS | Denial of Service |
| EULA | End-User License Agreement |
| FUBAR | Fucked Up Beyond All Repair/Recognition |
| GPL | General Public License |
| GUI | Graphical User Interface |
| HW | Hard Ware |
| IDE | Integrated Development Environment |
| IPS | Instructions Per Second |
| ISP | Internet Service Provider |
| MIPS | Millions of Instructions Per Second |
| MITM | Man In The Middle |
| OS | Operating System |
| RAM | Random-Access Memory |
| RTFM | Read The Fucking Manual |
| STP | Spanning Tree Protocol |
| STP | Spanning Tree Protocol |
| SW | Soft Ware |
| TIM | Thermal Interface Material |
| URL | Uniform Resource Locators |
Last modified: 2023-03-29
Operating Systems
This section is mostly about operating systems for computers, laptops, servers and so on. There is also a section about mobile operating systems in Mobile phones.
Last modified: 2023-03-29
Unix, Linux and computer revolution
Unix
Unix originated in 1960 as a product of AT&T and it was a proprietary operating system.
Many of the design principles of Unix (also known as Unix philosophy) are still used to this day and are considered good practice:
The Unix philosophy is documented by Doug McIlroy in the Bell System Technical Journal from 1978:
- Make each program do one thing well. To do a new job, build afresh rather than complicate old programs by adding new "features".
- Expect the output of every program to become the input to another, as yet unknown, program. Don't clutter output with extraneous information. Avoid stringently columnar or binary input formats. Don't insist on interactive input.
- Design and build software, even operating systems, to be tried early, ideally within weeks. Don't hesitate to throw away the clumsy parts and rebuild them.
- Use tools in preference to unskilled help to lighten a programming task, even if you have to detour to build the tools and expect to throw some of them out after you've finished using them.
It was later summarized by Peter H. Salus in A Quarter-Century of Unix (1994):
- Write programs that do one thing and do it well.
- Write programs to work together.
- Write programs to handle text streams, because that is a universal interface.
In their award-winning Unix paper of 1974, Ritchie and Thompson quote the following design considerations:
- Make it easy to write, test, and run programs.
- Interactive use instead of batch processing.
- Economy and elegance of design due to size constraints ("salvation through suffering").
- Self-supporting system: all Unix software is maintained under Unix.
YouTube channel Computerphile has a great video about Mainframes and the Unix Revolution.
GNU
As a legends say, Richard Stallman, bored of limitations of proprietary software, established a Free Software Foundation in 1985 and founded the GNU project.
GNU is collection of free-software programs to be essential part of operating system.
GNU stands for Gnu is Not Unix.
Free-software and open-source software are not the same thing. Both are similar, but not the same.
Free-software is heavily focused on user freedoms and rights, while open-source software focuses on practicality.
Open-source software requires, as the name implies, the source-code to be freely accessible. However the use of the software might be limited by the license.
Free-software also requires free access to the source-code, but in addition has additional requirements:
- Freedom 0: The freedom to use the program for any purpose.
- Freedom 1: The freedom to study how the program works, and change it to make it do what you wish.
- Freedom 2: The freedom to redistribute and make copies so you can help your neighbor.
- Freedom 3: The freedom to improve the program, and release your improvements (and modified versions in general) to the public, so that the whole community benefits.
It can be assumed that all free-software is also open-source software, but not all open-source software is free-software. In other words, free-software is subset of open-source software.
The combination of both is often referred to as free and open-source software.
The GNU project was going well, with only missing piece being the kernel.
Kernel is a computer program at the core of a computer's operating system and generally has complete control over everything in the system.
Kernel controls all the hardware, assigns system resources to programs and provides a abstraction layer to said programs via drivers.
Linux kernel
In 1990, Linus Torvalds was exposed to MINIX. Later, in 1991, Linus Torvalds developed the first Linux kernel and released it on 17 September 1991 (for the Intel x86 systems).
Minix is open-source Unix-like operating system designed for education. Basically bare-bones of Unix with some additions.
Since 2015 all Intel chipsets are running Minix3 as Intel Management Engine.
Nowadays, Linux kernel is developed by a community, making it the largest software community project in human history.
Quite a few Unix system (such as MacOS, Solaris, etc.) are developed by corporations as proprietary software.
Linus Torvalds, while working on Linux, found that source control and versioning tools available at the time were terrible. So in 2005 created Git.
Interesting video from Google: Tech Talk: Linus Torvalds on git
Here is the same video but with chapters and time-stamps: Creator of git, Linus Torvalds Presents the Fundamentals of git
In 2001 was released a very interesting documentary Revolution OS which cover over 20 years of GNU, Linux, open-source, and the free software movement. More information can be found at wikipedia page or official website. The documentary is also available on YouTube thanks to some questionable means.
BSD
BSD branched off Unix in 1978. Originally source-available, later open-source.
Later from BSD branched open-source projects such as FreeBSD or OpenBSD (just to name a few).
Final notes

BSD is a branch of Unix, based on the actual Unix source-code.
Linux is only inspired by Unix, hence Unix-like.
Nice and handy website called distrowatch.com acts like a centralized information hub regarding different free and open-source operating systems and distributions (Unix-like, Unix-based, etc).
Linux vs GNU/Linux
Generally, I prefer Linux over GNU/Linux, for following reasons:
- Linux is convenient short-hand. People know that in conversation
Linuxrefers to one of Linux distributions, often but not always including GNU. - There are Linux distributions which have nothing to do with GNU, such as Alpine Linux (gcc is replaced with musl, and GNU core utilities are replaced with BusyBox)
- Besides that, it is almost never only Linux kernel and GNU utilities, but also whole plethora of other software such as window manager, init system and so on.
Last modified: 2023-03-29
Lightweight
Sources:
There some some really minimalistic operating systems which can run on almost anything. Sometimes it is nice to resurrect some old and obsolete hardware, but it is difficult or close to impossible to fit onto it modern system. However there are some Linux distributions made for such task.
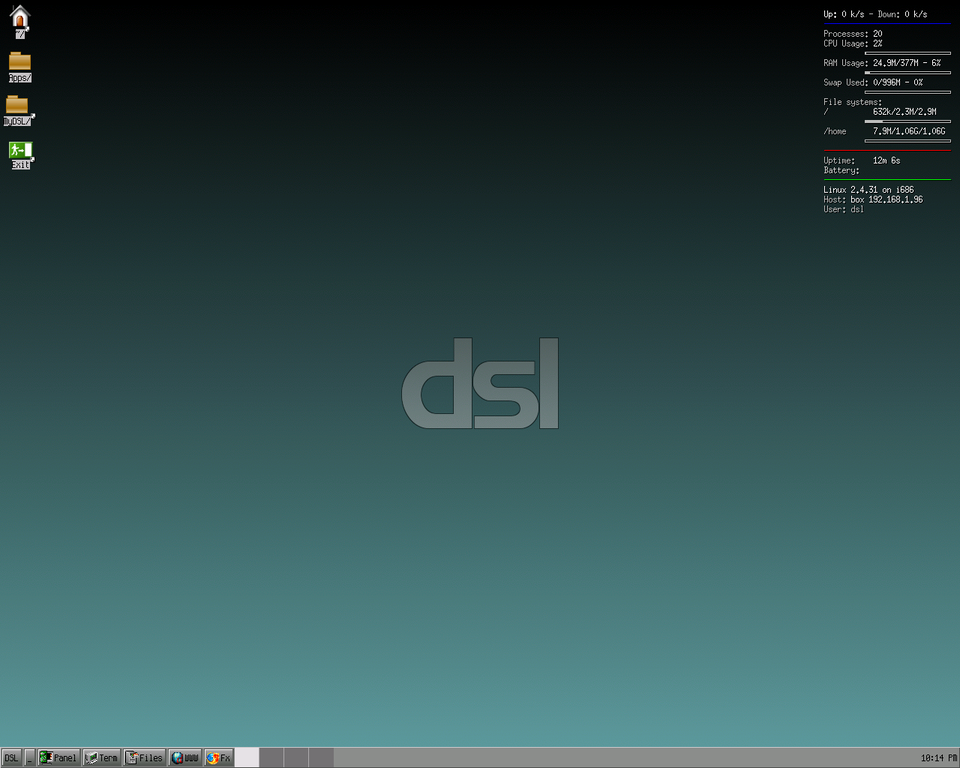
Tiny Core Linux
- 16 MB graphical Linux desktop based on recent Linux kernel. Runs entirely from memory and therefore it is fast.
- Minimum requirements: 46 MB RAM, CPU
i486DX(486 with a math processor). - Recommended requirements: 128 MB RAM + SWAP, CPU
Pentium 2or better. - Links:

Damn Small Linux
- DISCONTINUED
- last release was
DSL 4.11 RC2in 2012
- last release was
- 50 MB graphical, nearly complete Linux desktop.
- Minimum requirements: 16 MB RAM, CPU
i486DX(486 with a math processor). - Recommended requirements: 2 GB disk, 64 MB RAM, CPU 200 MHz or better.
- Links:
Puppy Linux
- 300 MB graphical Linux desktop, can run LIVE. Runs entirely from memory and therefore it is fast.
- Minimum requirements: 350 MB disk, 64 MB RAM, CPU 333 MHz.
- Recommended requirements: 256 MB RAM + 512 MB SWAP, CPU 600 MHz or better.
- Links:
FreeDOS
- It is not Linux-based, but it is open-source software. It can run any MS-DOS compatible software, with improvements in memory usage and power management compared to
MS-DOS. In addition, number of different packages have bee ported from Linux to extend functionality. - Minimum requirements: 20 MB disk, 640 kB RAM, CPU
8088(XT). - Recommended requirements: CPU
Intel i386or better. - Links:
Honorable mentions
- Alpine Linux
- OpenWRT
- Designed to run on embedded network devices.
- Linux From Scratch
- This one is not a ready-to-go distro, rather a step-by-step guide to build your own custom Linux system.
Super cool projects with tiny Linux
Running Linux on business card
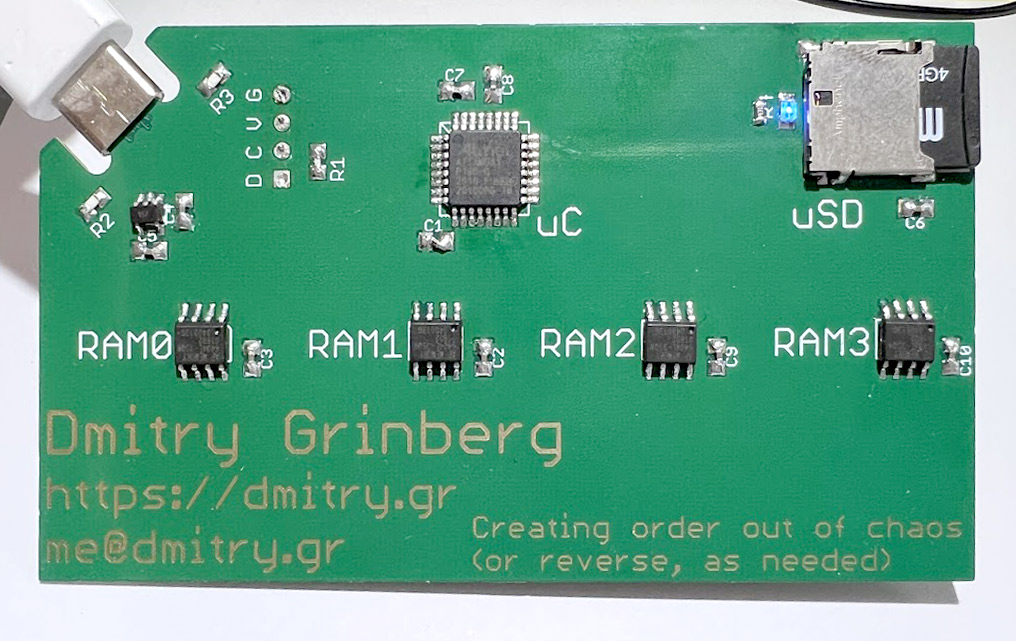
Specs:
- CPU:
ATSAMD21, 32-bit ARM, form 48 MHz to 72 MHz - Memory: from 4 MB to 32 MB
Sources:
Last modified: 2023-03-29
Windows
Microsoft Windows is a proprietary operating system developed by Microsoft. Since Microsoft's inception, there were many Windows versions, which are listed in Wikipedia article.

Reasons why I do not use Windows
- EULA
- No privacy


- Microsoft's telemetry is spying on users. While it is possible to disable, it is often re-enabled by updates.
- Basic (required) telemetry includes details about all connected hardware (including printers, cameras, etc) and Microsoft Store data such as installed programs.
- Enhanced telemetry includes all above and browser history, used programs, disk usage and more. Microsoft is rather vague about details.
- Computers can often even take 100% of system resources for couple of seconds or even minutes to compile the telemetry report, regardless whether or not you are using said computer.
- Additional sources:
- YouTube video from Techquickie: What Data Does Windows 10 Send to Microsoft
- Conclusion: Microsoft, go to the corner of shame next to Facebook and Google
- Updates
- I was seriously pissed about the forced upgrade from Windows 7 to Windows 10. And many Windows users too.
- Never10 program to disable the automatic upgrades
- Stops Accidental Windows 10 Upgrades
- Forum post
- Personally, I would not be surprised if the same will happen with Windows 11.
- Forced updates
- Windows randomly decides to update without authorization. As Murphy's law dictates, at the most inconvinient time.
- Many updates fail, sometimes damaging the operating system or even deleting all of user data.
- More than once I left my computer run over night to finish a task, just to discover in the morning that automatic update restarted the computer.
- Long waiting time for bug fixes
- Microsoft takes months to fix critical Azure Synapse bug
- Why Microsoft Took A Year To Fix Critical Windows Bug That Allowed Hackers To Spy On Worker PCs
- Microsoft Keeps Failing to Patch the Critical PrintNightmare Bug
- Not a security issue, but Microsoft Finally Fixes Notepad After 20 Years of Inadequacy
- Conclusion: fuck you Microsoft
- I was seriously pissed about the forced upgrade from Windows 7 to Windows 10. And many Windows users too.
- Security
- Example can be Windows Share exploit which leaked from NSA tools, latex exploited by WannaCry.
- Windows is full of the stupid security holes. Not only that, but it takes Microsoft months or even years to fix some of the known issues. And some issue will never be fixed because of the flawed design.
- pwdump exploits a poor password management in Windows (pwdump7)
- Video demonstrating cracking window password using pwdump
- Video with deeper explanation. This problem cannot be fixed, it is result of flawed design, Microsoft just tries to obfuscate it.
- pwdump exploits a poor password management in Windows (pwdump7)
- Conclusion: security in Windows is a joke
- Windows Store
- Simply horrible experience (last updated in November 2018)
- Full of bloatware (check Windows debloating youtube video Debloat Windows 10).
- Forcing developers to pay for this service exactly like Valve with Steam.
- Simply horrible experience (last updated in November 2018)
- Notification Bar
- Very annoying and useless, full of stuff that will be there no matter what.
- Security Center
- I want to pick my Anti-Virus, and choose my firewall settings.
- Cortana
- Privacy issues.
- Takes a lot of resources.
- Suggested apps
- Annoying bullshit equivalent to door salesman.
- Bloated Installation
- In the fresh installation of Windows, there is so much useless crap, it is unbelievable. No wonder you need SSD, 16GB of RAM and the newest CPU to to even turn on Windows.
- Windows is unstable
- And no wonder since they fired a whole lot of testers in 2015
Conclusion: Burn it with fire
Inspiration for this was video from Chris Titus Tech; Why I stopped using Windows 10 - 8 Major Reasons.
I agree with a Chris's prediction from the video, that Microsoft will attempt make Windows store the only way to install software.
My prediction: Microsoft will eventually scrap the whole Windows thing and replace with Ubuntu. Of course they would change wallpaper, pre-install opposite of WINE and call it something stupid like "Windows Next".
Last modified: 2023-03-29
Windows-like
Here are few options to replace Windows.
Linux with Cinnamon
If you only need looks of Window 10, consider Cinnamon. Cinnamon is a desktop environment which is out of the box similar to classic Windows.
Few distributions shipping with Cinnamon:
Additionally, Cinnamon supports themes, here are some available Windows themes:

Zorin OS
Zorin OS is aiming to be beginner-friendly Ubuntu-based system designed to feel like Windows.

Robolinux
Robolinux is also Ubuntu-base system, but with a twist. It offers pre-configured virtual machines with Windows XP, Windows 7 and even Windows 10.

ReactOS
ReactOS is not a Linux-based system! It is actually operating system written from scratch to be binary-compatible with Windows.

Even though it is being developed for over 20 years, do not expect any miracles. It is still in alpha stage.
Last modified: 2023-03-29
Linux 1
         _nnnn_
        dGGGGMMb
       @p~qp~~qMb
       M|@||@) M|
       @,----.JM|
      JS^\__/  qKL
     dZP        qKRb
    dZP          qKKb
   fZP            SMMb
   HZM            MMMM
   FqM            MMMM
 __| ".        |\dS"qML
 |    `.       | `' \Zq
_)      \.___.,|     .'
\____   )MMMMMP|   .'
     `-'       `--' hjm
1: https://ascii.co.uk/art/tux
Last modified: 2023-03-29
btrfs

Last modified: 2023-03-29
dm-crypt
Last modified: 2023-03-29
Remote Unlocking
Sources: archlinux.org/Dm-crypt
How to remotely unlock dm-crypt device
Guide to remotely (via ssh) unlock system disk encrypted with dm-crypt on ArchLinux.
The booting system will set networking card and start ssh server. You will be able to unlock the encrypted system via ssh, but also with attached keyboard (as usual).
Pre-requisites
- At least two computers on the same nework
- Computer to be remotelly unclocked - codename
mars_rover - Computer that you will use for remote unlocking - codename
mission_control
- Computer to be remotelly unclocked - codename
- Expectations for
mars_rover- Installed system (
ArchLinux) - System disk is encrypted with
dm-crypt(except/boot). - Static IP address (
192.168.1.100is used in this guide as example)
- Installed system (
- Expectations for
mission_control- ssh client compatible with
Ed25519andECDSAkey types
- ssh client compatible with
Guide
Install packages
Install required packages to mars_rover:
pacman -S --needed mkinitcpio-netconf mkinitcpio-utils mkinitcpio-tinyssh
Setup SSH keys
On mission_control computer, generate ed25519 key pair for ssh (example of ssh-keygen). Copy the public key (*.pub) into mars_rover to file called /etc/tinyssh/root_key.
Example content of /etc/tinyssh/root_key:
ssh-ed25519 AAAAC3N..... whatever_comment_you_chose
This file can contain multiple keys. Basically, on mars_rover you can copy the ~/.ssh/authorized_keys to /etc/tinyssh/root_key and it will work.
cp /home/<user>/.ssh/authorized_keys /etc/tinyssh/root_key
NOTE: Every-time you make changes to these keys, you have to regenerate initramfs by running mkinitcpio -P.
Edit mkinitcpio.conf
Edit hooks in /etc/mkinitcpio.conf in mars_rover by adding netconf tinyssh encryptssh
...
HOOKS=(base udev autodetect modconf block netconf tinyssh encryptssh lvm2 filesystems keyboard fsck)
...
NOTE: (encryptssh replaces the encrypt)
Edit bootloader settings
Edit bootloader setting in mars_rover by adding IP address.
You can either rely on DHCP server on you network:
ip=dhcp
NOTE: Use DHCP, since hardcoding IP address might be broken. However, if there will be no DHCP server on network, the boot will hang and wait for DHCP (at that moment direct manual entry will not be possible).
For more specific instructions see example of rEFInd configuration and example of GRUB2 configuration.
Regenerate initramfs
Regenerate initramfs in mars_rover:
mkinitcpio -P
Reboot the computer and ssh into it
Reboot mars_rover. If everything went according to plan, then the screen should promt you for password to decrypt the disk as usual, but there should be also mention of ssh server running (for example Starting tinyssh).
Now it should be possible to connect to mars_rover from mission_control with:
ssh root@192.168.1.100
Keep in mind that for unlocking the dm-crypt, you have to use root user (this is not real root - this root is only in the initrd).
Troubleshooting
WARNING: REMOTE HOST IDENTIFICATION HAS CHANGED!
Cause
This happens because your mission_control already has the computer in list ~/.ssh/known_hosts and the fingerprint does not match.
This is expected since your ordinary ssh server is independent (and different) from the tinyssh server running from initramfs.
Solution
On the mission_control, go to ~/.ssh/known_hosts and comment out with # (hash/number sign) character the fingerprint for the mars_rover. Connect to mars_rover, confirm to add fingerprint and unlock the sysntem disk.
Then edit the ~/.ssh/known_hosts in mission_control again (now with the new fingerprint) and simply uncomment the previous fingerprint - such that there will be 2 fingerprints for the mars_rover.
Error while decrypting: libgcc_s.so.1 must be installed for pthread_cancel to work
Solution
Add /usr/lib/libgcc_s.so.1 to the BINARIES array.
Unable to negotiate with XXX.XXX.XXX.XXX port 22: no matching host key type found. Their offer:
Cause
This happens because the tinyssh server has no server key.
Solution
Generate a set of server keys using openssh, then convert it to tinyssh format a place it in /etc/tinyssh/sshkeydir/.
# mkdir /etc/tinyssh/openssh_keys
# ssh-keygen -t ed25519 -f /etc/tinyssh/openssh_keys/${HOSTNAME}.key -C "${HOSTNAME} tinyssh key"
# tinyssh-convert /etc/tinyssh/sshkeydir < /etc/tinyssh/openssh_keys/${HOSTNAME}.key
If you get error: tinyssh-convert: fatal: out-tinysshkeydir exist, simply remove the output directory with rmdir /etc/tinyssh/sshkeydir.
Last modified: 2023-03-29
GRUB config
Configuration for GRUB, located at /etc/default/grub.
Edit /etc/default/grub and add network configuration into GRUB_CMDLINE_LINUX_DEFAULT attribute.
Most of the information is from ArchLinux wiki.
There are multiple ways to configure this, however my favorite is to use IP address assigned by DHCP server, essentially:
ip=dhcp
I also like to add netconf_timeout, especially on laptop, otherwise the device will hand and indefinitely wait for IP address from DHCP.
netconf_timeout=10
Example with UUID
GRUB_CMDLINE_LINUX_DEFAULT="loglevel=3 cryptdevice=UUID=3c8e3563-6394-46d0-88cc-e068387f1e1c:ark_system_luks:allow-discards ip=dhcp netconf_timeout=10 l1tf=full,force mds=full,nosmt mitigations=auto,nosmt nosmt=force usbhid.quirks=0x0463:0xffff:0x08"
It is also possible to use multiple configurations. You can add a specific network configuration into GRUB menu as additional entry. That way, you can pick on boot whether you wish to use DHCP or hard-coded IP address.
Last modified: 2023-03-29
REFInd
Configuration for REFInd, located at ESP/refind.conf (ESP is EFI system partition).
I am no longer using REFInd on any of my devices, I prefer to use GRUB. Therefore this page is no longer maintained.
Most of the things are identical to GRUB configuration.
"Boot with standard options" "cryptdevice=/dev/nvme0n1p2:system_luks root=/dev/system_vg/root ip=dhcp rw add_efi_memmap initrd=initramfs-%v.img"
Last modified: 2023-03-29
SSH key generation
tinySSH supports Ed25519 and ECDSA key types. To select which you can read more about it at archlinux.org/SSH_keys/Choosing_the_authentication_key_type.
Ed25519 is faster and more secure than ECDSA, therefore it is used in example below.
ssh-keygen ed25519
Generate Ed25519 kay pair:
ssh-keygen -t ed25519 -f ~/.ssh/whatever_name_you_chose.key -C "whatever_comment_you_chose"
Result should be key pair:
~/.ssh/
	|-- whatever_name_you_chose.key
	|-- whatever_name_you_chose.key.pub
Sources
Last modified: 2023-03-29
ssh
Last modified: 2023-04-08
dotfiles
TODO:
User-specific application configuration is traditionally stored in so called dotfiles (files whose filename starts with a dot). It is common practice to track dotfiles with a version control system such as Git to keep track of changes and synchronize dotfiles across various hosts.
There is a article on archlinux wiki about doftiles.
I am fan of yadm, which is what I am using and what I will focus on here.
yadm is based on git (basically just a git wrapper), with all of git's features with addition of alternative files, templates, bootstrapping script and hooks. Documentation for yadm.
I am tracking two separate set of dotfiles - user dotfiles and system dotfiles - therefore I have two repositories. Both these repositories are still work in progress, but I guess that is always the case with dotfiles xD.
system dotfiles
Starting from scratch
Here I took inspiration from yadm FAQ.
The plan is to manage system dotfiles only unser root user, therefore I create a alias for root (/root/.bashrc):
alias yadm='sudo yadm --yadm-dir /etc/yadm'
There is sudo used in the alias because of problems with environment variables. Something I should fix at some point.
Initialize the yadm repo using the worktree of /
# yadm init -w /
You should see something like:
Initialized empty shared Git repository in /root/.local/share/yadm/repo.git/
You can add remote:
yadm remote add origin git@git.sr.ht:~atomicfs/dotfiles-system
The you can start using it as git repository:
# yadm add /root/.bashrc
# yadm commit -m "added .bashrc file"
# yadm push --set-upstream origin master
Last modified: 2023-03-29
Archive encryption
It is easy to protect archive with a password, however common process will not encrypt the header (which contains the tree structure with file names).
\$ 7z l test.zip
7-Zip [64] 17.04 : Copyright (c) 1999-2021 Igor Pavlov : 2017-08-28
p7zip Version 17.04 (locale=en_CS.UTF-8,Utf16=on,HugeFiles=on,64 bits,24 CPUs x64)

Scanning the drive for archives:
1 file, 3366 bytes (4 KiB)

Listing archive: test.zip

--
Path = test.zip
Type = zip
Physical Size = 3366

   Date      Time    Attr         Size   Compressed  Name
------------------- ----- ------------ ------------  ------------------------
2022-05-11 22:12:29 .....         9399         3150  test.txt
------------------- ----- ------------ ------------  ------------------------
2022-05-11 22:12:29               9399         3150  1 files
You can use p7zip program to encrypt the header information:
\$ 7za -p'password' -mhe=on a archive_name.7z folder_name
\$ 7za -p -mhe=on a archive_name.7z folder_name
Where -p'password' sets the password and -mhe=on will enable encrypting the header. If there is no string with password, user will be prompted to enter it - this way it will not be logged in terminal history.
With header encrypted, you cannot access the information without password.
\$ 7z l test.7z
7-Zip [64] 17.04 : Copyright (c) 1999-2021 Igor Pavlov : 2017-08-28
p7zip Version 17.04 (locale=en_CS.UTF-8,Utf16=on,HugeFiles=on,64 bits,24 CPUs x64)

Scanning the drive for archives:
1 file, 3215 bytes (4 KiB)

Listing archive: test.7z


Enter password (will not be echoed):

ERROR: test.7z : Can not open encrypted archive. Wrong password?

ERRORS:
Headers Error


Errors: 1
Last modified: 2023-03-29
Identify file type
In Linux you can use file command (package also called file) find the file type based on the actual file, indepentently on filename and extension.
For example when run on 7z file:
\$ file unknown.123
unknown.123: 7-zip archive data, version 0.4
Or when run on ordinary text file:
\$ file unknown.abc
unknown.abc: ASCII text, with very long lines (1042)
One of the tools that forensic analytics use is filter that detects discrepancies between file extension and file type. Such files are flagged as suspicious and only draw more attention.
Let's that that user renames a dick_pic.png file to dick_pic.zip. On windows the file will appear corrupted since the extension is the primary source of file type information. However on Linux this is not always the case. Not to mention that you can easily with single quick command find the truth.
Surprisingly many people think that this is legitimate way of hiding the content of the file from prying eyes.
Last modified: 2023-03-29
Linux Distributions
ArchLinux 1
                   -`
                  .o+`
                 `ooo/
                `+oooo:
               `+oooooo:
               -+oooooo+:
             `/:-:++oooo+:
            `/++++/+++++++:
           `/++++++++++++++:
          `/+++ooooooooooooo/`
         ./ooosssso++osssssso+`
        .oossssso-````/ossssss+`
       -osssssso.      :ssssssso.
      :osssssss/        osssso+++.
     /ossssssss/        +ssssooo/-
   `/ossssso+/:-        -:/+osssso+-
  `+sso+:-`                 `.-/+oso:
 `++:.                           `-/+/
 .`                                 `/
| Last used | Today |
|---|---|
| Daily driver from | 2019 |
| Daily driver to | now |
While very difficult to get started, it is worth it for me.
I failed miserably multiple times trying to install it. And even with some helping hand it took me over 2 or 3 days to get functional system up and running. Thanks to this distro, I have learned a lot about GNU/Linux and how to tweak it.
Debian 2
       _,met\$\$\$\$\$gg.
    ,g\$\$\$\$\$\$\$\$\$\$\$\$\$\$\$P.
  ,g\$\$P"     """Y\$\$.".
 ,\$\$P'              `\$\$\$.
',\$\$P       ,ggs.     `\$\$b:
`d\$\$'     ,\$P"'   .    \$\$\$
 \$\$P      d\$'     ,    \$\$P
 \$\$:      \$\$.   -    ,d\$\$'
 \$\$;      Y\$b._   _,d\$P'
 Y\$\$.    `.`"Y\$\$\$\$P"'
 `\$\$b      "-.__
  `Y\$\$
   `Y\$\$.
     `\$\$b.
       `Y\$\$b.
         `"Y\$b._
              `"""
| Last used | 2022 |
|---|---|
| Daily driver from | ???? |
| Daily driver to | ???? |
I have never really used Debian as my daily driver. It was always for some project (customer's PC, docker image, etc).
Well, this is a distribution that I hate for multiple reasons. While I have not used it a lot, but still came across few caveats.
Here are the reasons why I hate it:
- Default
PATHvariable is wrongPATHshould by default include location of system/admin software such as/usr/binsimply because user should be just warned of insufficient privileges, instead of error saying that the software is not installed.- Best option is to fix
PATH, but if you don't do that (and let's assume that most new users will not) then they are going to run either most commands asrootjust to simplify things. Which is stupid. - Message to Debian: fix
PATHvariable
- Packaging is pain
- I have tried to create my own packages for
Debianin the past and ended up without will to live. - The official documentation is over complicated and also practically useless. Unofficial documentation is fragmented, obsolete, incomplete.
- Recommendation:
- Look into some widelly used
Debianpackage and copy the structure - Make package for another distro and then use some script to convert it
- Ignore all the documentation, just start with blank directory and add files based on error messages
- Look into some widelly used
- I have tried to create my own packages for
- Obsolete software
- Installer by default uses kernel names instead of
UUID's in/etf/fstab- Kernel names can and do change over time (when new hardware is added, etc), so it is common practice to use
UUIDinstead because that will remain the same across all computers and all distributions. But no,Debianhas to use by default kernel names. This will mess things up when for example a virtual machine create in VirtualBox will be started inKVM/QEMU(kernel name inVirtualBoxwill be/dev/sdawhile inKVM/QEMUit will be/dev/vda). - Message to Debian: use
UUIDlike a normal person
- Kernel names can and do change over time (when new hardware is added, etc), so it is common practice to use
- Remastering installation disk is F.U.B.A.R3
- I have tried to change partitioning scheme and so I looked into documentation and changed the configuration files. And it installed itself, but with default partitioning scheme. I have spent a lot of time on this and concluded that the documentation is wrong and the software is garbage. When I tried to copy-paste example config from documentation without any changes, it also failed claiming that the configuration is invalid.
- Recommendation: avoid
In conclusion, this distribution is broken by default in so many aspects. It has old software and even older documentation.
Fedora 4
          /:-------------:\
       :-------------------::
     :-----------/shhOHbmp---:\
   /-----------omMMMNNNMMD  ---:
  :-----------sMMMMNMNMP.    ---:
 :-----------:MMMdP-------    ---\
,------------:MMMd--------    ---:
:------------:MMMd-------    .---:
:----    oNMMMMMMMMMNho     .----:
:--     .+shhhMMMmhhy++   .------/
:-    -------:MMMd--------------:
:-   --------/MMMd-------------;
:-    ------/hMMMy------------:
:-- :dMNdhhdNMMNo------------;
:---:sdNMMMMNds:------------:
:------:://:-------------::
:---------------------://
| Last used | 2019 |
|---|---|
| Daily driver from | 2011 |
| Daily driver to | 2019 |
On recommendation from friend, I have tried Fedora. It is not really a beginner-friendly distribution, but after few tries I have managed to get it up and running the way I wanted. It came with GNOME and I got used to that.
There were quite a few problems over the years, the most prominent being broken system upgrade between releases. You were better of re-installing. It was a decent run, but I would not return.
Ubuntu 5
                         ./+o+-
                 yyyyy- -yyyyyy+
              ://+//////-yyyyyyo
          .++ .:/++++++/-.+sss/`
        .:++o:  /++++++++/:--:/-
       o:+o+:++.`..```.-/oo+++++/
      .:+o:+o/.          `+sssoo+/
 .++/+:+oo+o:`             /sssooo.
/+++//+:`oo+o               /::--:.
+/+o+++`o++o               ++////.
 .++.o+++oo+:`             /dddhhh.
      .+.o+oo:.          `oddhhhh+
       +.++o+o``-````.:ohdhhhhh+
        `:o+++ `ohhhhhhhhyo++os:
          .o:`.syhhhhhhh/.oo++o`
              /osyyyyyyo++ooo+++/
                  ````` +oo+++o:
                         `oo++.
| Last used | 2016 |
|---|---|
| Daily driver from | 2011 |
| Daily driver to | 2011 |
Ubuntu was my first ever experience with GNU/Linux system, which lasted less than a week.
Basically, I disliked the whole experience which was far to much like Windows which I hated. The system just forced me to do things certain way, and kept breaking if they were done differently. It was just the whole Windows crappy experience all over again. Very quickly I got pissed and switched to another distribution.
Later I came across Ubuntu again for few projects and the things have not changed at all. What changed was my knowledge and experience. All the stuff in background, for example unattended (and unwanted) updates. And the upgrade from one release to another never worked, it was a miracle when the system booted afterwards.
1: neofetch --ascii_distro Arch -L
2: neofetch --ascii_distro Debian -L
3: Fucked up beyond all recognition or Fucked up beyond all repair
4: neofetch --ascii_distro Fedora -L
5: neofetch --ascii_distro Ubuntu_old -L
Last modified: 2023-03-29
ArchLinux 1
                   -`
                  .o+`
                 `ooo/
                `+oooo:
               `+oooooo:
               -+oooooo+:
             `/:-:++oooo+:
            `/++++/+++++++:
           `/++++++++++++++:
          `/+++ooooooooooooo/`
         ./ooosssso++osssssso+`
        .oossssso-````/ossssss+`
       -osssssso.      :ssssssso.
      :osssssss/        osssso+++.
     /ossssssss/        +ssssooo/-
   `/ossssso+/:-        -:/+osssso+-
  `+sso+:-`                 `.-/+oso:
 `++:.                           `-/+/
 .`                                 `/
Arch Linux is a highly customizable distribution and as such it does not have any graphical installer. Everything is done manually in terminal. As a result it is highly flexible and lean distribution.
Lightweight and flexible Linux distribution that tries to Keep It Simple
1: neofetch --ascii_distro Arch -L
Last modified: 2023-03-29
Installation
Last modified: 2023-03-29
ArchLinux: Installation

Source: wiki.archlinux.org
This installation is mostly bare-bone installation, with following features:
- encrypted disk (
/bootis not encrypted) - local and remote unlock o encrypted disk via ssh
- btrfs as file-system
doasinstead ofsudo- micro-code updates
- secured
GRUBwith password (tampering prevention) - secured boot with
chkboot(tampering detection) - early KMS to initialize graphics card
Verify the boot mode
Check if the motherboard supports UEFI (and if it is enabled).
\$ ls /sys/firmware/efi/efivars
If the directory does not exist, the system is likely booted in BIOS mode.
Update system clock
\$ timedatectl set-ntp true
To check service status:
\$ timedatectl status
               Local time: Sun 2019-12-08 10:55:34 CET
           Universal time: Sun 2019-12-08 09:55:34 UTC
                 RTC time: Sun 2019-12-08 09:55:34
                Time zone: Europe/Prague (CET, +0100)
System clock synchronized: yes
              NTP service: active
          RTC in local TZ: no
Prepare the disk
Since this installation is going to be encrypted, I recommend to wipe the disk.
HDD or SSD with deniable encryption
Write random data to it:
# dd if=/dev/urandom of=/dev/sdX bs=4M status=progress
or use shred:
# shred -v -n 1 /dev/sdX
SSD
Use secure-erase if available. To check availability look for supported: enhanced erase in Security:
# hdparm -I /dev/sdX
/dev/sda:

ATA device, with non-removable media
	Model Number:       XXXXXXX
	Serial Number:      XXXXXXX
	Firmware Revision:  XXXXXXX
	Transport:          Serial, ATA8-AST, SATA 1.0a, SATA II Extensions, SATA Rev 2.5, SATA Rev 2.6, SATA Rev 3.0
Standards:
	...
Configuration:
	...
Capabilities:
	...
Commands/features:
	...
Security:
	Master password revision code = 65534
		supported
	not	enabled
	not	locked
		frozen
	not	expired: security count
		supported: enhanced erase
	XXmin for SECURITY ERASE UNIT. XXmin for ENHANCED SECURITY ERASE UNIT.
Logical Unit WWN Device Identifier: XXXXXXX
	...
Checksum: correct
Secure-erase:
# hdparm --user-master u --security-set-pass NULL /dev/sdX
# hdparm --user-master u --security-erase NULL /dev/sdX
Partition the disk
I will be using single partition, encrypted with dm-crypt in LUKS2 mode and btrfs. The layout will be as follows:
/dev/sdX
|-- /dev/sdX1
    `-- ext4 : /boot
`-- /dev/sdX2
    `-- luks : hostname_system_luks
        `-- btrfs : hostname_system_btrfs
            |-- @ : /
            |   |-- @/var/cache/pacman/pkg
            |   |-- @/var/lib/libvirt/iso_images
            |   |-- @/var/lib/libvirt/virtual_machines
            |   |-- @/var/log
            |   `-- @/var/tmp
            |-- @home : /home
            `-- @snapshots : /.snapshots
# fdisk /dev/sdX
| BIOS | UEFI | |
|---|---|---|
| Partition table | ||
o | g | |
/boot partition | ||
n | n | |
default (p) | ||
default (1) | default (1) | |
default | default | |
+100M | +100M | |
a | t | |
default (1) | ||
1 | ||
/ partition | ||
n | n | |
default (p) | ||
default (2) | default (2) | |
default | default | |
default | default |
dm-crypt
Create a LUKS2 encrypted container:
# cryptsetup -v --type luks2 luksFormat /dev/sdX2
WARNING!
========
This will overwrite data on /dev/sdX2 irrevocably.

Are you sure? (Type uppercase yes): YES
Enter passphrase for /dev/sdX2:
Verify passphrase:
Command successful.
18.77s user 1.18s system 99% cpu 20.051 total
Open the container:
# cryptsetup open /dev/sdX2 hostname_system_luks
SSD: Enable TRIM and disable workqueue:
# cryptsetup --allow-discards --perf-no_read_workqueue --perf-no_write_workqueue --persistent open /dev/sdX2 hostname_system_luks
Verify status:
# cryptsetup -v status hostname_system_luks
/dev/mapper/hostname_system_luks is active and is in use.
	type:	LUKS2
	cipher:	aes-xts-plain64
	keysize:	512 bits
	key location:	keyring
	device:	/dev/sdX2
	sector size:	512
	offset:	19888128 sectors
	mode:	read/write
Command successful.
Create file-systems
/boot partition for BIOS
Format the /boot partition:
# mkfs.ext4 -L hostname_boot /dev/sdX1
/boot partition for UEFI
Format the /boot partition:
# mkfs.fat -F32 /dev/sdX1
btrfs for the rest
Format the open LUKS2 container to btrfs:
# mkfs.btrfs -L hostname_system_btrfs /dev/mapper/hostname_system_luks
Create subvolumes:
# mount /dev/mapper/hostname_system_luks /mnt
# btrfs subvolume create /mnt/@
# btrfs subvolume create /mnt/@home
# btrfs subvolume create /mnt/@snapshots
# mkdir -p /mnt/@/var/cache/pacman
# btrfs subvolume create /mnt/@/var/cache/pacman/pkg
# mkdir -p /mnt/@/var/lib/libvirt
# btrfs subvolume create /mnt/@/var/lib/libvirt/iso_images
# btrfs subvolume create /mnt/@/var/lib/libvirt/virtual_machines
# btrfs subvolume create /mnt/@/var/log
# btrfs subvolume create /mnt/@/var/tmp
Verify:
# btrfs subvolume list /mnt
Remount everything to correct locations:
# umount /mnt
# mount -o compress=zstd,subvol=@ /dev/mapper/hostname_system_luks /mnt
# mkdir -p /mnt/{home,.snapshots,boot}
# mount /dev/sdX1 /mnt/boot
# mount -o compress=zstd,subvol=@home /dev/mapper/hostname_system_luks /mnt/home
# mount -o compress=zstd,subvol=@snapshots /dev/mapper/hostname_system_luks /mnt/.snapshots
TRIM: To enable asynchronous discard add mount option discard=async
Disable btrfs COW (Copy on Write) and compression for certain directories:
# chattr +C /mnt/var/lib/libvirt/iso_images
# chattr +C /mnt/var/lib/libvirt/virtual_machines
Can be verified with (for explanation of parameters check man chattr):
# lsattr -a /mnt/var/lib/libvirt/virtual_machines
Mirrors
Edit list of mirrors and move those geographically close to your location up in the list. The list will be copied into the newly installed system.
It might be useful to setup a pacman proxy cache, especially if you are installing or updating multiple machines.
Edit list manually:
# nano /etc/pacman.d/mirrorlist
To use local mirror or cache, simply add at the top (don't forget to replace IP address and port):
Server = http://192.168.8.1:7878/\$repo/os/\$arch
Or use reflector to benchmark and select fastest mirrors:
# reflector --verbose --age 24 --country Germany --protocol https --sort rate --save /etc/pacman.d/mirrorlist
Installation bare-minimum
Add sudo into list of ignored packages in pacman configuration:
# nano /etc/pacman.conf
...

# Pacman won't upgrade packages listed in IgnorePkg and members of IgnoreGroup
#IgnorePkg   =
IgnorePkg   = sudo
#IgnoreGroup =

...
Update package databases:
# pacman -Syy
Install following:
# pacstrap /mnt base base-devel linux linux-headers linux-firmware doas nano git btrfs-progs bash-completion grub openssh amd-ucode intel-ucode
Generate an /etc/fstab file:
# genfstab -U /mnt >> /mnt/etc/fstab
Configure some basics
chroot into the new system:
# arch-chroot /mnt
Set the time zone (replace REGION and CITY):
# ln -sf /usr/share/zoneinfo/REGION/CITY /etc/localtime
Run hwclock to generate /etc/adjtime:
# hwclock --systohc
Uncomment en_US.UTF-8 UTF-8 and other needed locales in /etc/locale.gen:
# nano /etc/locale.gen
The generate:
# locale-gen
Create the /etc/locale.conf file, and set the LANG variable accordingly:
# echo "LANG=en_US.UTF-8" > /etc/locale.conf
If you set the keyboard layout, make the changes persistent in /etc/vconsole.conf:
# echo "KEYMAP=en" > /etc/vconsole.conf
Create the /etc/hostname file:
# echo "HOSTNAME" > /etc/hostname
Add matching entries to /etc/hosts man/hosts:
# nano /etc/hosts
Example:
127.0.0.1  localhost
::1        localhost
127.0.1.1  hostname.localdomain  hostname
If the system has a permanent IP address, it should be used instead of 127.0.1.1.
Set the root password if required:
# passwd
Add non-root user and set password:
# useradd -m username
# passwd username
# gpasswd -a username wheel
Give wheel group dias privileges (configuration file must end with newline!):
# nano /etc/doas.conf
permit setenv { XAUTHORITY LANG LC_ALL } :wheel
Symlink doas to where sudo would be:
# ln -s \$(which doas) /usr/bin/sudo
Edit ~/.bashrc and add useful things (or global /etc/bash.bashrc):
\$ nano ~/.bashrc
alias sudo='doas'
alias sudoedit='doas rnano'

# Bash tab completion
complete -cf doas
Install AUR helper
I am going with yay, but feel free to choose another one.
Use non-privileged user:
# su username
\$ export EDITOR=nano
\$ cd /tmp
\$ git clone https://aur.archlinux.org/yay.git
\$ cd yay
\$ makepkg -si
Install additional packages
\$ yay -S pacman-cleanup-hook systemd-cleanup-pacman-hook
Install bootloader GRUB
grub-install for BIOS
Keep in mind to select entire disk and not only partition:
# grub-install --target=i386-pc /dev/sdX
grub-install for UEFI
# grub-install --target=x86_64-efi --efi-directory=/boot --bootloader-id=GRUB --removable
GRUB configuration
In configuration file /etc/default/grub change kernel parameters in GRUB_CMDLINE_LINUX_DEFAULT by adding parameter for LUKS:
# nano /etc/default/grub
The format of the new parameter is:
cryptdevice=UUID=<uuid>:devicemapper_name cryptkey=<path>
Where devicemapper_name is the device-mapper name given to the device after decryption, which will be available as /dev/mapper/devicemapper_name. cryptkey is optional.
dm-crypt device UUID can be found with:
# lsblk -f
NAME       FSTYPE      FSVER            LABEL            UUID                                 FSAVAIL FSUSE% MOUNTPOINTS
loop0      squashfs    4.0
sr0        iso9660     Joliet Extension ARCH_202202      2022-02-01-17-06-09-00
vda
├─vda1     ext4        1.0              aex_boot         c68779d4-96f2-4b17-9725-0e207d659ecb 1006.4M     6% /boot
└─vda2     crypto_LUKS 2                                 c7f63f65-2904-4f20-bfbb-db2c66cb6fb0
  └─aex_system_luks
           btrfs                        aes_system_btrfs 734cce8c-f3b9-4b2c-aaf5-effe0ec98c2e   26.6G     7% /.snapshots
                                                                                                             /home
                                                                                                             /
The said UUID in this example is c7f63f65-2904-4f20-bfbb-db2c66cb6fb0.
Example of GRUB configuration:
# GRUB boot loader configuration

GRUB_DEFAULT=0
GRUB_TIMEOUT=3
GRUB_DISTRIBUTOR="Arch"
GRUB_CMDLINE_LINUX_DEFAULT="loglevel=3 cryptdevice=UUID=c7f63f65-2904-4f20-bfbb-db2c66cb6fb0:hostname_system_luks ip=dhcp netconf_timeout=10"
GRUB_CMDLINE_LINUX=""

CONFIG_BLK_DEV_INITRD=y
CONFIG_MICROCODE=y
CONFIG_MICROCODE_INTEL=y
CONFIG_MICROCODE_AMD=y
Install additional helpful packages:
\$ yay -S update-grub grub-reboot-poweroff grub-netboot-archlinux
Useful only with full-disk-encryption (/boot is also encrypted):
# pacman -S grub-btrfs
Add password protection to GRUB menu:
# grub-mkpasswd-pbkdf2
[...]
Your PBKDF2 is grub.pbkdf2.sha512.10000.C8ABD3E93C4DFC83138B0C7A3D719BC650E6234310DA069E6FDB0DD4156313DA3D0D9BFFC2846C21D5A2DDA515114CF6378F8A064C94198D0618E70D23717E82.509BFA8A4217EAD0B33C87432524C0B6B64B34FBAD22D3E6E6874D9B101996C5F98AB1746FE7C7199147ECF4ABD8661C222EEEDB7D14A843261FFF2C07B1269A
Add this hashed password and username into /etc/grub.d/40_custom, where password is the string generated by grub-mkpasswd_pbkdf2:
# nano /etc/grub.d/40_custom
set superusers="username"
password_pbkdf2 username password
Edit /etc/grub.d/10_linux and add --unrestricted to the CLASS. This will allow boot, but prevent changes. You can also add --unrestricted to other files such as /etc/grub.d/90_reboot or /etc/grub.d/91_poweroff.
# nano /etc/grub.d/10_linux
CLASS="--class gnu-linux --class gnu --class os --unrestricted"
Now generate main configuration file:
# grub-mkconfig -o /boot/grub/grub.cfg
Or use update-grub:
# update-grub
Configure initramfs
Normally the initramfs was already generated and would be ready to go, however because of system disk encryption there are some changes required.
Disable generating of fallback initramfs (I have never used it and it only takes up time):
# nano /etc/mkinitcpio.d/linux.preset
PRESETS=('default')
# rm /boot/initramfs-linux-fallback.img
Install few additional items:
\$ yay -S chkboot
# systemctl enable chkboot
# pacman -S mkinitcpio-netconf mkinitcpio-tinyssh mkinitcpio-utils
Add pacman hook to update chkboot hashes on update:
# nano /etc/pacman.d/hooks/chkboot.hook
[Trigger]
Operation = Upgrade
Type = Package
Target = *

[Action]
Description = Updating hashes of all files in /boot
Depends = chkboot
When = PostTransaction
Exec = /usr/bin/chkboot --update
AbortOnFail
Optionally also install mkinitcpio-numlock to enable numlock on boot:
\$ yay -S mkinitcpio-numlock
Edit /etc/mkinitcpio.conf:
# nano /etc/mkinitcpio.conf
Make following changes:
- Add support for
btrfsto enable use ofbtrfs-checkbyBINARIES=("/usr/bin/btrfs") - Add remote
dm-cryptunlock byHOOKS=(base udev autodetect modconf block netconf tinyssh encryptssh filesystems keyboard fsck) - Add early KMS start
amdgpufor AMDGPU, orradeonwhen using the legacy ATI driveri915for Intel graphicsnouveaufor the open-source Nouveau drivernvidia nvidia_modeset nvidia_uvm nvidia_drmfor nvidia driver. See NVIDIA#DRM kernel mode setting for details.mgag200for Matrox graphics- Depending on QEMU graphics in use (
qemuoption-vga typeorlibvirt <video><model type='type'>):bochsforstd(qemu) andvga/bochs(libvirt)virtio-gpuforvirtioqxlforqxlvmwgfxforvmware(qemu) andvmvga(libvirt)cirrusforcirrus
- Depending on VirtualBox graphics controller:
vmwgfxfor VMSVGAvboxvideofor VBoxVGA or VBoxSVGA
# vim:set ft=sh
# MODULES
# The following modules are loaded before any boot hooks are
# run.  Advanced users may wish to specify all system modules
# in this array.  For instance:
#     MODULES=(piix ide_disk reiserfs)
MODULES=()

# BINARIES
# This setting includes any additional binaries a given user may
# wish into the CPIO image.  This is run last, so it may be used to
# override the actual binaries included by a given hook
# BINARIES are dependency parsed, so you may safely ignore libraries
BINARIES=("/usr/bin/btrfs")

# FILES
# This setting is similar to BINARIES above, however, files are added
# as-is and are not parsed in any way.  This is useful for config files.
FILES=()

# HOOKS
# This is the most important setting in this file.  The HOOKS control the
# modules and scripts added to the image, and what happens at boot time.
# Order is important, and it is recommended that you do not change the
# order in which HOOKS are added.  Run 'mkinitcpio -H <hook name>' for
# help on a given hook.
# 'base' is _required_ unless you know precisely what you are doing.
# 'udev' is _required_ in order to automatically load modules
# 'filesystems' is _required_ unless you specify your fs modules in MODULES
# Examples:
##   This setup specifies all modules in the MODULES setting above.
##   No raid, lvm2, or encrypted root is needed.
#    HOOKS=(base)
#
##   This setup will autodetect all modules for your system and should
##   work as a sane default
#    HOOKS=(base udev autodetect block filesystems)
#
##   This setup will generate a 'full' image which supports most systems.
##   No autodetection is done.
#    HOOKS=(base udev block filesystems)
#
##   This setup assembles a pata mdadm array with an encrypted root FS.
##   Note: See 'mkinitcpio -H mdadm' for more information on raid devices.
#    HOOKS=(base udev block mdadm encrypt filesystems)
#
##   This setup loads an lvm2 volume group on a usb device.
#    HOOKS=(base udev block lvm2 filesystems)
#
##   NOTE: If you have /usr on a separate partition, you MUST include the
#    usr, fsck and shutdown hooks.
HOOKS=(base udev autodetect modconf block netconf tinyssh encryptssh filesystems keyboard fsck)

# COMPRESSION
# Use this to compress the initramfs image. By default, zstd compression
# is used. Use 'cat' to create an uncompressed image.
#COMPRESSION="zstd"
#COMPRESSION="gzip"
#COMPRESSION="bzip2"
#COMPRESSION="lzma"
#COMPRESSION="xz"
#COMPRESSION="lzop"
#COMPRESSION="lz4"

# COMPRESSION_OPTIONS
# Additional options for the compressor
#COMPRESSION_OPTIONS=()
Copy public key of ed25519 key-pair into /etc/tinyssh/root_key (equivalent of ~/.ssh/authorized_keys) to allow remote ssh unlock. To generate one, you can use following command:
\$ ssh-keygen -t ed25519 -f "\${HOME}/.ssh/\${HOSTNAME}/\${HOSTNAME}_<TARGET>.key" -C "\${HOSTNAME} -> <TARGET>"
Generate tinyssh server keys:
# mkdir /etc/tinyssh/openssh_keys
# ssh-keygen -t ed25519 -f /etc/tinyssh/openssh_keys/\${HOSTNAME}.key -C "\${HOSTNAME} tinyssh key"
# tinyssh-convert /etc/tinyssh/sshkeydir < /etc/tinyssh/openssh_keys/\${HOSTNAME}.key
Generate new initramfs:
# mkinitcpio -P
Update GRUB:
# update-grub
Network configuration (optional)
Create systemd network configuration file:
# nano /etc/systemd/network/lan.network
[Match]
Name=e*

[Network]
DHCP=yes
Enable systemd-networkd:
# systemctl enable systemd-networkd
# systemctl enable systemd-resolved
Optionally also enable ssh service:
# systemctl enable sshd
Reboot
Exit chroot:
# exit
Optionally umount all in /mnt and close dm-crypt device:
# umount -R /mnt
# cryptsetup close hostname_system_luks
# reboot
Last modified: 2023-03-29
Automatic installation
While I love the installation process of Arch Linux, once you figure out how you like your systems to be installed and structured, any followup installation is just a chore.
It helps greatly to write down some notes or instructions, just like I did in manual installation section, it is time-consuming. And what is the best way to kill time ... I mean save time? Automation baby!
atomicfs-install
First comes the install script atomicfs-install.
The script is very naive and simple, since I require almost no variation between installations.
I have it in form of pacman package.
# Maintainer: Vojtech Vesely <vojtech.vesely@protonmail.com>

pkgname=atomicfs-install
pkgver=1.0.11
pkgrel=2
pkgdesc='Script for automatic installation of ArchLinux, with packages and dotfiles'
arch=('x86_64')
url='https://git.sr.ht/~atomicfs/atomicfs-repo-arch'
license=('MIT')
depends=(
  'arch-install-scripts'
  'btrfs-progs'
  'cryptsetup'
  'grep'
  'p7zip'
  'pacman'
  'sed'
)
checkdepends=(
  'namcap'
  'shellcheck'
)
check(){
  namcap ../PKGBUILD
  shellcheck atomicfs-install.sh
}
package(){
  install -vDm755 atomicfs-install.sh "$pkgdir"/usr/bin/atomicfs-install
  install -vDm644 data.7z "$pkgdir"/usr/share/atomicfs-install/data.7z
}
The code is quite straight forward, mostly just commands I would write manually into console. It has few additional features such as resume function (thanks to flag-files).
Flag file is usually empty file used to alter programs behaviour. Basically:
- IF file exists: do something
- IF file does not exists: do something else
It is super handy to get some persistence across multiple execution or instances.
Then there is also very important point of downloading and setting up my dotfiles. For this, I need to supply few special things such as SSH keys, this is supplied in encrypted archive data.7z. The archive is then decrypted and extracted during the installation.
Installation managed by meta packages
Most of the magic comes from the custom meta packages which can be found in atomicfs-repo-arch (packages named wht_*).
My meta-packages have following dependency structure:
wht_system
├─wht_devel
├─wht_nas
├─wht_server
│ ├─wht_server_https
│ │ ├─wht_server_paperless
│ │ ├─wht_server_pihole
│ │ ├─wht_server_piwigo
│ │ └─wht_server_ttrss
│ ├─wht_server_mariadb
│ │ ├─wht_server_paperless
│ │ ├─wht_server_piwigo
│ │ └─wht_server_ttrss
│ ├─wht_server_mumble
│ └─wht_server_tmate
└─wht_sway
  └─wht_desktop
    └─wht_desktop_work
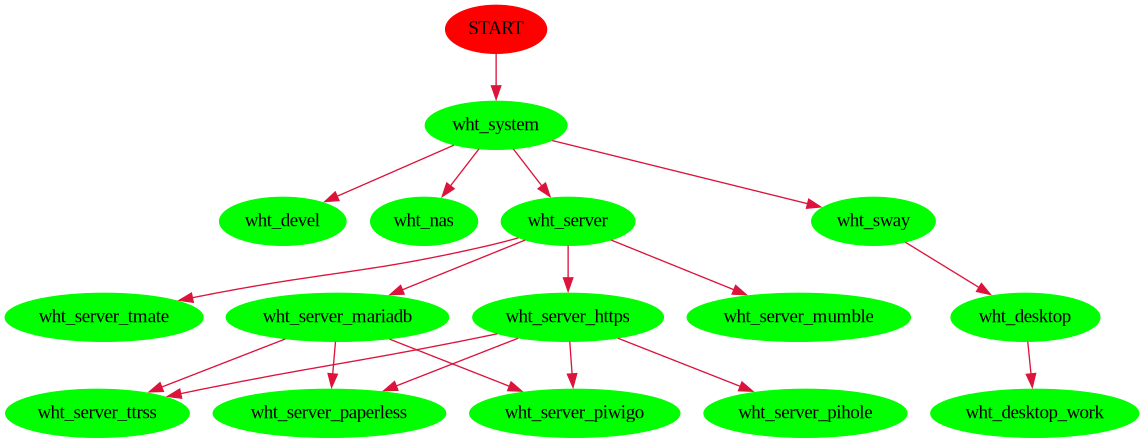
For example the wht_system which defines the minimum to get working system, and some handy tools on top - if you install this, you get working system.
Other packages are building on top of wht_system and each other. For example if I want to install system on server, I simply install only wht_server - since it depends on wht_system it will install that too automatically.
Or if I want to install system with sway and my favorite desktop tools (like web browser, office suite, etc) I simply install only wht_desktop - this will automatically also install wht_sway and wht_system.
Thanks to the dependency management, you can even set up such things like conflicts - you can specify that server and desktop are mutually exclusive. For more details checkout Arch Linux wiki creating packages and package guidelines.
atomicfs-archiso
And finally comes the atomicfs-archiso, which is a project for remastering Arch Linux ISO disc to include my installation script.
When the disc is booted, simply run the atomicfs-install with proper arguments and let it do it's magic. In few minutes, your system will be up and running ;)
Last modified: 2023-03-29
pacman
AUR helpers
yay
Skip integrity check (useful when importing GPG keys is not working):
$ yay -S --mflags --skipinteg <PACKAGE>
Troubleshooting
When upgrading the system with pacman -Syu or installing new packages, and you get a lot of errors in the stage checking package integrity that look soimething like this:
error: glibc: signature from "NAME NAME <EMAIL@EXAMPLE.com>" is unknown trust
:: File /var/cache/pacman/pkg/PACKAGE.pkg.tar.zst is corrupted (invalid or corrupted package (PGP signature)).
Then you have obsolete pacman keys for signature verification.
# pacman -S archlinux-keyring
# pacman-key --refresh-keys
The refresh-keys might take a while and you might see a lot of errors - this is fine.
Last modified: 2023-03-29
pacman: cache
Last modified: 2023-03-29
pacman: custom packages
Last modified: 2023-03-29
pacman: custom repository
To simplify installation if custom packages, you can create custom repository.
I am going to use following structure:
- git.sr.ht/~atomicfs/atomicfs-repo-arch
- the main repository with all the code and packages
- upon trigger it builds new versions of packages and
git push --forceinto gitlab
- gitlab.com/AtomicFS/atomicfs-repo-arch-gitlab
- repository used only to host the content in
pages
- repository used only to host the content in
GPG signature
Firstly create a PGP key (guide):
gpg --full-gen-key
Upon successful creation you should see following:
pub   rsa3072 2022-04-09 [SC] [expires: 2023-04-09]
      B941681D8C7FE3876F84F9BEE0C66981D83CBF4A
uid                      Vojtech Vesely (custom_archlinux_packages) <vojtech_vesely@white-hat-hacker.icu>
sub   rsa3072 2022-04-09 [E] [expires: 2023-04-09]
Where the B941681D8C7FE3876F84F9BEE0C66981D83CBF4A is the user-id.
Export public and private key:
gpg --export --armor --output archlinux_packages.pub.key B941681D8C7FE3876F84F9BEE0C66981D83CBF4A
gpg --export-secret-keys --armor --output archlinux_packages.priv.asc B941681D8C7FE3876F84F9BEE0C66981D83CBF4A
You can also publish it:
gpg --send-keys B941681D8C7FE3876F84F9BEE0C66981D83CBF4A
Add the private key into secrets:
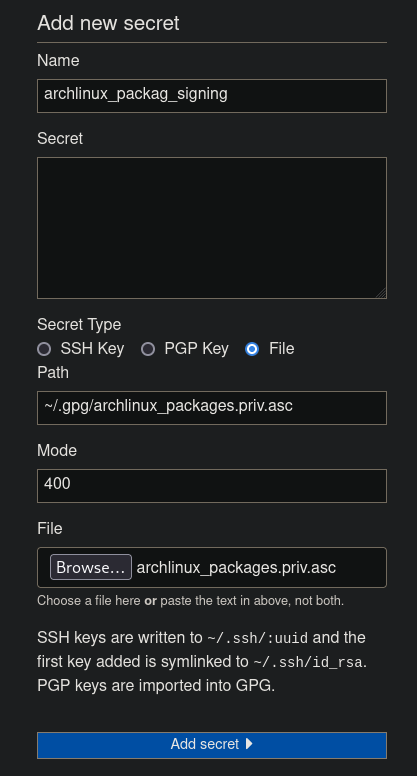
Then the new secret will get assigned UUID (in this case d146a201-579a-4f45-b097-b282ca4c6bd7):

Add this secret into the secrets section in the build.yml file:
secrets:
  - d146a201-579a-4f45-b097-b282ca4c6bd7
And then import the key before building the packages:
gpg --import ~/.gpg/archlinux_packages.priv.asc
Add the repository in system
Edit pacman's configuration file and add the repository:
[atomicfs-repo-arch]
Server = https://atomicfs.gitlab.io/atomicfs-repo-arch-gitlab/x86_64/
SigLevel = Required DatabaseOptional
Or you can point your own domain to it:
[atomicfs-repo-arch]
Server = https://repo-arch.white-hat-hacker.icu/x86_64/
SigLevel = Required DatabaseOptional
Import the public key to your other systems:
pacman-key --recv-key B941681D8C7FE3876F84F9BEE0C66981D83CBF4A --keyserver keyserver.ubuntu.com
pacman-key --lsign-key B941681D8C7FE3876F84F9BEE0C66981D83CBF4A
And you are done, now you can install packages from your own repository.
Last modified: 2023-03-29
Meta package
Meta package in a package with not code or executable, but only dependencies.
I use these to define sets of packages to maintain my machines.
Last modified: 2023-03-29
Licenses
Last modified: 2023-03-29
Microsoft Windows EULA

Last modified: 2023-03-29
Last modified: 2023-04-08
Programming languages

Memory management
Cool video from Computerphile: Garbage Collection (Mark & Sweep)
- Reference counting
- basically keep count how many references you have for specific memory
- creating varibale sets counter to 1
- creating new reference increments the counter, destroying reference decrements the counter
- when the couter reaches 0, memory can be freed
- Problems:
- it is surprisingly difficult to keep track of references
- such coutnters take up memory
- incrementing and decrementing the couters can become very performance expensive under specific circumstances
- basically keep count how many references you have for specific memory
- Garbage collection
- Mark and sweep algorithm
- once in while go though the memory and mark object that are still live (referenced), then sweep (free) those objects that are not marked
- Mark and sweep algorithm
Stack vs Heap
- Stack
- Objects and variables that have known size at the compile time
- Heap
- Objects and variables that have unknown size at the compile time, but also those which need to change size over time (dynamic size)
C and C++ do not have any build-in means to find out if variable is stored in stack or in heap.
- Unverified theory: On most platforms stack grows down from highest address available, heap grows up from lowest. So in theory you could look at the address of variable and see where it is located - closer to top or bottom, and make a guess.
- Source
Last modified: 2023-04-08
C
| Year | Informal name | C Standard |
|---|---|---|
| 1972 | Birth | |
| 1978 | K&R C | |
| 1989 | ANSI C | |
| 1990 | C90 | ISO/IEC 9899:1990 |
| 1999 | C99 | ISO/IEC 9899:1999 |
| 2011 | C11, C1x | ISO/IEC 9899:2011 |
| 2018 | C17 | ISO/IEC 9899:2018 |
- C89 / ANSI is the most important standard, a must to know in C world
- C89 and C90 are practically identical
- C99 and C11 are nice to have
- It is recommended to use
gcc program.c -Wall -Wextra -pedantic -std=c89to give you additional feedback and code checks - Many things from C++ were backported into C99
- like
const, so you can avoid preprocessor's#define - and
stdint.h
- like
- specifications of C standards (source; they are technically drafts, but are valid)
Stuff to cover
*.cand*.cppcontain the implementation*.hcontain the definitions or prototypes- Preprocessor
- Header files
- Macros
- construction enclosed in
(and) - C language is stream oriented
- Memory Layout of C Programs
Operators
Sources:
See also:
-
Unary operators
- Perform action with single variable
- Examples:
++,++,!,sizeof, etc
-
Binary operators
- Perform action with two variables
- Examples:
+,-,*,>=, etc
-
Ternary operator
?- shorthand for
ifstatement
int larger;
if (a > b)
	larger = a;
else
	larger = b;
int larger;
larger = (a > b) ? a : b;
Comparison operators / relational operators
| Syntax | Operator |
|---|---|
| a == b | Equal to |
| a != b | Not equal to |
| a > b | Greater than |
| a < b | Less than |
| a >= b | Greater than or equal to |
| a <= b | Less than or equal to |
C++ also has this:
| Syntax | Operator |
|---|---|
| a <=> b | Three-way comparison |
Logic operators
| Operator | Function |
|---|---|
| a && b | AND |
| a || b | OR |
| !a | NOT |
- Non-zero values are
TRUE - Zero is always
FALSEjust like\0
Bitwise logic operators
| Operator | Function |
|---|---|
| a & b | AND |
| a | b | OR |
| ~a | NOT |
| a ^ b | XOR |
| a >> b | right shift |
| a << b | left shift |
Assignment operators
| Syntax | Operator name |
|---|---|
| a = b | Direct assignment |
| a += b | Addition assignment |
| a -= b | Subtraction assignment |
| a *= b | Multiplication assignment |
| a /= b | Division assignment |
| a %= b | Modulo assignment |
| a |= b | Bitwise OR assignment |
| a ^= b | Bitwise XOR assignment |
| a <<= b | Bitwise left shift assignment |
| a >>= b | Bitwise right shift assignment |
Member and pointer operators
| Syntax | Operator name |
|---|---|
| a[b] | Subscript |
| *a | Indirection (object pointed to by a) |
| &a | Address-of (address of a) |
| a->b | Structure dereference (member b of object pointed to by a) |
| a.b | Structure reference (member b of object a) |
Other operators
| Syntax | Operator name |
|---|---|
| a(b, c) | Function call |
| a, b | Comma |
| a ? b : c | Ternary conditional |
| sizeof a | sizeof |
| sizeof(type) | sizeof |
| (type) a | conversion / cast |
Variables
extern
static
Sources:
static:
- A static variable inside a function keeps its value between invocations.
- When you use
static int x = 0;, the variable is initialized to0only on creation and is not reset in later iterations. - Can be used instead of global variable.
- When you use
- A static global variable or a function is "seen" only in the file it's declared in.
- Static variables are allocated memory in data segment, not stack segment (see Memory Layout of C Programs)
- Static variables should not be declared inside structure. The reason is C compiler requires the entire structure elements to be placed together (i.e.) memory allocation for structure members should be contiguous.
In C++ the static can be used to define class attributes and methods shared between all objects of given class.
Arrays
Size of array
Sources:
sizeof with first element
int a[20];
size_t length = sizeof(a) / sizeof(a[0]);
sizeof with type
int a[20];
size_t length = sizeof(a) / sizeof(int);
Macro
#define NUM(a) (sizeof(a) / sizeof(*a))
for (i = 0; i < NUM(a); i++)
Compiler should be smart enough to not calculate the macro at compile time.
Libraries
math vs cmath vs math.h vs cmath.h
- those with
.hwill pollute your global namespace with a lot of junk, those without may or may not (no guarantees) cvsc++: prefixcis forC++and is missing the.hat the end
stdio.h
int printf ( const char * format, ... );- print C stringint putchar ( int character );- print single characterint puts ( const char * str);- print C string with newlineint scanf ( cost chat * format, ... );- read formatted data fromstdin- for example
scanf ("format", &var);, do not use&for string or array - stops at first white-space character
- discouraged to input strings because of possible buffer overflow
- rather use
fgets
- rather use
- for example
char * fgets ( char * str, int num, FILE * stream );
char input[64];
fgets(input,64,stdin);
Look into format specifiers to format data.
math.h
- usually use
double - Order of precedence
- equations are evaluated left to right
- multiplication and division are done first
- addition and subtraction
- parentheses used to prioritize some calculations
string.h
- C language does not have string, but rather arrays of characters
- final character of string is
nullcharacter (\0)
- final character of string is
char string[]where brackets can be empty if immediate assignment, otherwise length of desired string + 1 for null characterchar string[] = "hello";char string[6]; strcpy(string,"hello");
- string manipulation function are in
string.h
stdlib.h
void* malloc(size_t size);- successful allocation returns address
- failed allocation returns
NULLpointerNULLis a contant pointer, use it to check if allocation was succesful (not the same thing as\0)
char *sto;
sto = malloc( sizeof(char) * 1024 ); // want to store 1024 chars

if (sto == NULL){
	printf("Unable to allocate memory\n");
	return(1);
}
Pointers
- pointer is declared with
*operator - pointer type must match variable type it is pointing at
- when used without
*it represents an address - when used with
*it represents the value at the address
int pokey = 987;
int *p = &pokey;
printf("The address of 'pokey' is %p\n", &pokey);
printf("The address in 'p' is %p\n", p);

printf("The value of `pokey` is %d\n", pokey);
printf("The value of `*p` is %d\n", *p);
The address of 'pokey' is 0x7ffd437e4a8c
The address in 'p' is 0x7ffd437e4a8c

The value of `pokey` is 987
The value of `*p` is 987
Pointer arithmetic
int array[] = {11, 13, 17, 19};
int *aptr, *aptr2;
aptr = array;
aptr2 = &array[1];

printf("Elements is %d\n", *aptr);
printf("Elements is %d\n", *aptr2);

printf("Elements is %d\n", array[3]);
printf("Elements is %d\n", *(aptr+3));
Elements is 11
Elements is 13

Elements is 19
Elements is 19
Misc
- Required
main()function (this is the entry point) - operator
sizeofreturns number of bytes used by variable- can be even used of
struct
- can be even used of
- uninitialized variables contain garbage, this includes pointers
- modulo operator
%is for remainder after integer division
sizeof
struct stuff {
	int a;
	float b;
	char c[32];
}
printf("Sizeof struct is %lu bytes", sizeof(struct stuff) );
returns:
Sizeof struct is 40 bytes
Last modified: 2023-04-07
JavaScript
Last modified: 2023-03-29
BIOS and UEFI

Sources:
Both BIOS and UEFI are low-level software to initialize the hardware and boot OS.
BIOS is commonly a proprietary software made specifically for each motherboard model by the manufacturer.
Proprietary BIOS and UEFI firmware often contains back-doors, can be slow and has severe bugs (for more details see section Intel ME and AMD PSP). It contains bloat from decades ago for backwards compatibility to awkward and no longer used devices, sometimes even software for obscure interfaces not present on motherboard. Developers simply copy-paste the old code without a thought or any review.
Open alternatives are faster, more secure and more reliable than most non-free firmware options. In addition, they provide many advanced features, like encrypted /boot partition, GPG signature checking before booting kernel and more. Here are few specimens:
coreboot started as LinuxBIOS back in a day when hardware was simple enough. Back then Linux kernel was used instead of BIOS. Since then, the hardware got more complicated as well as the boot sequence (for example nowadays memory has to be trained).
libreboot is coreboot without proprietary blobs, but this is to certain degree redundant since coreboot build will not contain any blobs for motherboards that can run without them.
u-boot is also open and de facto a standard for ARM devices. Although it is rumored that the code quality if worse than coreboot's.
Intel, EFI and slimboot
14th of September 2018, Intel has announced open EFI implementation called slimboot, however it is widely despised, especially in coreboot community and for a good reasons.
Long-story short, Intel wanted coreboot to include their EFI, coreboot community refused since it contradicts their philosophy and so Intel created slimboot by forking coreboot, added their EFI and abandoned the project afterwards (there is practically no activity in slimboot git repository).
Sidenote: Intel is often trying to push their bullshit into coreboot community.
Here are links to the coreboot mailing-list thread:
Last modified: 2023-03-29
BIOS
BIOS stands for Basic Input/Output System and dates back into 1975. It initializes the hardware and loads the boot loader which then initializes the operating system.
Back in the day, BIOS provided a abstraction layer for operating system to access the hardware (keyboard, mouse, etc.), nowadays it is done by the operating system itself. It used to be stored in ROM on the motherboard, but in modern computers it is in flash memory to allow end-user updates (bug fixes, new features, etc.), which also opened a new vector of attacks (BIOS rootkits).
BIOS has severe limitations, such as the BIOS must run in 16-bit mode, BIOS has only 1 MB of space to execute in, problems to initialize multiple hardware devices at once (longer boot time) and more.
BIOS uses MBR partition scheme. Because of that, BIOS can't use disk for booting larger than 2 TB.
Last modified: 2023-03-29
UEFI
UEFI stands for Unified Extended Firmware Interface. It aims to replace BIOS and is designed to not have the limitations of BIOS. Intel has started to work on EFI specification in 1998 and in 2007 Intel, AMD, Microsoft and others agreed to UEFI.
UEFI uses GPT partition table allowing it to boot from devices larger than 2 TB.
UEFI Criticism
UEFI and even more it's feature SecureBoot has been heavily criticized from OpenSource community. Since there have been many attempts to cut out any operating system other then Microsoft Windows from booting. Citation from wikipedia:
Numerous digital rights activists have protested against UEFI. Ronald G. Minnich, a co-author of coreboot, and Cory Doctorow, a digital rights activist, have criticized EFI as an attempt to remove the ability of the user to truly control the computer. It does not solve any of the BIOS's long-standing problems of requiring two different drivers-one for the firmware and one for the operating system-for most hardware.
In 2011, Microsoft announced that computers certified to run its Windows 8 operating system had to ship with secure boot enabled using a Microsoft private key. Following the announcement, the company was accused by critics and free software/open source advocates (including the Free Software Foundation) of trying to use the secure boot functionality of UEFI to hinder or outright prevent the installation of alternative operating systems such as Linux. Microsoft denied that the secure boot requirement was intended to serve as a form of lock-in, and clarified its requirements by stating that Intel-based systems certified for Windows 8 must allow secure boot to enter custom mode or be disabled, but not on systems using the ARM architecture. Windows 10 allows OEMs to decide whether or not secure boot can be managed by users of their x86 systems.
More information can be found in interview with Ronald G. Minnich at archive.fosdem.org or in article The Coming War on General Purpose Computation.
Last modified: 2023-03-29
coreboot
coreboot is one of the open alternatives to the BIOS and UEFI, and supports a great variety of hardware.
It does contain few proprietary software components, but they are "necessary evil" for CPU function (since CPU manufacturer refuses to provide source code or documentation).
Official homepage at coreboot.org.
Philosophy
UEFI is running all the time in background to provide various services to operating system. coreboot's philosophy is exact opposite - do the bare minimum to get the system working and hand over the control to operating system.
Payloads
Additional features are added though payloads such as SeaBIOS or TianoCore.
SeaBIOS is an open source implementation of a 16-bit x86 BIOS. SeaBIOS can run in an emulator (it is the default BIOS for the QEMU and KVM virtualization) or it can run natively on x86 hardware with the use of coreboot (SeaBIOS used as payload). It runs on 386 and later processors and requires a minimum of 1 MB of RAM. Compiled SeaBIOS images can be flashed into supported motherboards using flashrom.
Supported devices
coreboot.org/status/board-status.html (the site contains a lot of data and might be very slow).
Last modified: 2023-03-29
General notes
This is how I set-up my Raspberry Pi to be used as external flasher.
There are two ways to flash coreboot into motherboard.
Internal flashing - boot a operating system on the motherboard, install flashrom and flash it via motherboard's internal SPI iterface. This methid is preferable due to simplicity, but not always possible.
External flashing - user external tool to flash the motherboard. If the flash-chip with BIOS is socketed, you can extract it and flash it with programmer. If the flash chip is soldered to the motherboard, you can do in-circuit flashing by connecting to chip's pins.
Gotchas
Create a backup of the original BIOS by reading the SPI flash chip.
The original can be flashed back in case the coreboot fails, but also some useful things might be extracted from it such as vgabios, IntelME, network card driver and so on.
Read out the SPI flash chip multiple times (two or three) and compare their checksums to veryfy that the electrical connection is solid.
If the flashing procedure failed, do not power down the setup! Research about possible solutions.
Always check the your RAM modules are placed into correct slots (look into manual).
Often there are 4 slots (from closest to CPU): A1, A2, B1, B2. Then there are following possible configurations:
- 1 DIMMs:
A2 - 2 DIMMs:
A2B2 - 4 DIMMs: all slots
With stock BIOS / UEFI it might be OK to use slightly different placement, but coreboot will likely end up with RAM INIT FAILURE! and fail to boot.
First boot of coreboot always takes longer - this is mostly because of training memory. Any subsequent boots should be faster.
To get started with new board, keep most settings on default (have as few features as possible to keep it simple). Then if succesful, you can enable more features.
You can use serial port for debugging, if you board has one. Enable debugging with Serial port console output and Show POST codes on the debug console.
Look for existing configuration files in coreboot/configs or in another projects like heads.
SPI flash chip pinout
While the following pinout and voltage is common, it might vary between various manufacturers and chip models! Always check datasheet.
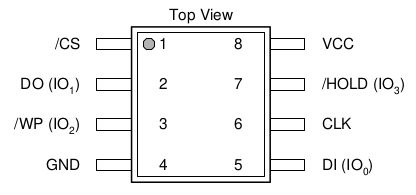
| Pin | Name | Function |
|---|---|---|
| 1 | CS | Chip Select |
| 2 | DO | Data Output |
| 3 | WP | Write Protect |
| 4 | GND | Ground |
| 5 | DI | Data Input |
| 6 | CLK | Serial clock input |
| 7 | HOLD | Hold Input |
| 8 | VCC | Power supply |
Coreboot bassics
Build crossgcc (this will take a while):
make crossgcc CPUS=4
Configure the coreboot build:
make menuconfig
Build coreboot:
make
Serial
Open serial with:
screen /dev/ttyUSB0 115200
To close it Ctrl+A followed by K.
Last modified: 2023-03-29
Raspberry Pi flashing
This is how I set-up my Raspberry Pi to be used as external flasher.
Raspberry Pi makes for poor and over-complicated flashing tool, but it is often already in drawer ready for use. Consider getting dedicated programmer if you are going to flash motherboards on regular basis.
Bill of Materials
- Raspberry Pi - I am going to use Raspberry Pi 1 Model B+ because that is what I have available at hand
- Raspbian - specifically Raspberry Pi OS Lite based on Debian 11
- SOIC clip (SOIC-8, which is for 8 pin chips - Pomona 5250 or equivalent)
Setting up Raspberry Pi
Here are briefly described steps I have made:
- Copy the operating system image to microSD card
- Mount the system partition
- Add ssh public key into
/root/.ssh/authorized_keys - Change
/etc/hostnameto desired hostname - Assign static IP address to the Raspberry Pi in the router
- Place the card into Raspberry Pi and boot
- Go though the first boot setup
- Update the system with
apt update && apt upgrade - Install
openssh-serverandflashrom(and maybeaptitude) - Configure the ssh by editing
/etc/ssh/sshd_config- I intent to use root user with ssh keys, so enable root login and disable password authentication
raspi-config- enable SPI interface
- enable ssh
- disable autologin (optional)
Wiring
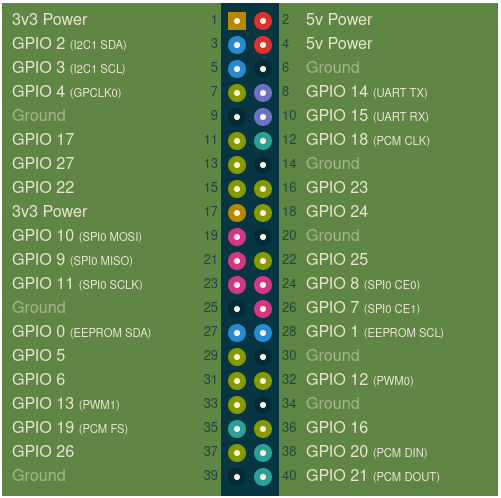
| Pin | Name | Function |
|---|---|---|
| 25 | GND | Ground |
| 24 | CS | Chip Select |
| 23 | SCK | Serial clock input |
| 21 | DO | Data Output |
| 19 | DI | Data Input |
| 17 | 3.3 VCC | Power supply |
The GPIO Pin 17 should be used only as power supply (do not connect external power to it), but it has a limit of and powering the chip in circuit might draw much more since other components might turn on as well, easily exceeding the current limit. Therefore external power supply might be needed.
In general the WP and HOLD pins on flash chip (usually pin 3 and pin 7) should be connected to VCC unless they are required to be floating or connected to GND (both extremely uncommon for SPI flash chips). Please consult the datasheet for the flash chip in question.
Flashing
Whenever calling flashrom, you have to specify SPI interface and speed:
# flashrom -p linux_spi:dev=/dev/spidev0.0,spispeed=1000
Output example:
flashrom v1.2 on Linux 5.15.32+ (armv6l)
flashrom is free software, get the source code at https://flashrom.org

Using clock_gettime for delay loops (clk_id: 1, resolution: 1ns).
Found Winbond flash chip "W25Q64.V" (8192 kB, SPI) on linux_spi.
No operations were specified.
Last modified: 2023-03-29
Intel D510MO
According to the documentation
This board has a working framebuffer in Grub, but in GNU/Linux in native resolution the display is unusable due to some raminit issues. This board can however be used for building a headless server.
Simply said, it has significant problems to display anything on screen with integrated GPU. I have tested old dedicated GPU in PCI port, but it was not getting any signal (it was working with proprietary BIOS).
Even with such limitation, it is still usable for headless server, NAS or similar use.
Last modified: 2023-03-29
Lenovo Thinkpad x230
Last modified: 2023-03-29
Gigabyte GA-G41M-ES2L
This board is possible to flash internally - even with original BIOS.
While I attempted to do that, I failed and board is now bricked, since the guide forgot to mention to do complete shutdown instead reboot after flashing. After it rebooted, the board was bricked. I attempted to re-flash again externally, but the chip was not recognized - possibly damaged. Now, I am waiting for delivery of new chip to solder on the board instead (after flashing). Clearing CMOS does not help.
Last modified: 2023-03-29
ASUS F2A85-M2
At the moment I am experiencing a problem with memory. Memtest86+ fails and in coreboot logs there is a SPD READ ERROR.
Also, dmedecode -t memory gives no output.
Rather neat board with socketted SPI flash chip for BIOS / UEFI.
My initial trials were less than successful, especially when it comes to vgabios which was rather problematic. But in the end I managed to get the board up and running with coreboot.
Internal flashing and UEFI version
First of all, original UEFI version - coreboot docs state that internal flashing can be used for any version in between v5018 and v6402 (included), but ASUS F2A85-M2 has different versioning system.
So I have looked at release dates. Let's take v6402 for ASUS F2A85-M which was released 2013-07-26 according to manufacturer's web. The closest match is v0704 for ASUS F2A85-M2 which was released on the exact same date according to manufacturer's web.
My motherboard has custom UEFI varian claiming to be v9904, which made things a bit more complicated. I could use internal flashing, but I could not use UEFI's ASUS EZ Flash 2 Utility to flash v0704. It was complaining about downgrade, even though according to UEFI setup the release date for running UEFI sometime in 2012 (year older than v0704).
Although custom, the running UEFI version fit in between the versions with possible internal flashing.
vgabios
I am not going to use dedicated GPU, so I want to get the integrated GPU running, for which I need vgabios.
vgabios is a bit complicated. First of all, in coreboot docs there is very little information about this ASUS F2A85-M2 so I have made few guesses. One of which was the UEFI version (I settled with v0704).
Then I used the suggested MMTool Aptio v5.0.0.7 (which seems to be some proprietary software that is not openly available). Steps are described in coreboot docs. I have used the mentioned v0704 UEFI version.
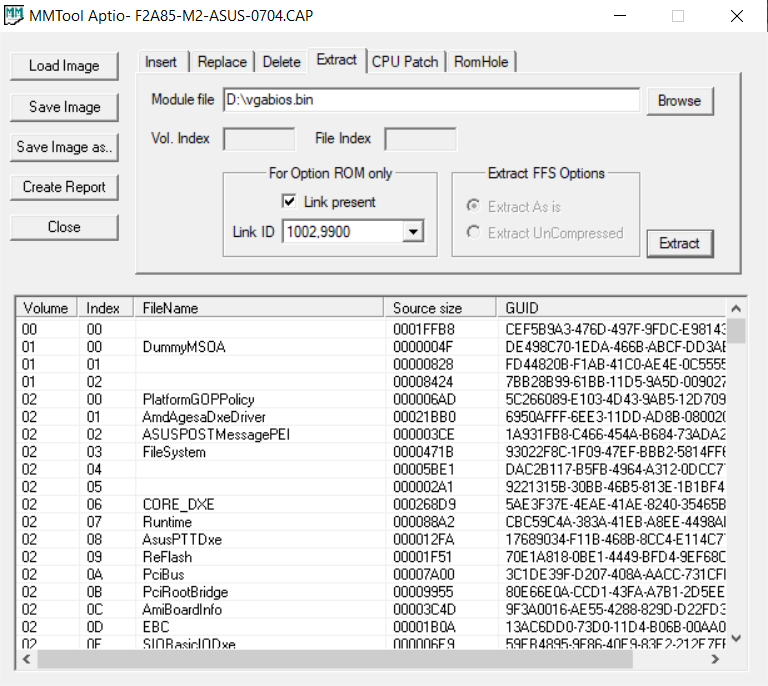
The CPU I intend to use is AMD A8-6500, which according to cpu-world.com has integrated Radeon HD 8570D which translates to VGA device PCI ID 1002,990e.
The I placed the vgabios into root directory of coreboot and named it vgabios.bin
coreboot
|-- ...
|-- vgabios.bin
|-- .config
|-- Makefile
|-- README.md
`-- ...
Configuration
My .config file can be found in sourcehut repository
In Mainboard select vendor ASUS and model F2A85-M, the rest can remain on default.
Then with make menuconfig, in Devices I have enabled Add a VGA BIOS image and set VGA device PCI IDs to 1002,990e as mentioned above.
As primary payload I use SeaBIOS, with secondary payloads coreinfo, Memtest86+ and nvramcui.
Also, in System tables I have changed SMBIOS Product name from ASUS F2A85-M to ASUS F2A85-M2, but this is only cosmetic change.
And that is it. Configuration is now complete.
Flashing
Just use internal programmer. If the board does not boot, just take out the SPI flash and program it externally in breadboard or some doodad.
Last modified: 2023-03-29
libreboot
libreboot is a fork of coreboot with focus on removing all the proprietary components and sticking to true Free Software spirit. That unfortunately greatly limits the list of compatible hardware.
In addition, you get equivalent results by selecting specific hardware and configuration.
Official homepage at libreboot.org.
Supported devices
It is very unlikely that any modern hardware will ever be supported due to required Intel ME and AMD PSP since that would defy the whole point of LibreBOOT.
Last modified: 2023-03-29
Resetting BIOS / UEFI passwords
This is a long story, which just recently had a update.
Long story short, I have set a supervisor password (password to access BIOS / UEFI settings) on my personal Lenovo ThinkPad E531 laptop without writing it down. And of course I forgot it.
I kept using it since I could still access boot order menu, but eventually a needed to change settings protected by the supervisor password. And as one does in such situation, I searched the internet. (this is back in 2019)
I have quickly learned that this specific model does not store the password in CMOS memory (which can be easily erased) but in EEPROM, and that Lenovo does not offer any means of removal / reset of the password other than replacing the entire motherboard. Which in my opinion is unacceptable waste of perfectly functional hardware.
Even though it was likely to fail, I created a thread on forums.lenovo.com in hopes of getting some help. Of course I got very useless response. However after successfully solving the problem myself, I have returned to that forum thread and asserted my dominance by letting everyone know that it is possible to bypass this so called "security feature".
Lenovo Thinkpad E531 - how to clear supervisor password into BIOS
Hi,
I have a Lenovo Thinkpad E531. And some time ago I have set a supervisor password in BIOS, but I have unfortunatelly forgotten it.
When I attemped to clear the password by clearing CMOS (by removing batteries), it did not help.
How do you clear the supervisor password into BIOS?
Welcome to the Community.
Short answer is, "you don't." A BIOS password wouldn't be much security if it could easily be changed. I'm afraid you'll either have to try harder to recall it or swap out the motherboard.
Probably useless, but if you can find other passwords you set at about the same time you created this one, it might help. While it's not a good idea to use the same password for everything, I find anything that puts my brain into the same time frame as something I'm trying to remember, I have a better chance of remembering it. Could be just the way I'm wired.. :)
Doc
I have solved the problem by short-circuiting the EEPROM, bypassing the password.
Never mind.
In following subsection are few methods of resetting BIOS / UEFI passwords that I know of.
Sources:
CMOS
Old devices have BIOS passwords stored in volatile memory backed by CMOS battery.
In this case the password can be removed (along with all BIOS settings) by removing all power-sources including the CMOS battery for few minutes.
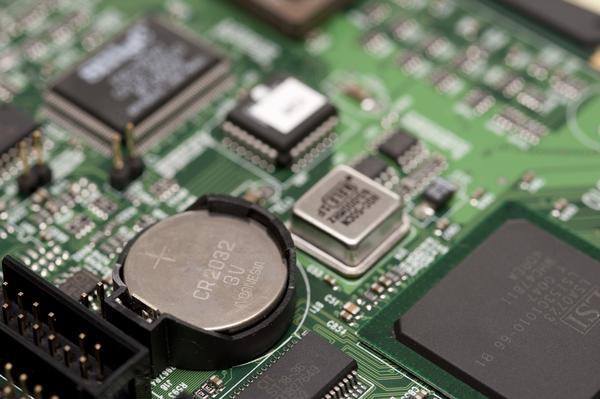
Alternatively there might be a jumper to clear the CMOS, which might save you some time.
![]()
Backdoor password
Some devices offer a recovery option / backdoor. If you enter wring passwords multiple times, you might be presented with a unique code.

Normally you would have to call a tech support and provide them with this code, but there is a nifty website bios-pw.org which is a collection of backdoor password generator for various BIOS and UEFI systems.
Default password
Generic BIOS password listings
EEPROM short-circuit (Lenovo ThinkPad E531)
In essence, you press power-on button, wait a certain time, temporarily short-circuit SDA and SCL pins on EEPROM, enter BIOS / UEFI and change password.
Your goal is to short the data pins on EEPROM exactly in the time that BIOS / UEFI tries to read the stored password(s). Thanks to shorting of the pins, it will fail and the system will behave like no password is set.
I recommend using metallic tweezers to short the pins. I found it far more reliable and precise than screwdriver.
The timing, while critical, can vary greatly on your system and you have to experiment. For me, it took around 20 tries to get the exact timing. For example my system could not even start with shorted pins, but I had to short then very soon after.
After you successfully get into BIOS / UEFI without password (the attack was successful), you have to change the password. By changing it, you over-write the existing password in EEPROM which you just bypassed. Afterwards you can remove it by conventional means if you wish.
What really helped me was forum allservice.ro which hosts many pictures with EEPROM location.

Sources:
- Detailed guide at Remove BIOS and Supervisor Password from Lenovo ThinkPad Laptops (FYI this article came out afterwards)
- Resetting the EEPROM/Lost Supervisor Password on Lenovo Thinkpad T430s
UEFI embedded password (HP Zbook 15 G5)
Recently, I have acquired HP Zbook 15 G5, unfortunately with UEFI password set (of course without knowing the password).
Even more unfortunately it seems that the password is set right in the SPI flash where UEFI resides. Also, this specific device came from corporate which disabled the backdoor password which could be normally used.
As far as I know, it should be possible to "simply" edit the UEFI ROM and remove the password. This is one of my future projects.
Last modified: 2023-03-29
Last modified: 2023-03-29
Intel ME and AMD PSP

Relatively recent discoveries about hidden "features" in Intel and AMD processors such as Intel ME (Management Engine) and AMD PSP (Platform Security Processor) has risen many serious concerns.
It was later followed by discovery of fatal flaws in the architecture - most famous is SPECTER and MELTDOWN which are possible thanks to the speculative computing. These flaws in architecture in addition to hidden operating system inside every CPU has lead to significant traction and serious security and privacy concerns (2017 and especially in 2018).
Intel ME is an independent co-processor, running custom operating system (based on MINIX 3), integrated inside CPU and it is the base hardware for many features like Intel AMT (Active Management Technology - for remote management), Intel Boot Guard, Intel PAVP (Platform Embedded Security Technology Revealed) and many others. To provide such features, it requires full access to the system, including memory (through DMA) and network access.
Intel ME is in every processor since 2006 and AMD PSP since 2013.
There is overwhelming number concerns about these systems as they present an almost undetectable back-door into any and every computer. After the reveal of Intel ME, many vulnerabilities have been discovered and attempts to remove, disable or replace Intel ME have been made. In essence the Intel ME and most likely AMD PSP are extremely flawed and vulnerable and present great risk to security and privacy (more info at wikipedia.org/wiki/Intel_Management_Engine).
Intel Management Engine is a severe threat to privacy and security, not to mention freedom, since it is a remote backdoor that provides remote access to a computer where it is present (publicly admitted by Intel).
Option 1 - run old hardware
It is possible to completely avoid the Intel ME and AMD PSP by simply running on old hardware from era preceding them. This solution isn't too bad, assuming use of AMD components - where one can go as recent as 2013.
To improve the security on such device (and sometimes even performance), it is recommended to flash the motherboard with alternative firmware such as coreboot.
Option 2 - reduce effects
Another option is to modify the already present firmware, which in case of Intel ME is possible with use of ME Cleaner. ME Cleaner is a Python script able to modify an Intel ME image with the final purpose of reducing its ability to interact with the system.
According to the GitHub documentation, it takes the firmware image, then it is modified and flashed back. External flashing is recommended.
Since multitude of devices are also supported by coreboot, coreboot in combination with Me Cleaner will significantly reduce the effects. For example Thinkpad x230 has Intel ME in it, but it can be reduced from 5.2 MB to mere 98.3 kB - reduction to less than 2% of original size.
Quote from ME Cleaner's README:
Before Nehalem (ME version 6, 2008/2009) the ME firmware could be removed completely from the flash chip by setting a couple of bits inside the flash descriptor, effectively disabling it.
Starting from Nehalem the Intel ME firmware can't be removed anymore: without a valid firmware the PC shuts off forcefully after 30 minutes, probably as an attempt to enforce the Intel Anti-Theft policies.
However, while Intel ME can't be turned off completely, it is still possible to modify its firmware up to a point where Intel ME is active only during the boot process, effectively disabling it during the normal operation, which is what ME Cleaner tries to accomplish.
Last modified: 2023-03-29
Mobile phones

Let's start by stating the obvious - I hate Apple, Apple's iPhone, and I also hate Android. So I was always looking for alternatives.
Android
First of all, Android is made by Google, which is known for gathering all data about you as humanly possible. Android is basically advertisement platform combined with google car, spying on you all the time.
Apple
Overpriced piece of shit, which is locked down as much as possible and user can not do much (maybe change wallpaper).
Last modified: 2023-03-29
Hardware
Last modified: 2023-03-29
PipePhone
I am just a customer and these are my opinions. I am not affiliated with PinePhone or Pine64.
I have purchased PINEPHONE Beta Edition with Convergence Package Linux SmartPhone, and later I also got myself the keyboard case right after it became available.
PinePhone specs:
- CPU: 64-bit Quad-core 1.2 GHz ARM Cortex A-53
- RAM: 3GB LPDDR3 SDRAM
- Storage: 32GB eMMC
When using the keyboard case, do not charge your phone via the USB-C on your phone, but via the USB-C in the keyboard case. You will fuck-up the changing circuit. See manual.
PinePhone Pro has different boot order! PinePhone boots primarily from SD card, then eMMC. PinePhone pro boots primarily from eMMC, booting the Manjaro u-Boot, taking away control over the bootloader. This is unacceptable.
p-boot demo on SD card
p-boot-demo is definitely a must-have. In essence, it is a collection of multiple Operating Systems for PinePhone, and it allows you to quickly try out various operating systems. Download link is in the Download section.

Installation
Decompress the archive
\$ zstd -d multi.img.zst
Write the image to SD card (in this example the SD card shows up as /dev/sdc block device)
# dd if=multi.img of=/dev/sdc bs=4M oflag=direct status=progress
Resize the second partition with fdisk
# fdisk /dev/sdc
- Delete 2nd partition
- Create new partition
- Partition number: 2
- Partition type: primary
- First sector: 409600
- Do not remove the file-system signature
So not forget to change first sector!
The original partition table had 2nd partition starting at sector 409600.
Disk /dev/sdc: 14.52 GiB, 15590227968 bytes, 30449664 sectors
Disk model: UHS-II SD Reader
Units: sectors of 1 * 512 = 512 bytes
Sector size (logical/physical): 512 bytes / 512 bytes
I/O size (minimum/optimal): 512 bytes / 512 bytes
Disklabel type: dos
Disk identifier: 0x12345678

Device     Boot  Start      End  Sectors  Size Id Type
/dev/sdc1  *      8192   409599   401408  196M 83 Linux
/dev/sdc2       409600 20479999 20070400  9.6G 83 Linux
Welcome to fdisk (util-linux 2.38.1).
Changes will remain in memory only, until you decide to write them.
Be careful before using the write command.


Command (m for help): d
Partition number (1,2, default 2):

Partition 2 has been deleted.

Command (m for help): n
Partition type
   p   primary (1 primary, 0 extended, 3 free)
   e   extended (container for logical partitions)
Select (default p):

Using default response p.
Partition number (2-4, default 2):
First sector (2048-30449663, default 2048): 409600
Last sector, +/-sectors or +/-size{K,M,G,T,P} (409600-30449663, default 30449663):

Created a new partition 2 of type 'Linux' and of size 14.3 GiB.
Partition #2 contains a btrfs signature.

Do you want to remove the signature? [Y]es/[N]o: n

Command (m for help): w

The partition table has been altered.
Calling ioctl() to re-read partition table.
Syncing disks.
The resize the BTRFS file-system.
# mount /dev/sdc2 /mnt/
# btrfs filesystem resize max /mnt/
# sync
# umount /mnt
# eject /dev/sdc
Flash eMMC
Firstly use the p-boot to boot JumpDrive, and then connect the phone via USB-C cable to you phone. The JumpDrive will expose eMMC and SD card is block devices.
You can then use dd to write image you wish to install.
# dd if=Manjaro-ARM-phosh-pinephone-beta28.img of=/dev/sdc bs=4M oflag=direct conv=fsync status=progress
Keyboard tools
Firstly install yay
# pacman -S --needed base-devel
\$ git clone https://aur.archlinux.org/yay.git
\$ cd yay
\$ makepkg -si
Then install pinephone-keyboard-git
\$ yay -S pinephone-keyboard-git
Now you can use ppkb-i2c-charger-ctl to interact with the battery charger.
Review
Initially I started with DanctNIX (ArchLinux), mostly because I like ArchLinux but also because encrypted system partition with dm-crypt is a must-have. Unfortunately there are many problems, mostly caused by broken Pine64 community.
I also started with SXMO, but soon had to switch to Phosh. SXMO is nice and super-cool, but unfinished. For example you can't send / press numerical keys during call. This is important when calling companies to navigate though answering machine.
Right now, I am using Manjaro with Phosh, just because it seems to be the least broken option.
Overall, this phone has a lot of pros and cons.
Pros:
- You can purchase spare parts
- One of few Open-Source friendly phones on market that did not die few months after launch
Cons:
- GSM module is fucked, often goes offline during sleep without warning
- Hight power-consumption and low battery capacity
- Available Operating Systems other than Manjaro have poor support from Pine64 (manufacturer)
- TLDR:
- Pine64 likes Manjaro and nobody else
- Manjaro is a bunch of noobs
- Nobody ever upstreams their changes so each distro must re-invent the wheel to get it working
- Long version (drama alert):
- TLDR:
Verdict (after almost 2 years of daily use):
- Would I recommend this phone to "normal" people as daily driver?
- No way
- Would I recommend this phone to Linux geeks as daily driver?
- No
- Would I recommend this phone to Linux geeks as a toy?
- Maybe
- I am happy with my purchase of this phone?
- Not really, I am disappointed with the software and Pine64 community
- Would I buy this phone again?
- No
Just to say, my requirements for phone are functional and reliable GSM, running Linux, WiFi. That's it, my demands are very low.
Since this phone is such a disaster, I am actually considering to resurrect my old project to build RaspberryPi-phone based on RaspberryPi-Zero.
Few interesting sources
Last modified: 2023-03-29
Software
Last modified: 2023-03-29
Android
Android is a mobile operating system based on a modified version of the Linux kernel and other open-source software, designed primarily for touchscreen mobile devices such as smartphones and tablets.
Last modified: 2023-03-29
LineageOS
LineageOS is a free and open-source operating system for various devices, based on the Android mobile platform.
In essence, replacement for Android.
Some phones are better than others. If you are considering to purchase a phone witch is supported by LineageOS, definitelly check out the community section, where people often write about their experiences.
For example here is a reddit post about Redmi 5 Plus from 2018:
I own a
Redmi 5 Plus. With the new generation (5) you have to wait 360 hours to unlock your bootloader. Previously it was 72 hours, but now it's an actual half month.Also consider that there are tons of steps to perform before that - create a Mi Account, apply for having your Mi account set up as a developer account, add your devices to your Mi developer account, ensuring your ROM can even unlock the bootloader (there's a switch in MIUI, and my ROM couldn't, I had to flash the Global Dev ROM to do it, which you can do without unlocking the bootloader).
All of this creates a hurdled process just to be able to flash a ROM that isn't made by Xiaomi, so I wouldn't recommend Xiaomi for LineageOS.
Last modified: 2023-03-29
Last modified: 2023-03-29
Naming conventions and ideas

A good naming scheme is scalable, unique, and easy to remember. The purpose of these naming schemes is to name networked servers, wireless access points or client computers, but it can also be used to name projects, products, variables, streets, pets, kids, or any other project where unique names and rememberable names are required.
With multiple devices on network, it is a good idea to establish a naming scheme.
Example of one scheme (source no longer available):
My wifi network is "Periodic" and that leads itself to all sorts of sub-naming schemes:
- Linux machines are noble gasses (Xenon, Argon, Neon, etc.)
- Desktops and laptops are transition metals (Iridium, Titanium, Zirconium, etc.)
- Phones are non-metals (Carbon, Oxygen, Nitrogen, etc.)
- Virtual machines are radioactive (those machines have a short half-life; Plutonium, Uranium, etc.)
- My tethering network is Actinoids
- My wife's tethering network is Lanthanoids
Or medieval scheme from linustechtips.com:
Currently everything I have is medieval ages inspired. The network is "The Kingdom" and the devices on it are as follows: King (My main rig) Queen (My wifes) Prince and Princess (You can guess) Scribe (printer) MiniMessenger (My phone) Jester (TV PC) and so on and so forth for other computers that could fit into a castle somehow.
List of ideas by origin
Firefly
- Ares
- Hera
- Miranda
- Osiris
- Serenity
- Whitefall
Elements
- Argon
- Boron
- Chrom
- Cobalt
- Krypton
- Mercury
- Neon
- Radon
- Selen
- Thor
- Titan
- Tungsten
- Uran
- Xenon
Stars, planets, moons, probes
- Charon
- Dragonfly
- Europa
- Horizon
- Iocaste
- Pandora
- Prometheus
- Saturn
- Thebe
- Venus
EVE online ships
- Ark
- Avatar
- Blackbird
- Caracal
- Cerberus
- Charon
- Chimera
- Claw
- Corax
- Falcon
- Golem
- Guardian
- Heron
- Hyperion
- Jaguar
- Legion
- Leviathan
- Merlin
- Nomad
- Oracle
- Paladin
- Panther
- Phoenix
- Providence
- Raptor
- Raven
- Reaper
- Rook
- Scorpion
- Sentinel
- Thorax
- Tristan
- Typhoon
- Zealot
Human names
- Adam
- Cassandra
- Falcon (Robert Falcon Scott)
- Jack
- Norman
- Bismarck
- Gaspar/Caspar, Melchior, and Balthasar/Balthazar (Bible / Evangelion)
Top500 supercomputers
- Excalibur
- Pangea
- Thunder
- Topaz
- Trinity
- Vulcan
Movies and series
- Akira
- Andrew
- Cairon
- Defiant
- Flynn
- Guardian
- Leviathan
- Sam
- Sentinel
- Sullivan
- Weebo
- Calculon (Futurama)
- Tinny Tim (Futurama / Markiplier)
- Tyderium (StarWars)
- Tiberius (That's the T in James T Kirk)
Games: Crysis, DeusEx, TimeShift
- Alcatraz
- Prophet
- Sarif
- SSAM
Random
- Hydra
- Phantom
- Turing
- Orca
- Infinity
- Orion
- Pegasus
- Cosmos
- Dwarf
- Neutron
- Tau
- Neuron
- Buttons
- Prism
- Hemlock
- BigBrother
Pre-sorted by application
Desktop
- Phoenix
- Norman
- Hyperion
- Krypton
- Radon
- Raptor
Laptop
- Falcon
- Nomad
Server-like
- Leviathan
- Whitefall
- Legion
- Hyperion
- Horizon
- Cassandra
NAS
- Ark
- Charon
- Providence
Router
- Sullivan
- Paladin
- Blackbird
- Alcatraz
Switch
- Corax
- Chimera
Firewall
- Alcatraz
- Defiant
- Gatekeeper
- Guardian
- Heimdall
- Rook
Intrusion detection system (IDS)
- Zealot
- Sentinel
- Scorpion
Phone
- Dragonfly
- Merlin
- Sam
- Topaz
Email server
- Hermes
- Pigeon
Last modified: 2023-03-29
Cybersecurity

Last modified: 2023-03-29
DNS sinkhole
A DNS sinkhole, also known as a sinkhole server, Internet sinkhole, or Blackhole DNS[1] is a Domain Name System (DNS) server that has been configured to hand out non-routable addresses for a certain set of domain names.
In essence, DNS sinkhole is a DNS server with whitelist and/or blacklist of domains to be blocked. It is often used to block advertisements, malicious domains and botnets.
Most notably WannaCry was stopped by DNS sinkhole thanks to discovery of hard-coded kill switch.
The Domain Name System (DNS) is a hierarchical and distributed naming system for computers, services, and other resources in the Internet or other Internet Protocol (IP) networks.
It associates various information with domain names assigned to each of the associated entities. Most prominently, it translates readily memorized domain names to the numerical IP addresses needed for locating and identifying computer services and devices with the underlying network protocols.
DNS in essence translates domain (such as gitlab.com) into IP address (such as 172.65.251.78). Device sends a request to DNS server to resolve a domain, in return DNS server returns IP address.
+-------------+   +---------+
|   PC        |<->|  DNS    |
| 192.168.1.2 |   | 1.1.1.1 |
+-------------+   +---------+

gitlab.com     -->
               <-- 172.65.251.78

blockthis.com  -->
               <-- 199.59.243.222
DNS sinkhole is essentially Man-in-the-Middle. You set your device to use DNS sinkhole server as DNS server (this can be done via DHCP).
The DNS sinkhole will first check it's blacklist for requested domain, if present it returns non-routable addresses (such as 0.0.0.0), if not present it forwards the request to upstream DNS server.
+-------------+   +--------------+   +---------+
|   PC        |<->| DNS sinkhole |<->|  DNS    |
| 192.168.1.2 |   | 192.168.1.1  |   | 1.1.1.1 |
+-------------+   +--------------+   +---------+

gitlab.com     --> gitlab.com     -->
               <-- 172.65.251.78  <-- 172.65.251.78

blockthis.com  -->
               <-- 0.0.0.0
Advertisements
Probably most common use of DNS sinkhole by common folk is to block ads on the internet. When it comes to blocking ads, the most common way are browser extensions or addons. In my opinion you should use both.
While browser extensions are great, there are few advantages to use DNS sinkhole.
Pros of DNS sinkhole over browser extension:
- Faster browsing and lower internet bandwidth
- With extension, you computer has to resolve the domain and download the content, which then gets hidden by the extension. Although this depends on the combination of browser + extension + specific web.
- With DNS sinkhole, the domain is resolved to non-routable addresses (which is very fast since the DNS sinkhole is usually on local network) and no content is downloaded.
- Any device or program on the network can be used with DNS sinkhole (browsers, programs, smartphones, smart TVs, ... you name it)
- Yes, you can get rid off mobile ads without installing any additional software to your device.
Unfortunately some devices come with hard-coded DNS server, and therefore DNS sinkhole will not work, for example Chromecast.
But it might be possible to change the DNS somewhere in settings.
Cons of DNS sinkhole over browser extension:
- Granting temporary exceptions can be pain (especially for non-admin users)
Available DNS sinkholes
There are public DNS servers offer filtering, for example CloudFlare DNS servers:
| DNS IP | Filtering |
|---|---|
| 1.1.1.1 | None |
| 1.1.1.2 | Malware |
| 1.1.1.3 | Malware and Adult content |
CloudFlare is rather controversial. Mostly with claims of censorship, abusive monopoly and censorship.
Personally, I do not know what to make of it, I have not done my research yet.
Alternatively you can self-hosted DNS sinkholes:
- Pi-hole - I use this one, described in Pi-hole section
- AdGuardHome
- Technitium DNS
- Blocky
Last modified: 2023-03-29
VPN

First of all, let me say this: I see ads and promotions for NordVPN, Surfshark VPN and other all the time, and I get triggered.
They increase your security only in specific cases! To use VPN all the time is stupid, unless you live in country with heavy censorship.
Bullshit arguments to use VPN:
- Your internet provider can see all you traffic, they are not trustworthy
- When using VPN service, the VPN provider can see you traffic instead. Is your VPN provider trustworthy?
- Remember: If you are not paying for the product, you are the product. However high product price and selling your data is not mutually-exclusive.
- We do not log any data
- This is a straight up lie. All providers log data, the question is which data and how long they keep it. Check the VPN provider privacy policy.
- You are anonymous with VPN
- No you are not, you only hide your IP address.
- Hackers
- ... eeehh ... where do I even start ...
Valid reasons to use VPN:
- Bypass geo-blocking
- When using public hotspots while traveling
VPN service alternatives:
- Run your own VPN server
- With public IP address at your home, you can run VPN server at your home. Which is great because you get access to your home network, and it runs on hardware fully under your control.
- You can also install VPN into VPS. Then the question again is if you trust the VPS provider. If you can install your own system and configure it to your liking (disk encryption, etc), then I guess it is better than nothing.
- Use TOR or other decentralized network
Last modified: 2023-03-29
Malware
Last modified: 2023-03-29
WannaCry
The WannaCry ransomware attack was a worldwide cyberattack in May 2017 by the WannaCry ransomware cryptoworm, which targeted computers running the Microsoft Windows operating system by encrypting data and demanding ransom payments in the Bitcoin cryptocurrency.
It propagated by using EternalBlue, an exploit developed by the United States National Security Agency (NSA) for Windows systems. EternalBlue was stolen and leaked by a group called The Shadow Brokers a month prior to the attack.
Last modified: 2023-03-29
Stuxnet
Stuxnet is a malicious computer worm first uncovered in 2010 and thought to have been in development since at least 2005. Stuxnet targets supervisory control and data acquisition (SCADA) systems and is believed to be responsible for causing substantial damage to the nuclear program of Iran.
Although neither country has openly admitted responsibility, the worm is widely understood to be a cyberweapon built jointly by the United States and Israel in a collaborative effort known as Operation Olympic Games.
Last modified: 2023-03-29
Sex toys

Cybersecurity is generally poor when it comes to commercial products. However when the product can cause a serious harm, it is a big deal.
Some sex toys have companion applications for phones, leaking data. Moreover, some even feature cameras and microphones, often for virtual sex or cybersex). These can be accessed by 3rd party and used for blackmail or revenge porn.
Other sex toys feature physical properties, which can under some circumstances, cause physical damage. One famous example is a chastity cage (also known as male chastity belt) when attacker can lock down your genitals.

And so far the scariest one it a pear flower anal plug made by QIUI. Product inspired by pear of anguish (medieval torture device). This one is potentially very dangerous toys which could cause a serious harm, since it can open up to 180 degrees. However I was unable to figure out if the actuation is handled via some motor, or if it is manual.

Bluetooth
The devices often connect to smart phones via Bluetooth, which is known for it's flawed design and terrible security model (for example bluesnarfing).
Projects
- The Internet Of Dongs Project is a project to hack sex toys to make them safer and more private
- Pen Test Partners provides cyber security consulting and testing to a huge variety of industries and organisations
- Privacy Not Included is web with product reviews by expert
Articles
- Why smart sex toys can do a whole lot of harm ... to your cyber security
- We need to talk about sex toys and cyber security
- Sex in the digital era – ESET reveals new research into security of smart sex toys
- Sex in the digital era: How secure are smart sex toys?
- Don’t Get Your Valentine an Internet-Connected Sex Toy
- Internet Of Dildos: A Long Way To A Vibrant Future – From IoT To IoD
Last modified: 2023-03-29
Archive encryption
It is easy to protect archive with a password, however common process will not encrypt the header (which contains the tree structure with file names).
7zip
\$ 7za -p'password' -mhe=on a archive_name.7z folder_name
\$ 7za -p -mhe=on a archive_name.7z folder_name
Where -p'password' sets the password and -mhe=on enables encryption of the header. If there is no string with password, user will be prompted to enter it - this way it will not be logged in terminal history.
Last modified: 2023-03-29
Famous hackers
Many people in this section are controversioal. Some have done questionable or even illegal things.
Last modified: 2023-03-29
Adrian Lamo

Adrián Alfonso Lamo Atwood (February 20, 1981 – March 14, 2018) was an American threat analyst and hacker. Lamo first gained media attention for breaking into several high-profile computer networks, including those of The New York Times, Yahoo!, and Microsoft, culminating in his 2003 arrest.
Lamo was best known for reporting U.S. soldier Chelsea Manning to Army criminal investigators in 2010 for leaking hundreds of thousands of sensitive U.S. government documents to WikiLeaks. Lamo died on March 14, 2018, at the age of 37.
Also known as the homeless hacker.
Known for
Adrian Lamo was known for unconventional life-style, mostly couch-surfing or squatting. Lamo was using rather simple and primitive methods of gaining access to restricted information. Most of the time, he used only web browser.
Additional sources
- Wikipedia
- The Screen Savers interview
- YouTube video: Who is Adrian Lamo?
- CBS News report: How Does Wikileaks Get Its Information
- YouTube video: Scary Mysteries: Homeless White Hat Hacker - Adrian Lamo
Last modified: 2023-03-29
Kevin Mitnick

Kevin Mitnick (born August 6, 1963) is an American computer security consultant, author, and convicted hacker. He is best known for his high-profile 1995 arrest and five years in prison for various computer and communications-related crimes.
Known for
- 1979: Social engineering into getting developer account at DEC because of peer pressure.
- 1981: Stealing computer manuals from Pacific Bell's switching center.
- 1982: Breaking into computers at the University of Southern California.
- 1987: Gained access into computers of a Santa Cruz software publisher.
- 1988: Going into DEC again to obtain copy of RSTS/E operating system (Source).
- 1992: Gained access into Pacific Bell voicemail computers to keep an eye on law enforcement personnel monitoring him.
The Pacific Bell voicemail's confirmed his suspicions and Kevin decided to run. In 1992 Kevin Mitnick became the most wanted hacker in the world.
Kevin Mitnick was arrested multiple times, but shit hit the fan in 1995 when he got arrested by FBI. He was put into prison for 4 years without trial, without bail hearing. In the end spent 5 years in prison, out of which 8 months were in solitary confinement.
This spawned Free Kevin movement, as the hacking community revolted against what they called a gross injustice.
There are multiple sources regarding Kevin Mitnick's story, most of it is from John Markoff's book Takedown, which was later made into movie Track Down (2000). Most of the mentioned allegations are unfounded gossip at best. And as expected, Kevin Mitnick claims that John Markoff's version of the story is fundamentally inaccurate. I recommend to watch documentary Freedom Downtime (2001), which was re-released in 2004 with additional footage and hour long interview with Kevin.
Currently
Since 2000, Mitnick has been a paid security consultant, public speaker, and author. He does security consulting for, performs penetration testing services, and teaches social engineering classes to companies and government agencies. His company Mitnick Security Consulting is based in Las Vegas, Nevada where he currently resides.
Additional sources
- Wikipedia
- Kevin Mitnick - The Most Infamous Hacker of All Time
- YouTube documentary on the life of Kevin Mitnick
- Documentary about Free Kevin movement: Freedom Downtime (2001)
Funny stories
Last modified: 2023-04-08
Public-key cryptography
Brief comparison of SSH keys
Comparing SSH Keys is a quite nice comparison, which could be summarized like so:
DSA- quite bad history of security problems caused by bad implementations
ECDSA/ECDSA-SK- uses elliptic curve
- in essence elliptic curve implementation of
DSA, improves speed but not security compared toDSA
Ed25519/Ed25519-SK- uses elliptic curve
- considered more secure than
ECDSA - quite popular
- really good go-to key type
RSA- most widely adopted
- Considered secure if at least 3072 bits long
ed25519 is a good choice, got with it is possifle. It has good security and good adoption.
ecdsa is also decent choice, but adoption is not great.
rsa is OK if you use keys of at least 3072 bits long. It is compatible with almost everything.
dsa should be last resort.
ECDSA vs ECDH vs Ed25519 vs Curve25519
- Curve25519 is a elliptic curve (mathematical thing).
- ECDH is protocol for key exchange for elliptic-curve algorithms.
- EdDSA is generic algorithm for public key cryptography using curves.
- Ed25519 is a
EdDSAusingCurve25519elliptic-curve. - ECDSA is re-implementation of DSA with
P-256elliptic-curve.
Last modified: 2023-05-16
Work from office sucks
There is a lot of contradicting oppinions and studies.
This is a mixture of cherry-picked articles and data to support my personal views and opinions. And above all, I just wanted to vent a bit, so take it all with grain of salt ;)
With COVID19, there was a massive wave of work from home. And recently there has been a push from employers and managers to get back into office. There is no denial, a lot of people like working from home and it is not going away.
So I thought I would try to create a brief yet comprehensive overview of benefits and drawbacks, along with arguments from both sides.
There is a lot to cover, so I tried to separate it into sections by individual topics. Each section has also a very brief TLDR subsection with summary.
Ecological effects
Over the years we have seen a lot of coverage, and a lot of contradicting arguments. Just search work from home environmental impact and you will be overwhelmed with articles of various opinions and qualities.
Few examples:
- 6 Surprising Environmental Impacts of Remotely Working from Home
- Telecommuting Could Save U.S. Over 700 Billion a Year and Much More
- 5 Ways Companies Can Embrace Sustainability in a Remote Work Setting And How It Will Impact Their Future Growth
- How Eco-Friendly Is Remote Working?
So, let's break it down.
Less commuting = less emissions?
There is no doubt that less commuting to work means less emissions - smaller \(CO_2\) footprint, cleaner air in cities, less traffic.
According to Globalization Partners, emissions were reduced by 25% to 34% in London due to COVID19 confinement measures. Forbes released an article: How Working From Home Could Save 11 Billion Road Miles, Cut Emissions.
On top of that the average American spends 52 minutes commuting to work.
Employees often with the new found flexibility will travel more to enjoy themselves, partially canceling out the initial savings in commuting. I have not found data to show how much more travel that is, but even if it cancels out completely, isn't it better to spend the \(CO_2\) footprint on enjoyable and relaxing trips rather then simply commute to work?
In world where it is either one or the other, I would argue that it is far better investment to work from home and travel for relaxation.
Waste of furniture and office equipment
Another argument against working from home is that reducing office space increases furniture waste.
This is nothing else than sunk cost fallacy and mentality "I bought it, so you will use it!". If you do not want to throw it away, sell it. If you can't sell it, then donate it. I am certain that a lot of people will welcome free office equipment for their new home office. Or give it to the next office renter.
The other side of the argument is the waste on employees side. They have purchased furniture and equipment to create a comfortable home office, which would go wasted if they have to get back to office.
In my personal opinion, this argument is invalid and frankly sounds hypocritical to me.
Higher energy consumption per household
Well, the only difference is where the electricity is consumed - office or home. Solution is simple - subsidize the bill.
TLDR
Financial effects and Real estate
To demonstrate the financial effects, I will focus on New York City, since I am a following it's situation for some time.
The property in New York was always pricey thanks to high demand, which has given birth to Billionaires' Row - in essence a safety deposit (safe investment) for the rich.
There is a well made documentary made by B1M: Why New York's Billionaires' Row Is Half Empty.
However many of the properties are vacant for years, some even from time before COVID19 (see YouTube playlist of walkthroughs thought dead city neighborhood). Then of course the pandemic has amplified the problem, thanks to lock downs and work from home. Since companies do not need the office space, the value is slowly going down as demonstrated in supply and demand economic model.

This is influencing also the government since according to New York City budget around 31% of the income is from property tax, which is determined from value of the property. New York will have to adjust to 9 billion dollar plunge in NYC commercial real estate.
After Pandemic, Shrinking Need for Office Space Could Crush Landlords ... this resembles China's problem with real estate.
China real estate bubble
For some context, majority of real-estate in China is sold as investment.
In China, general population has very limited options to invest. Deutsche Welle News: Homebuyers pay price for China's property meltdown provides a general overview.
This lead to entire cities being vacant, owned as investment. China's government then introduced a three red lines policy in 2020 which triggered a domino effect. Developers could not lend more money and could not finish already started projects. People did not want to pay mortgages for unfinished houses, especially since the construction has halted with no hope of resuming. Developers had to undercut the market to sell any real estate to raise capital, which in turn caused drop of real estate prices first time in 20 years.
29% of China's GDP was real estate in 2021, which is huge!
For comparison, in USA real estate accounted for 17% in 2022.
This bubble is ready to burst for some time, and the pop will likely be worse than the 2008 financial crisis simply due to the shear size.
12 billion lost, or gained?
Well, it very much depends on the perspective, look at the phrasing of this article: Remote Work Costing Manhattan More Than 12 Billion a Year, Report Says. In essence, the article is about people spending less money near their offices. But look at the wording - it is phrased that city and business are loosing money. Why?
One could also argue that it is actually 12 billion dollars saved by the employees, or simply spend elsewhere - in their local communities and small local business. So let me rephrase it:
Desperate attempts to fix the New York's problems
New York has passes new legislation to tax remote workers, resulting in double taxation if the employee does not live in New York but the employer resides there. In essence, employee has to pay tax in state of residence as well as tax in New York.
Regarding the real estate, property owners refuse to lower the prices, leading to low occupancy. Low occupancy then leads to lower traffic in the area which decreases profitability of said property. This in turn further lowers the attractiveness for potential renters or buyers, killing the occupancy numbers. Welcome infinite loop called real estate bubble.
There were some attempts to convert commercial real estate into residential, but that is not always possible. Consider your own requirements for apartment (even cheap one) - you will likely expect as bare minimum running water, toilet, shower and window. Now imagine typical office building ... how on earth you will slice it into apartments? The associated costs with the conversion would be astronomical.
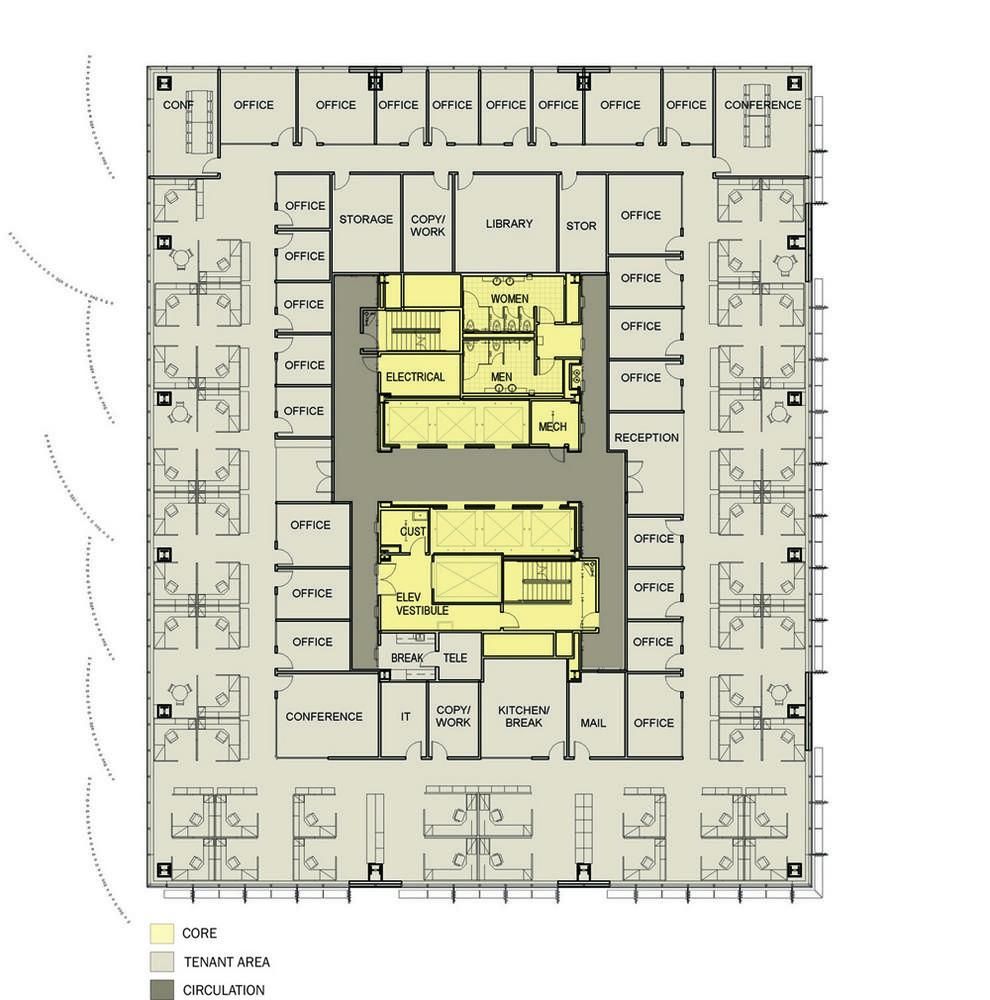
Not to mention the necessary legal challenge of changing the property from commercial into residential.
TLDR
Overpriced real estate property is common problem and now those who are hurting the most (financially) are government and property owners.
They force you to go back to office to stop hemorrhaging money they feel entitled to.
Work efficiency
Now a bit from my personal perspective. When the mandatory work from home hit me, it was hard - mostly because the company I worked for was not ready to support work from home. But eventually it improved and I started to like it.
I have saved a lot of money thanks to home cooking and had healthier foods. I could better arrange my day and work to my needs, it gave me great flexibility and I felt much less stressed.
Why programmers wear headphones and listen to music all the time?
While I was in the office, I was more-less forced to wear headphones and listen to music all the time. My office was not too big (thankfully not the open space monstrosity), but it had a few people in it.
And as programmer, my work requires concentration and creativity - basically I needed to get into the zone to be really productive. And this does take time, 30 minutes if I am lucky, hour or two when unlucky. And any interruption means I have to start all over - be it email notification, somebody asking me what is 1+1 or just slurping coffee too loud - it does not matter.
This is seriously frustrating and exhausting.

So one line of defense was to wear headphones to filter out the distracting elements and colleagues. Even though I hated to listen to music while working and it hindered my concentration, it was still preferable.
Important to say, I have nothing against them, it is just that they are not compatible with the zone.
And I am not the only one, there are other people having the same exact problem. Just a sample:
- How do you get into the zone? How long does it take? What steps do you take before?
- Software Engineers: How often do you get in the "zone" or "flow" while at work?
Are other people also more efficient from home?
According to article published by Tech.co: Working From Home Is More Efficient Than Ever.
In a January report based off this survey:
- 22.9% of workers said working remotely was hugely better than they'd expected
- 22% said it was substantially better
- 26.1% found it to be about the same
- 5.7% said it was worse
Last month, for instance, we covered a study out from the ADP Research Institute, which found that remote employees are slightly more optimistic than non-remote workers — 90% of remote workers report job satisfaction, while 82% of commuters do the same.
Plus, a full 64% of employees say they'd consider starting up a job search if their current boss asked them to return to the office full time.
What about socializing? Face-to-face feels better!
Well ... no. I myself am introvert and socializing drains me. Not to mention the in the zone problems.
Of course everything depends on the nature of the work. Trying to solve some technical problem with colleagues is better in the office, but listening to corporate lorem-ipsum power-point presentation is better spent with wireless headphones in the kitchen cooking lunch.
TLDR
Managers: The ultimate conspiracy
So after all of the arguments above, your manager still demands everyone to come back to the office and refuses to listen to voice of reason? As usual there is plethora of possible explanations, ranging from classic nonsense, all the way to large scale conspiracies. The financial aspect falls into the large-scale conspiracy. So to balance is out, here are some smaller-scale examples with anecdotal evidence.

Paid for results, not time
When the employee is in the office, it is very simple - the time starts with arrival and ends with departure. However with work from home, the employer looses this means of control and suddenly must trust the employee to put in the hours. Suddenly the only tangible evidence is the output (results). Interesting article about this from Forbes: The Real Reasons Why Companies Don't Want You To Work Remotely - Results Not Hours.
This is of course unacceptable to greedy overlords, because the employee could be done with work in half the time and slack of for the remainder, and yet be paid in full.
But why is this wrong? Shouldn't this be a reward to the employee for doing things more efficiently? For optimizing their work workflow or simply getting better at what they do? It is a common practice in classic on-premises work that efficient and fast employees are rewarded with more work. Which results in dissatisfaction and obvious countermeasures - "look busy" or "pretend you are working". There is simply no incentive for the employees to do better.
And work from home places the employee out of manager's supervision, so they can't so easily assign more work to them when they look "not busy".
Funnily enough, the sudden freedom from hawkish supervision opens up new possibilities, such as over-employment (there is a interesting subreddit r/overemployed). Maybe people practising over-employment do not reccomend it though. It is demanding and not sustainable in long run.
Over-employment is in essence joggling multiple employments at the same time. For example a experienced and good senior programmer will get employed twice for junior position. Junior positions because expectations are lower and deadlines are easy to meet. The idea being that monthly income from two or more junior positions is greater than from one senior position.
As with everything, over-employment has pros and cons.
Pros:
- Higher pay
- Lower fear of loosing job
Cons:
- Constant switching between tasks
- Stress from colliding meetings
- Increasing demands often result in burnout
- Might be illegal in certain locations
But maybe this whole approach should change as a study from Stanford professor shows:
In his research, economics professor John Pencavel found that productivity per hour decline sharply when a person works more than 50 hours a week. After 55 hours, productivity drops so much that putting in any more hours would be pointless. And, those who work up to 70 hours a week are only getting the same amount of work done as those who put in the 55 hours.
With this being said, employers should heavily invest their time into figuring out how to incentives working faster and more efficiently, instead of punishment. In a way, work from home seems like a good balance since the employee can "go home early" with no negative impact.
Then there is also the trade-off of productive and unproductive hours - when I found myself unproductive, rather than pushing though my limits, I would take time off (play a video-game for example) and return to work later. Basically exchanging useless time I would otherwise spend staring at the problem with no results, for a time of peak efficiency in late afternoon or maybe even weekend. However this requires mutual trust between employers and employees, which can be a problem.
Micromanagement and trust issues
This one is more on the bad manager side. Managers with need for micromanagement or trust issues will of course despise work from home. Suddenly they can't check if you work or slack off, they can't harass you as much as they would like, and so on.
This is not a problem of work from home, but problem of toxic management. And should be addressed as such.

Incompetent and manipulative management
Another example of bad and toxic management. Incompetent managers hate work from home, because suddenly their incompetence is visible and gaslights is harder. Let me elaborate.
Gaslighting is basically conscious intent to brainwash. It is a form of manipulation and psychological control, often associated with abusive relationships.
When working from home, it is much harder to keep the level of plausible deniability. When talking to someone in person, there is not record of what was said (under normal circumstances), and therefore it is possible to gaslight the employee.
However with work from home, it is not that easy to do when everything is written down in email. Not to mention that phone or video call conversations can be easily recorded.
Conclusion
If your employees like to work from home, let them. It is as simple as that. Listen to them and threat them as one of the most, if not the most, valuable asset.
Sticking to work from office just to keep price of real estate high and wallets of select few full is unsustainable and selfish. Sticking to work from office just to keep and eye on employees with hawkish supervision and distrust is avoiding the root cause of the problem - "employee = lazy thief" mindset.
In the end, it boils down to single question:
I would like to answer this question with a quote from my favorite TV show Star Trek:
Is this whole argument communist?
Maybe ... maybe ... but considering that automation is lately replacing more jobs than are added yearly, sooner or later a fundamental shift will be inevitable.
Nice made video from Kurzgesagt: The Rise of the Machines – Why Automation is Different this Time.
The society in Star Trek is technically socialist utopia, however it is necessary thanks to clean energy and replicators, which in essence rendered majority of jobs unnecessary. Captain Picard talks about economics of the future.
If we want to improve peoples lives, and truly take better care of the environment, we have to change.
Do I hate managers?
Depends, I hate people like this:
- CEO Celebrates Worker Who Sold Family Dog After He Demanded They Return to Office
- The ‘Pity City’ CEO Is Sorry Now
Last modified: 2023-05-15
Web sucks

Last modified: 2023-05-15
Gaming sucks
- How Good Games Go Bad video showcases some problems with:
- Valve's Team Fortress 2
- Ubisoft's Rainbow Six: Siege
- Nintendo's shitty treatment of their own fans
Last modified: 2023-05-15
Music sucks
Copyright industry is ruining the music and musicians
-
- TLDR: The annual revenue reports show record hight profits. But it is not enough, they want more!
-
- TLDR: The piracy is dropping, but industry refuses to acknowledge it.
-
Major Labels Claim Copyright Over Public Domain Songs; YouTube Punishes Musician
- TLDR: Musician Dave Colvin makes music, but gets slammed with copyright claims.
-
RIAA Launches Brand New Front Group Pretending To Represent Independent Artists
Fight against copyright
- Attempt To Put Every Musical Melody Into The Public Domain Demonstrates Craziness Of Modern Copyright
- TLDR: There is a limited number of possible melodies to be made, and to copyright-claim them is stupid (common practice nowadays). So Damien Riehl and Noah Rubin create a program to generate all possible melodies and put them into public domain to shield musicians from copyright claims.
- Tom Lehrer, Still Awesome, Releases Lyrics Into The Public Domain
Questionable
Last modified: 2023-04-08
sway
I used to use GNOME, and I was relatively happy with it. However there were problem. For example GNOME does not used configuration files like normal program, rather uses dconf and I hate it. It is very difficult to version the configuration as other dotfiles.
And then with GNOME version 40 came changes ... they changed keyboard shortcuts, they changed workspace layout, they changed preview ... just terrible. I hated these changes mostly because they were less efficient with screen space and also made no sense. So for a while I was using vertical-overview GNOME extension to fix these problems.
As the extension maintainer put it:
Gnome has had vertically stacked workspaces for a long time. The Gnome 40 update unfortunately made the switch to a horizontal layout. A choice that many Gnome users disagree with. This extension Aims to replace the new Gnome overview with something that resembles the old style.
But it was time to look for alternatives.
Friends of mine were using sway and it looked awesome! Not gonna lie, it took a while to get used to it, but the transition was worth it.
sway is quite modular, checkout section useful add ons in their wiki.
Installation
As with most of my systems, I handle the installation via meta packages. Here is the specific one for sway:
# Maintainer: Vojtech Vesely <vojtech.vesely@protonmail.com>

pkgname=wht_sway
pkgver=1.0.10
pkgrel=2
pkgdesc='archlinux meta package - sway desktop'
arch=('x86_64')
url='https://git.sr.ht/~atomicfs/atomicfs-repo-arch'
license=('MIT')
depends=(
  # Other meta packages
  'wht_system'

  # System stuff
  'networkmanager'  # Network connection manager and user applications
  'networkmanager-openvpn'  # NetworkManager VPN plugin for OpenVPN

  # Sway
  'bemenu-wayland'    # Wayland - wlroots-based compositors - renderer for bemenu
  'foot'      # Fast, lightweight, and minimalistic Wayland terminal emulator
  'greetd'    # Generic greeter daemon
  'greetd-tuigreet'  # A console UI greeter for greetd
  'kanshi'    # Dynamic output configuration for Wayland WMs
  'mako'      # Lightweight notification daemon for Wayland
  'sway'      # Tiling Wayland compositor and replacement for the i3 window manager
  'swaybg'    # Wallpaper tool for Wayland compositors
  'swaylock'  # Screen locker for Wayland
  'wl-clipboard'  # Command-line copy/paste utilities for Wayland
  'wlsunset'  # Day/night gamma adjustments for Wayland compositors
  'xorg-xwayland'  # run X clients under wayland

  # Sway statusbars
  'waybar'    # Highly customizable Wayland bar for Sway and Wlroots based compositors

  # Sway screenshots and screen sharing
  'grim'      # Screenshot utility for Wayland
  'slurp'     # Select a region in a Wayland compositor
  'wf-recorder'	# Screen recorder for wlroots-based compositors such as sway

  # Fonts
  'noto-fonts' # Google Noto TTF fonts
  'otf-font-awesome'  # Iconic font designed for Bootstrap
  'ttf-font-awesome'  # Iconic font designed for Bootstrap

  # Audio
  'pamixer'   # Pulseaudio command-line mixer like amixer
  'pavucontrol'  # PulseAudio Volume Control
  'pipewire'  # Low-latency audio/video router and processor
  'pipewire-pulse'  # Low-latency audio/video router and processor - PulseAudio replacement

  # Editors
  'zathura'	# Minimalistic document viewer
  'zathura-cb'
  'zathura-djvu'
  'zathura-pdf-poppler'
  'zathura-ps'

  # Utilities
  'exa'       # ls replacement
)
Add your user into the seat group. If the group does not exists, create it.
# gpasswd -a atom seat
Login manager
You do not need login manager, but I use it. Specifically tuigreet.

Edit the configuration file at /etc/greetd/config.toml:
[terminal]
# The VT to run the greeter on. Can be "next", "current" or a number
# designating the VT.
vt = 1

# The default session, also known as the greeter.
[default_session]

# `agreety` is the bundled agetty/login-lookalike. You can replace `$SHELL`
# with whatever you want started, such as `sway`.
command = "tuigreet --cmd sway --time --time-format '%F %T'"

# The user to run the command as. The privileges this user must have depends
# on the greeter. A graphical greeter may for example require the user to be
# in the `video` group.
user = "greeter"
And then enable the greetd.service and you are ready to go.
# systemctl enable greetd.service
Sway configuration
sway is configured by ~/.config/sway/config. It is usable from the start, but feel free to fool around ;)
Here is my main sway configuration file, but things were moved into separate files into ~/.config/sway/config.d/ directory
~/.config/sway/config
# Read `man 5 sway` for a complete reference.

# bind keys to codes instead of symbols so the bindings work in all KB layouts
set $bindkey bindsym --to-code
font pango:Noto Sans Mono 10

input type:keyboard {
	xkb_layout "us,cz"
	xkb_variant ",qwerty"
	xkb_options "grp:win_space_toggle"
	xkb_numlock enable
}

# Gaps
gaps inner 8
smart_gaps on

### Variables
#
# Logo key. Use Mod1 for Alt.
set $mod Mod4
# Home row direction keys, like vim
set $left h
set $down j
set $up k
set $right l
# Your preferred terminal emulator
set $term foot
# Your preferred application launcher
# Note: pass the final command to swaymsg so that the resulting window can be opened
# on the original workspace that the command was run on.
#set $menu dmenu_path | dmenu | xargs swaymsg exec --

### Key bindings
#
# Basics:
#
    # Start a terminal
    $bindkey $mod+Return exec $term

    # Kill focused window
    $bindkey $mod+Shift+q kill

    # Start your launcher
    #$bindkey $mod+d exec $menu
    $bindkey $mod+d exec bemenu-run --prompt ">"

    # Drag floating windows by holding down $mod and left mouse button.
    # Resize them with right mouse button + $mod.
    # Despite the name, also works for non-floating windows.
    # Change normal to inverse to use left mouse button for resizing and right
    # mouse button for dragging.
    floating_modifier $mod normal

    # Reload the configuration file
    $bindkey $mod+Shift+c reload

    # Exit sway (logs you out of your Wayland session)
    $bindkey $mod+Shift+e exec swaynag -t warning -m 'You pressed the exit shortcut. Do you really want to exit sway? This will end your Wayland session.' -B 'Yes, exit sway' 'swaymsg exit'
#
# Moving around:
#
    # Move your focus around
    $bindkey $mod+$left focus left
    $bindkey $mod+$down focus down
    $bindkey $mod+$up focus up
    $bindkey $mod+$right focus right
    # Or use $mod+[up|down|left|right]
    $bindkey $mod+Left focus left
    $bindkey $mod+Down focus down
    $bindkey $mod+Up focus up
    $bindkey $mod+Right focus right

    # Move the focused window with the same, but add Shift
    $bindkey $mod+Shift+$left move left
    $bindkey $mod+Shift+$down move down
    $bindkey $mod+Shift+$up move up
    $bindkey $mod+Shift+$right move right
    # Ditto, with arrow keys
    $bindkey $mod+Shift+Left move left
    $bindkey $mod+Shift+Down move down
    $bindkey $mod+Shift+Up move up
    $bindkey $mod+Shift+Right move right
#
# Workspaces:
#
    # Switch to workspace
    $bindkey $mod+1 workspace number 1
    $bindkey $mod+2 workspace number 2
    $bindkey $mod+3 workspace number 3
    $bindkey $mod+4 workspace number 4
    $bindkey $mod+5 workspace number 5
    $bindkey $mod+6 workspace number 6
    $bindkey $mod+7 workspace number 7
    $bindkey $mod+8 workspace number 8
    $bindkey $mod+9 workspace number 9
    $bindkey $mod+0 workspace number 10
    # Move focused container to workspace
    $bindkey $mod+Shift+1 move container to workspace number 1
    $bindkey $mod+Shift+2 move container to workspace number 2
    $bindkey $mod+Shift+3 move container to workspace number 3
    $bindkey $mod+Shift+4 move container to workspace number 4
    $bindkey $mod+Shift+5 move container to workspace number 5
    $bindkey $mod+Shift+6 move container to workspace number 6
    $bindkey $mod+Shift+7 move container to workspace number 7
    $bindkey $mod+Shift+8 move container to workspace number 8
    $bindkey $mod+Shift+9 move container to workspace number 9
    $bindkey $mod+Shift+0 move container to workspace number 10
    # Note: workspaces can have any name you want, not just numbers.
    # We just use 1-10 as the default.
#
# Layout stuff:
#
    # You can "split" the current object of your focus with
    # $mod+b or $mod+v, for horizontal and vertical splits
    # respectively.
    $bindkey $mod+b splith
    $bindkey $mod+v splitv

    # Switch the current container between different layout styles
    $bindkey $mod+s layout stacking
    $bindkey $mod+w layout tabbed
    $bindkey $mod+e layout toggle split

    # Make the current focus fullscreen
    $bindkey $mod+f fullscreen

    # Toggle the current focus between tiling and floating mode
    $bindkey $mod+Shift+space floating toggle

    # Swap focus between the tiling area and the floating area
    $bindkey $mod+space focus mode_toggle

    # Move focus to the parent container
    $bindkey $mod+a focus parent
#
# Scratchpad:
#
    # Sway has a "scratchpad", which is a bag of holding for windows.
    # You can send windows there and get them back later.

    # Move the currently focused window to the scratchpad
    $bindkey $mod+Shift+minus move scratchpad

    # Show the next scratchpad window or hide the focused scratchpad window.
    # If there are multiple scratchpad windows, this command cycles through them.
    $bindkey $mod+minus scratchpad show
#
# Resizing containers:
#
mode "resize" {
    # left will shrink the containers width
    # right will grow the containers width
    # up will shrink the containers height
    # down will grow the containers height
    $bindkey $left resize shrink width 10px
    $bindkey $down resize grow height 10px
    $bindkey $up resize shrink height 10px
    $bindkey $right resize grow width 10px

    # Ditto, with arrow keys
    $bindkey Left resize shrink width 10px
    $bindkey Down resize grow height 10px
    $bindkey Up resize shrink height 10px
    $bindkey Right resize grow width 10px

    # Return to default mode
    $bindkey Return mode "default"
    $bindkey Escape mode "default"
}
$bindkey $mod+r mode "resize"

# Volume keys
$bindkey XF86AudioRaiseVolume exec pamixer -i 5
$bindkey XF86AudioLowerVolume exec pamixer -d 5
$bindkey XF86AudioMute exec pamixer -t

# Brightness keys
$bindkey XF86MonBrightnessDown exec brightnessctl set 10%-
$bindkey XF86MonBrightnessUp exec brightnessctl set +10%

$bindkey $mod+o exec $swaylock

# Toggle screenbacklight
$bindkey $mod+Pause exec ${HOME}/.config/sway/scripts/backlight_toggle.sh

# Screenshots
set $screenshot grim "/tmp/screenshot_$(date +'%Y-%m-%d_%H-%M-%S-%N').png"
set $screenshot_sel grim -g "$(slurp)" "/tmp/screenshot_$(date +'%Y-%m-%d_%H-%M-%S-%N').png"
$bindkey $mod+Print exec $screenshot && notify-send --expire-time=2000 "Full screenshot saved as /tmp/screenshot_$(date +'%Y-%m-%d_%H-%M-%S-%N').png !"
$bindkey $mod+Shift+Print exec $screenshot_sel && notify-send --expire-time=2000 "Selection screenshot saved as /tmp/screenshot_$(date +'%Y-%m-%d_%H-%M-%S-%N').png!"


include /etc/sway/config.d/*
include ${HOME}/.config/sway/config.d/*.conf

exec_always "systemctl --user import-environment; systemctl --user start sway-session.target"
- Terminal opens with
Super+Enter swayconfig reloads withSuper+Shift+c.
Super key is the key with logo (often Windows logo)
Waybar configuration
While the default status bar is perfectly fine, I have decided recently to switch to waybar. It is cool and allows you to do all kinds of crazy stuff.
config
/* WARNING: Do not edit this file.
* It was generated by processing {{ yadm.source }}
*/
/* DOCS:
* https://github.com/Alexays/Waybar/wiki
*/
{
"layer": "bottom",
"position": "top",
"height": 30,
"spacing": 6, // Gaps between modules in pixels
"modules-left": [
"sway/workspaces",
"sway/mode",
"sway/scratchpad",
"custom/media"
],
"modules-center": [],
"modules-right": [
{% if yadm.hostname == "saturn" %}
"temperature#gpu",
{% endif %}
"temperature",
"battery",
"battery#bat2",
"backlight",
"network",
"cpu",
"memory",
"disk",
"pulseaudio",
"sway/language",
{% if yadm.hostname == "nomad" %}
//"custom/week",
"clock#dayshort",
{% else %}
"custom/week",
"clock#day",
{% endif %}
"clock"
],
"sway/mode": {
"format": "<span style=\"italic\">{}</span>"
},
"sway/scratchpad": {
"format": "{icon} {count}",
"show-empty": false,
"format-icons": ["", ""],
"tooltip": true,
"tooltip-format": "{app}: {title}"
},
"clock": {
"interval": 1,
"format": " {:%F %T}",
"tooltip-format": "<tt><small>{calendar}</small></tt>",
"calendar": {
"mode" : "year",
"mode-mon-col" : 3,
"weeks-pos" : "left",
"on-scroll" : 1,
"on-click-right": "mode",
"format": {
"months": "<span color='#ffead3'><b>{}</b></span>",
"days": "<span color='#ecc6d9'><b>{}</b></span>",
"weeks": "<span color='#99ffdd'><b>W{}</b></span>",
"weekdays": "<span color='#ffcc66'><b>{}</b></span>",
"today": "<span color='#ff6699'><b><u>{}</u></b></span>"
}
},
"actions": {
"on-click-right": "mode",
"on-click-forward": "tz_up",
"on-click-backward": "tz_down",
"on-scroll-up": "shift_up",
"on-scroll-down": "shift_down"
}
},
"clock#day": {
"interval": 60,
"format": " {:%a %B week:%V}"
},
"clock#dayshort": {
"interval": 60,
"format": " {:%a %B}"
},
"custom/week": {
"interval": 60,
"exec": "${HOME}/.config/sway/scripts/statusbar__day_of_the_week.sh",
"tooltip": false
},
"sway/language": {
"format": " {shortDescription}",
"tooltip-format": " {long}"
},
"cpu": {
"interval": 5,
"format": " {usage}% {avg_frequency} GHz",
"tooltip": true
},
"memory": {
"interval": 5,
"format": " {}%",
"tooltip-format": "Used: {used:0.1f} GiB\nAval: {avail:0.1f} GiB\nTotal: {total:0.1f} GiB"
},
"disk": {
"interval": 10,
"format": " {percentage_used}%",
"path": "/"
},
"temperature": {
"interval": 5,
{% if yadm.hostname == "saturn" %}
"hwmon-path": "/sys/class/hwmon/hwmon1/temp2_input",
{% endif %}
"format": " {temperatureC}°C"
},
{% if yadm.hostname == "saturn" %}
"temperature#gpu": {
"interval": 5,
"hwmon-path": "/sys/class/hwmon/hwmon3/temp1_input",
"format": " {temperatureC}°C"
},
{% endif %}
"backlight": {
// "device": "acpi_video1",
"format": " {percent}%"
},
"battery": {
"states": {
// "good": 95,
"warning": 30,
"critical": 15
},
"format": "{icon} {capacity}%",
"format-charging": " {capacity}%",
"format-plugged": " {capacity}%",
"format-alt": "{icon} {time}",
// "format-good": "", // An empty format will hide the module
// "format-full": "",
"format-icons": ["", "", "", "", ""]
},
"battery#bat2": {
"bat": "BAT2"
},
"network": {
// "interface": "wlp2*", // (Optional) To force the use of this interface
"interval": 5,
"family": "ipv4",
"format-wifi": " {essid} ({signalStrength}%)",
"format-ethernet": " {ipaddr}/{cidr}",
"tooltip-format": " {ifname} via {gwaddr}",
"format-linked": " {ifname} (No IP)",
"format-disconnected": " ⚠ Disconnected"
},
"pulseaudio": {
"scroll-step": 0,
"format": "{icon} {volume}% {format_source}",
"format-bluetooth": "{icon} {volume}% {format_source}",
"format-bluetooth-muted": " {icon} {format_source}",
"format-muted": " {format_source}",
"format-source": " {volume}%",
"format-source-muted": "",
"format-icons": {
"headphone": "",
"hands-free": "",
"headset": "",
"phone": "",
"portable": "",
"car": "",
"default": ["", "", ""]
},
"on-click": "pavucontrol"
}
}
style.css
* {
    /* `otf-font-awesome` is required to be installed for icons */
    font-family: FontAwesome, Noto Sans Mono;
    font-size: 14px;
}

window#waybar {
    background-color: rgba(43, 48, 59, 0.5);
    border-bottom: 3px solid rgba(100, 114, 125, 0.5);
    color: #ffffff;
    transition-property: background-color;
    transition-duration: .5s;
}

window#waybar.hidden {
    opacity: 0.2;
}

/*
window#waybar.empty {
    background-color: transparent;
}
window#waybar.solo {
    background-color: #FFFFFF;
}
*/

window#waybar.termite {
    background-color: #3F3F3F;
}

window#waybar.chromium {
    background-color: #000000;
    border: none;
}

button {
    /* Use box-shadow instead of border so the text isn't offset */
    box-shadow: inset 0 -3px transparent;
    /* Avoid rounded borders under each button name */
    border: none;
    border-radius: 0;
}

/* https://github.com/Alexays/Waybar/wiki/FAQ#the-workspace-buttons-have-a-strange-hover-effect */
button:hover {
    background: inherit;
    box-shadow: inset 0 -3px #ffffff;
}

#workspaces button {
    padding: 0 5px;
    background-color: transparent;
    /*background-color: #64727D;*/
    color: #ffffff;
}

#workspaces button:hover {
    background: rgba(0, 0, 0, 0.2);
}

#workspaces button.visible {
    background: rgba(0, 0, 0, 0.2);
}

#workspaces button.focused {
    background-color: #64727D;
    box-shadow: inset 0 -3px #ffffff;
}

#workspaces button.urgent {
    background-color: #eb4d4b;
}

#mode {
    background-color: #64727D;
    border-bottom: 3px solid #ffffff;
}

#clock,
#custom-week,
#battery,
#cpu,
#memory,
#disk,
#temperature,
#backlight,
#network,
#pulseaudio,
#wireplumber,
#custom-media,
#tray,
#mode,
#idle_inhibitor,
#scratchpad,
#mpd,
#language {
    padding: 0 10px;
    color: #dcdccc;
    /*background-color: rgba(41, 128, 185, 0.3);*/
    background-color: rgba(17, 17, 17, 0.8);
    border-top: 3px solid rgba(100, 114, 125, 0.8);
}

#window,
#workspaces {
    margin: 0 4px;
}

/* If workspaces is the leftmost module, omit left margin */
.modules-left > widget:first-child > #workspaces {
    margin-left: 0;
}

/* If workspaces is the rightmost module, omit right margin */
.modules-right > widget:last-child > #workspaces {
    margin-right: 0;
}

#clock {
}

#custom-week {
}

#battery {
}

#battery.charging, #battery.plugged {
}

@keyframes blink {
    to {
        background-color: #ffffff;
        color: #000000;
    }
}

#battery.critical:not(.charging) {
    background-color: #f53c3c;
    color: #ffffff;
    animation-name: blink;
    animation-duration: 0.5s;
    animation-timing-function: linear;
    animation-iteration-count: infinite;
    animation-direction: alternate;
}

label:focus {
    background-color: #000000;
}

#cpu {
    min-width: 120px;
}

#memory {
}

#disk {
}

#backlight {
}

#network {
}

#network.disconnected {
}

#pulseaudio {
}

#pulseaudio.muted {
}

#wireplumber {
}

#wireplumber.muted {
}

#custom-media {
    min-width: 100px;
}

#custom-media.custom-spotify {
}

#custom-media.custom-vlc {
}

#temperature {
}

#temperature.critical {
}

#tray {
}

#tray > .passive {
    -gtk-icon-effect: dim;
}

#tray > .needs-attention {
    -gtk-icon-effect: highlight;
}

#idle_inhibitor {
}

#idle_inhibitor.activated {
}

#mpd {
}

#mpd.disconnected {
}

#mpd.stopped {
}

#mpd.paused {
}

#language {
    min-width: 50px;
}

#keyboard-state {
    padding: 0 0px;
    margin: 0 5px;
    min-width: 16px;
}

#keyboard-state > label {
    padding: 0 5px;
}

#keyboard-state > label.locked {
}

#scratchpad {
}

#scratchpad.empty {
    background-color: transparent;
}
Inspiration
More can be found at r/unixporn, just look for sway.
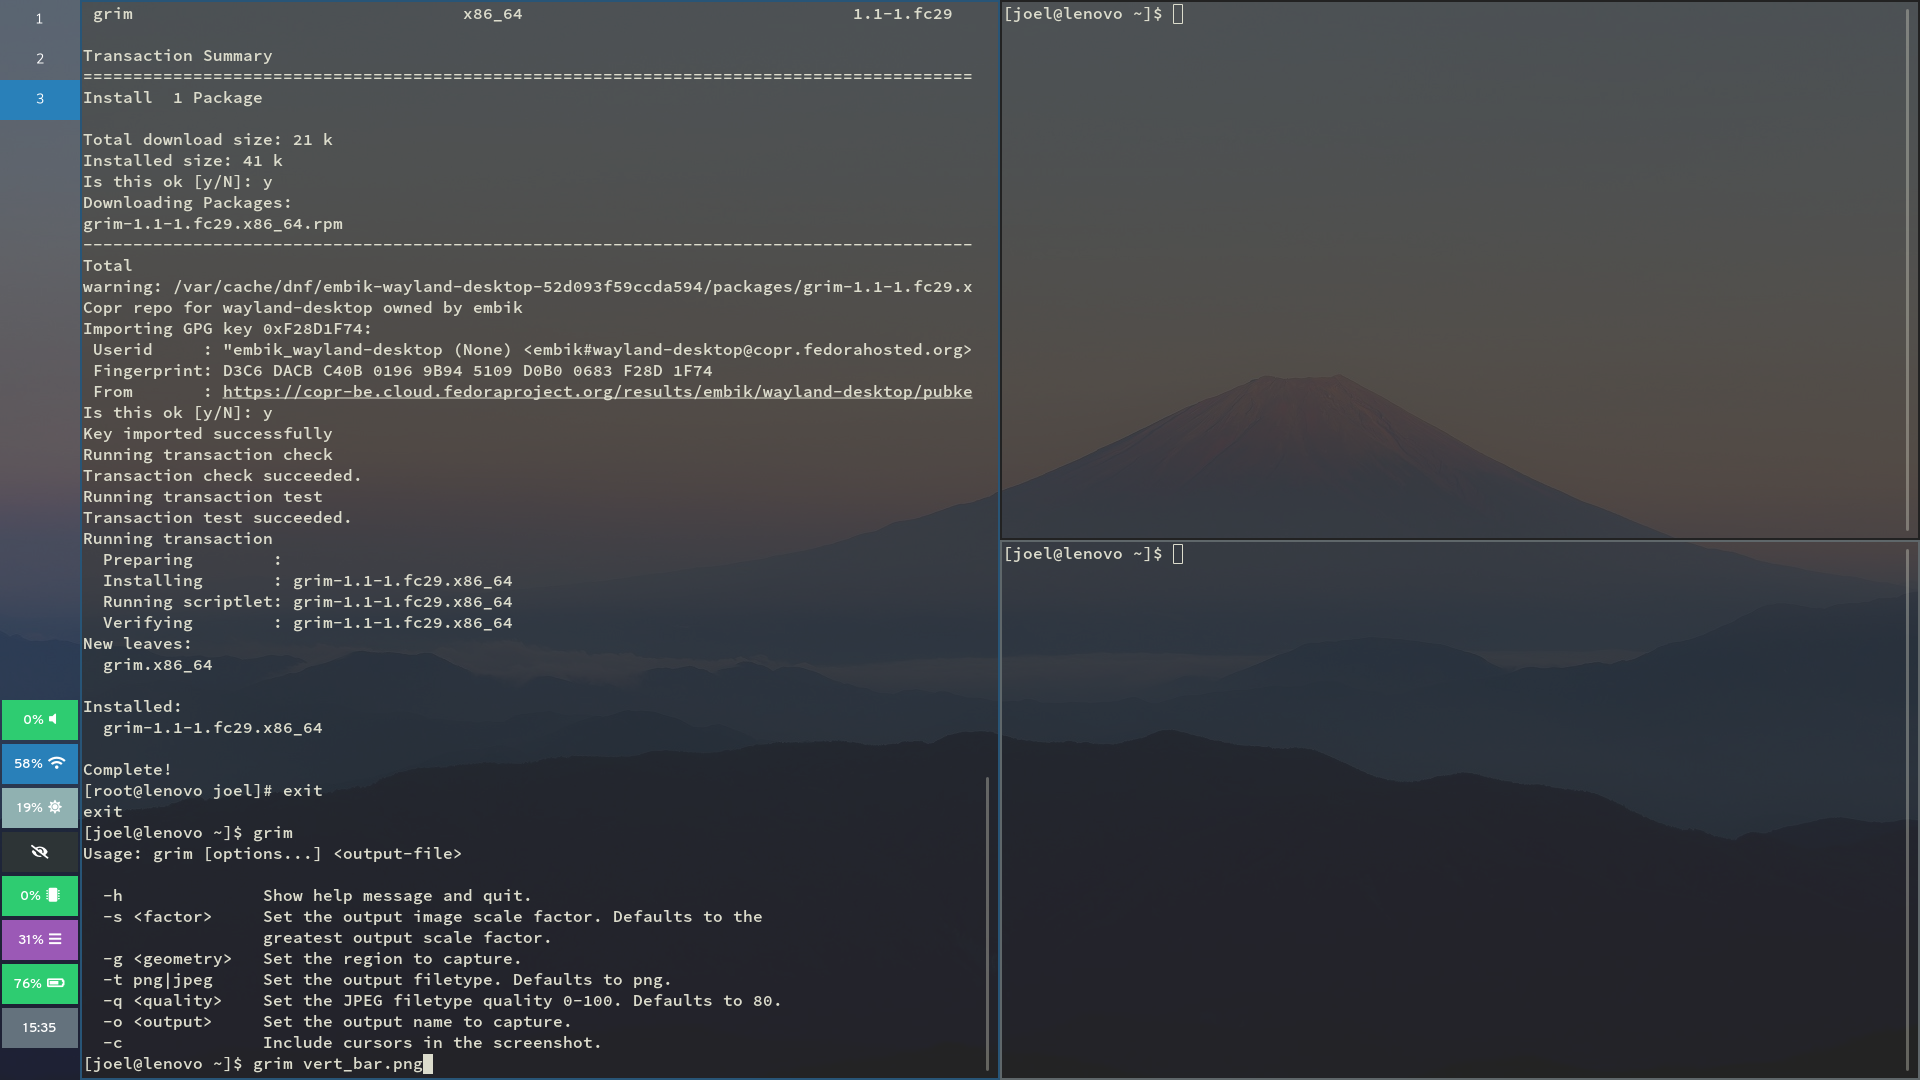
Last modified: 2023-03-29
aerc

aerc is a terminal-based e-mail client with Vim-style keybindings.
Let me just start by saying that sure, email is nice and all, but it is so obsolete technology.
And there are far too many "hotfixes" and additional layers of complexity just to keep it running these days in somewhat secure way. The protocol was simply not designed well, there is no security in mind, so many features were added on as afterthought and many things lack standardization.
I have underwent a process of creating my own email server and oh boy, that is a pain in the ass. So many loops and hoops you have to get though ...
aerc is a work in progress.
gmail does not work out of the box! You need 2FA (2 Factor Authentification) and special app password, but thankfully both of these are rather easy to setup.
It used to be enought to Allow Less Secure Apps in account settings, but that is no longer possible. See aerc mailing list: invalid credentials and Less secure apps & your Google Account
What I will describe here is setup of aerc to work offline and with multiple accounts. Regarding email providers, I will try to get following to work:
- Google / Gmail
- Microsoft / Outlook
- Protonmail
- Tutanota
- My personal email server
And I will use the following software:
- aerc = the email client, will serve as interface to emails stored locally on disk
- khard = console address book
- mbsync/isync with goimapnotify = synchronize mailboxes
- I want to use
goimapnotifyto get push notifications (mostly to save bandwidth, but the immediate mail delivery is also nice)
- I want to use
- keepassxc = password manager (to avoid saving passwords in config files)
- msmtp = SMTP client for sending emails (you need this for offline use)
Sources I have used for inspiration:
- https://takashiidobe.com/gen/offline-email.html
- Drew DeVault's blog post: aerc, mbsync, and postfix for maximum comfy offline email
- Google / Sign in with App Passwords
The structure
- all emails will be stored in MailDir format for offline use
- the local
MailDirwill be synchronised with email server viambsync/isync, triggered bygoimapnotifyusing push notifications - outgoing emails will be handled by
msmtpwhich will queue them until online aercwill be acting as user interfacekhardwill be used as address bookkeepassxcwill store passwords for the email accounts
The MailDir can be anywhere, but I will use ~/.mail, and each account will have it's subdirectory:
~/.mail
|-- account1
|   |-- INBOX
|   `-- ..
|-- account2
`-- ...
First issues
The first problem that I can see is that there is a lot of redundant configuration. The email accounts are defined in practically each of the used programs. If you have multiple accounts, it will be a lot of work.
Config files that need account details:
- aerc:
~/.config/aerc/accounts.conf - mbsync/isync:
~/.mbsyncrc(I will move this to~/.config/mbsyn/mbsyncrc.conf- do this in sync script) - goimapnotify:
~/.config/imapnotify/<account>.conf - msmtp:
~/.config/msmtp/config
I will start by configuring everything manually, one thing at the time, and slowly add on the layers. At the end, I will create a script for handling the configuration for me.
Last modified: 2023-03-29
The manual setup
This section describes the manual setup of everything. Feel free to skip to the semi-automatic setup.
| Stage | Sync mail | Sync trigger | Mail storage | Send mail | Passwords |
|---|---|---|---|---|---|
| 0 aerc | aerc | manual | none | aerc | aerc |
| 1 keepassxc | aerc | manual | none | aerc | keepassxc |
| 2 mbsync | mbsync | manual | maildir | aerc | keepassxc |
| 3 systemd | mbsync | systemd service | maildir | aerc | keepassxc |
| 4 msmtp | mbsync | systemd service | maildir | msmtp | keepassxc |
Stage 0: Test aerc and email access
First of all, make sure the you can connect with plain aerc to you account (at least one of them). I have use arec's build in wizard. This will get you default aerc experience.
Consider using email account with very few emails (maybe eve create a new one) since you might end up downloading it's content multiple times for debugging purposes.
Configuration file ~/.config/aerc/accounts.conf could look like this:
[tester@white-hat-hacker.icu]
source   = imaps://tester%40white-hat-hacker.icu:PASSWORD@mail.white-hat-hacker.icu:993
outgoing = smtps+plain://tester%40white-hat-hacker.icu:PASSWORD@mail.white-hat-hacker.icu:465
default  = INBOX
from     = tester <tester@white-hat-hacker.icu>
copy-to  = Sent
The user configuration file must be explicitly readable/writeable by its owner or aerc will fail (chmod 600).
PASSWORD is plain text password with URL encoding.
Stage 1: Configure keepassxc with secret service
Next step is to make sure that integration with keepassxc works. This is a bit clusterfuck of setting, but I will do my best to describe it.
Consider having the title and username identical in the keepassxc database, to avoid naming conflicts.
In the keepassxc in settings enable Enable Freedesktop.org Secret Service integration. Right below this should open up more settings (in keepassxc v 2.7.1 you have to save the new setting first to get access to configuration of the service itself).
So, below the Enable Freedesktop.org Secret Service integration should be now more settings available. In tab General, in the box Exposed database groups edit your database and expose the group with email accounts by going into Secret Service Integration, selecting Expose entries unser this group and there pick your group with email accounts.
If successful, you should have following:
At this moment I have created a test entry called test_secret_service in the exposed group with password 123abc. Then I have tried to retrieve it from terminal:
\$ secret-tool lookup "Title" "test_secret_service"
123abc
This means it works!
If you do not want to keep getting keepassxc database unlock prompts on every email refresh when the database is locked, uncheck the Promp to unlock database before searching.
Next, let's create a script ~/.local/email-stuff/get_password_from_secret_service.sh to retrieve the passwords (modified script from aerc-wiki):
#!/bin/sh

secret-tool lookup "\$1" "\$2"
# wait until the password is available
while [[ \$? != 0 ]]; do
	sleep 1
	secret-tool lookup "\$1" "\$2"
done
From now on you can replace plain-text passwords in configuration files with command to retrieve them from keepassxc.
If you are beeing bombarder with keepassxc that application requests access even though you pressed Allow All & Future, go to database settings and uncheck Confirm when passwords are retrieved by clients
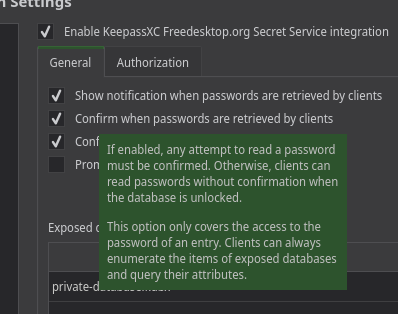
Stage 2: Download mail with mbsync/isync
Next, let's setup offline storage.
The name of the accouns and channels can be anything, but I decided to use username to keep things simple.
Emails will be synchronized over IMAP with mbsync/isync, config file at ~/.config/mbsyn/mbsyncrc.conf:
IMAPAccount tester@white-hat-hacker.icu
Host mail.white-hat-hacker.icu
User tester@white-hat-hacker.icu
#Pass
PassCmd "~/.local/email-stuff/get_password_from_secret_service.sh 'Title' 'tester@white-hat-hacker.icu'"
#
# Use SSL
SSLType IMAPS
# The following line should work. If you get certificate errors, uncomment the two following lines and read the "Troubleshooting" section.
CertificateFile /etc/ssl/certs/ca-certificates.crt
#CertificateFile ~/.cert/imap.gmail.com.pem
#CertificateFile ~/.cert/Equifax_Secure_CA.pem

IMAPStore tester@white-hat-hacker.icu-remote
Account tester@white-hat-hacker.icu

MaildirStore tester@white-hat-hacker.icu-local
SubFolders Verbatim
# The trailing "/" is important
Path ~/.mail/tester@white-hat-hacker.icu/
Inbox ~/.mail/tester@white-hat-hacker.icu/INBOX

Channel tester
Far :tester@white-hat-hacker.icu-remote:
Near :tester@white-hat-hacker.icu-local:
# Exclude everything under the internal [Gmail] folder, except the interesting folders
#Patterns * ![Gmail]* "[Gmail]/Sent Mail" "[Gmail]/Starred" "[Gmail]/All Mail"
# Or include everything
Patterns *
# Automatically create missing mailboxes, both locally and on the server
Create Both
# Sync the movement of messages between folders and deletions, add after making sure the sync works
Expunge Both
# Save the synchronization state files in the relevant directory
SyncState *
Now update config file for aerc:
diff --git a/.config/aerc/accounts.conf b/.config/aerc/accounts.conf
index efb5adf..7557c28 100644
--- a/.config/aerc/accounts.conf
+++ b/.config/aerc/accounts.conf
@@ -1,5 +1,5 @@
 [tester@white-hat-hacker.icu]
-source   = imaps://tester%40white-hat-hacker.icu:PASSWORD@mail.white-hat-hacker.icu:993
+source   = maildir://~/.mail/tester@white-hat-hacker.icu
 outgoing = smtps+plain://tester%40white-hat-hacker.icu:PASSWORD@mail.white-hat-hacker.icu:465
 default  = INBOX
 from     = tester <tester@white-hat-hacker.icu>
Create the appropriate directory before attempting to sync:
\$ mkdir -p ~/.mail/tester@white-hat-hacker.icu
Otherwise you get error:
Maildir error: cannot open store '~/.mail/tester@white-hat-hacker.icu/'
To synchronize the email (or download in this case), run command:
\$ mbsync --config ~/.config/mbsync/mbsyncrc.conf -a
Now when you run aerc, all emails should load instantly since they are store locally.
Stage 3: Automatic email retrieval
I will use mainly push notifications, however push notification is only triggered on arrival of new email. Therefore I need two systemd service types:
- trigger sync on boot / user login
- start push notifications
First is easy, create a systemd service ~/.config/systemd/user/mbsync.service:
[Unit]
Description=Mailbox synchronization service

[Service]
Type=oneshot
ExecStart=/usr/bin/mbsync --config ${HOME}/.config/mbsync/mbsyncrc.conf -Va

[Install]
WantedBy=default.target
Then enable the service:
systemctl enable --now --user mbsync.service
This service will synchronize the emails on boot or user login (I am not sure). But it will have to wait for keepassxc database to be unlocked anyway.
Now the push notification system. Let's create a override for the existing goimapnotify service:
systemctl edit --user goimapnotify@.service
 [Unit]
 Description=Execute scripts on IMAP mailbox changes (new/deleted/updated messages) using IDLE, golang version.
+After=mbsync

 [Service]
 Type=simple
 ExecStart=/usr/bin/goimapnotify -conf %h/.config/imapnotify/%i.conf
 Restart=always
 RestartSec=30

 [Install]
 WantedBy=default.target
This is to avoid conflict between push imapnotify and mbsync. (although they might have some lock-files ... well better safe than sorry)
Next is a configuration file for the imapnotify at ~/.config/imapnotify/testerwhite-hat-hackericu.conf:
{
  "host": "mail.white-hat-hacker.icu",
  "port": 993,
  "tls": true,
  "tlsOptions": {
    "rejectUnauthorized": false
  },
  "username": "tester@white-hat-hacker.icu",
  "passwordCmd": "~/.local/email-stuff/get_password_from_secret_service.sh 'Title' 'tester@white-hat-hacker.icu' | head -n1",
  "onNewMail": "mbsync --config ~/.config/mbsync/mbsyncrc.conf tester@white-hat-hacker.icu",
  "wait": 5,
  "boxes": [
    "INBOX"
  ]
}
The wait: 5 is there so that if you get multiple emails at once, the sync is not triggered on each email.
Now start and enable the service:
systemctl enable --now --user goimapnotify@testerwhite-hat-hackericu.service
And that is it for automatic synchronization with the server.
Stage 4: Send mail with msmtp
Next is offline sending of emails with msmtp. Or to be more specific, ability to write emails while offline and have them queued for later when online. Let's start with configuration file at $XDG_CONFIG_HOME/msmtp/config which is more less msmtp basic setup:
# Set default values for all following accounts.
defaults
auth           on
tls            on
tls_trust_file /etc/ssl/certs/ca-certificates.crt
logfile        ~/.cache/msmtp.log

# Gmail
account        tester@white-hat-hacker.icu
host           mail.white-hat-hacker.icu
port           465
from           tester@white-hat-hacker.icu
user           tester
#password       plain-text-password
passwordeval   "~/.local/email-stuff/get_password_from_secret_service.sh 'Title' 'tester@white-hat-hacker.icu'"

# A freemail service
#account        freemail
#host           smtp.freemail.example
#from           joe_smith@freemail.example

# Set a default account
account default : tester@white-hat-hacker.icu
The user configuration file must be explicitly readable/writeable by its owner or msmtp will fail (chmod 600).
Change the permissions:
chmod 600 \$XDG_CONFIG_HOME/msmtp/config
I have tried script from /usr/share/doc/msmtp/msmtpqueue/ (and I have changed the QUEUEDIR), but I had some issues. Instead I ended up using scripts from /usr/share/doc/msmtp/msmtpq/. Copy your selected scripts into ~/.local/email-stuff/ (I select this directory since the configuration is done by editing the script itself, so to keep it in your home).
The configuration is done by editing the msmtpq itself:
diff --git a/.local/email-stuff/msmtpq b/.local/email-stuff/msmtpq
index 1b39fc6..fcd3232 100755
--- a/.local/email-stuff/msmtpq
+++ b/.local/email-stuff/msmtpq
@@ -70,7 +70,7 @@ MSMTP=msmtp
 ##            ( chmod 0700 msmtp.queue )
 ##
 ## the queue dir - modify this to reflect where you'd like it to be  (no quotes !!)
-Q=~/.msmtp.queue
+Q=~/.mail/.msmtpqueue
 [ -d "$Q" ] || mkdir -m 0700 "$Q" || \
   err '' "msmtpq : can't find or create msmtp queue directory [ $Q ]" ''     # if not present - complain ; quit
 ##
@@ -84,7 +84,7 @@ Q=~/.msmtp.queue
 ##     (doing so would be inadvisable under most conditions, however)
 ##
 ## the queue log file - modify (or comment out) to taste  (but no quotes !!)
-LOG=~/log/msmtp.queue.log
+LOG=~/.cache/msmtp.queue.log
 ## ======================================================================================

 ## msmtpq can use the following environment variables :
Create the queue directory:
mkdir -p ~/.mail/.msmtpqueue
chmod 0700 ~/.mail/.msmtpqueue
As described in the readme, you can use msmtp-queue to work with the queue.
msmtp-queue usage :
-----------------

msmtp-queue offers the following options :

  msmtp-queue -r -- runs (flushes) all the contents of the queue

  msmtp-queue -R -- sends selected individual mail(s) in the queue

  msmtp-queue
  msmtp-queue -d -- displays the contents of the queue   (<-- default)

  msmtp-queue -p -- allows the specific purging of one or more mails

  msmtp-queue -a -- purges all mail in the queue

  msmtp-queue -h -- offers a helpful blurt
I don't know what would be the best automatic trigger to send the queued emails. Right now you can either run the command msmtp-queue -r, or just send another email which will trigger queue flush.
Probably the best option is systemd service with timer that will run msmtp-queue -r command.
Stage 5: email indexing with notmuch (Work-in-Progress)
First of all, I will move the configuration file into .config/notmuch where it belongs. So I am adding export NOTMUCH_CONFIG="${XDG_CONFIG_HOME}/notmuch/notmuch.conf" to ~/.bash_profile.
Now run notmuch setup and enter information accordingly. As for Top-level directory of your email archive enter your /home/USER/.mail. Then run notmuch new.
diff --git a/.config/systemd/user/mbsync.service b/.config/systemd/user/mbsync.service
index 6428b7c..b020fbf 100644
--- a/.config/systemd/user/mbsync.service
+++ b/.config/systemd/user/mbsync.service
@@ -4,6 +4,7 @@ Description=Mailbox synchronization service
 [Service]
 Type=oneshot
 ExecStart=/usr/bin/mbsync --config ${HOME}/.config/mbsync/mbsyncrc.conf -Va
+ExecStartPost=/usr/bin/notmuch new

 [Install]
 WantedBy=default.target
Then update the ~/.config/aerc/accounts.conf:
diff --git a/.config/aerc/accounts.conf b/.config/aerc/accounts.conf
index d2f133e..5c99162 100644
--- a/.config/aerc/accounts.conf
+++ b/.config/aerc/accounts.conf
@@ -1,5 +1,5 @@
 [tester@white-hat-hacker.icu]
-source   = maildir://~/.mail/tester@white-hat-hacker.icu
+source   = notmuch://~/.mail/tester@white-hat-hacker.icu
 outgoing = /home/atom/.local/email-stuff/msmtpq
 from     = <tester@white-hat-hacker.icu>
 default  = INBOX
With notmuch, deletion of files gets a bit complicated. Basically, via aerc you add a custom label and then can notmuch to cleanup. I will be mostly following this aerc: notmuch guide.
Create a script to syncrhonise and cleanup the maildir at ~/.local/email-stuff/mail-sync.sh:
#!/bin/sh

MBSYNC=\$(pgrep mbsync)
NOTMUCH=\$(pgrep notmuch)

if [ -n "\$MBSYNC" -o -n "\$NOTMUCH" ]; then
    echo "Already running one instance of mbsync or notmuch. Exiting..."
    exit 0
fi

echo "Deleting messages tagged as *deleted*"
notmuch search --format=text0 --output=files tag:deleted | xargs -0 --no-run-if-empty rm -v

mbsync --config \${HOME}/.config/mbsync/mbsyncrc.conf -Va
notmuch new
diff --git a/.config/imapnotify/testerwhite-hat-hackericu.conf b/.config/imapnotify/testerwhite-hat-hackericu.conf
index 711189e..3144fb8 100644
--- a/.config/imapnotify/testerwhite-hat-hackericu.conf
+++ b/.config/imapnotify/testerwhite-hat-hackericu.conf
@@ -7,7 +7,7 @@
   },
   "username": "tester@white-hat-hacker.icu",
   "passwordCmd": "~/.local/email-stuff/get_password_from_secret_service.sh 'Title' 'tester@white-hat-hacker.icu' | head -n1",
-  "onNewMail": "mbsync --config ~/.config/mbsync/mbsyncrc.conf tester@white-hat-hacker.icu",
+  "onNewMail": "~/.local/email-stuff/mail-sync.sh",
   "wait": 5,
   "boxes": [
     "INBOX"
This might not be optimal since now all accounts will be synchronised on arrival of one email, but you could theoretically pass along the account name and therefore optimise this.
Last modified: 2023-03-29
The automatic setup
Basic idea is to have single configuration file with definitions of all accounts, and then with script generate all other configuration files for all programs that require to account information (aerc, mbsync/isync, msmtp, ...).
I have written a Python script to handle the configuration, and it is placed at https://git.sr.ht/~atomicfs/aerc-offline-configurator.
It uses configparser to retrieve the data in a Python script. The script will then generate configuration files.
stuff
-
IMAP to get mail
-
SMTP to send mail
-
MailDir to store mail
-
Push notifications
-
For push notifications systemd services check out some kind of lock file
mbsync --config /tmp/pytest-of-atom/pytest-current/test__mbsync_livecurrent/mbsyncrc.conf/mbsyncrc.conf --list -a
Gmail
INBOX[Gmail]/All Mail[Gmail]/Drafts[Gmail]/Important[Gmail]/Sent Mail[Gmail]/Spam[Gmail]/Starred[Gmail]/Trash
Protonmail
INBOXAll MailArchiveDraftsSentSpamStarredTrash
white
INBOXtrashdraftsjunksent
seznam
INBOXarchivedraftssentspamtrash
Last modified: 2023-03-29
tmate
tmate is program for instant terminal sharing.
tmate is awesome! I use it quite often and it is superior to simple screen-sharing that seems to be industry standard. And it is usable right out of the box (see the webpage for details)!
I also host my own tmate server.
Last modified: 2023-03-29
Multiboot USB flash disk
Ventoy
Last modified: 2023-03-29
GRUB ISO
I always wanted to add Arch Linux ISO into boot options in GRUB, mostly because it is just convinient to have always at hand rescue ISO in case something goes wrong. While I do usually carry multiboot USB flash disk with me as keychain, it would be cooler to have such option right in the GRUB.
I know of grub-imageboot, but that project is quite a mess and not really maintained anymore - not only the AUR package, but also the project itself. I thought about taking it over / fixing it / forking it, but maybe later.
Anyway, I just wanted to put Arch Linux ISO into the /boot partition and have it in GRUB. Since ISO is fine. Not gonna lie, to get it working was pain, and it is still sub-optimal.
- GRUB/Tips_and_tricks
- Multiboot_USB_drive
- (GRUB) Booting arch installer iso from a partition on ssd
- floriandejonckheere/40_iso.cfg
- Boot arch from iso and grub2
- GNU GRUB Manual
However all of these such because they require you to hard-code values like /boot's UUID and ISO filename. Not to mention that they are distribution dependent (since each distro puts vmlinuz into different location).
Last modified: 2023-03-29
Self hosting
Few interesting links:
1: Service as a Software Substitute
Last modified: 2023-03-29
MariaDB

Last modified: 2023-04-08
Paperless
Paperless is an open source document management system that indexes your scanned documents and allows you to easily search for documents and store metadata alongside your documents.
A supercharged version of paperless: scan, index and archive all your physical documents.
I am going with bare-metal installation, and to manage all dependencies I use a meta package called wht_nas_paperless.
Most of these steps are taken from the documentation.
Bug
If you see this error log, it is known issue:
bad escape \d at position 7 : Traceback (most recent call last):
  File "/usr/lib/python3.10/site-packages/django_q/cluster.py", line 432, in worker
    res = f(*task["args"], **task["kwargs"])
  File "/usr/share/paperless/src/documents/tasks.py", line 154, in consume_file
    document = Consumer().try_consume_file(
  File "/usr/share/paperless/src/documents/consumer.py", line 334, in try_consume_file
    date = parse_date(self.filename, text)
  File "/usr/share/paperless/src/documents/parsers.py", line 221, in parse_date
    return next(parse_date_generator(filename, text), None)
  File "/usr/share/paperless/src/documents/parsers.py", line 280, in parse_date_generator
    yield from __process_content(text, settings.DATE_ORDER)
  File "/usr/share/paperless/src/documents/parsers.py", line 271, in __process_content
    date = __process_match(m, date_order)
  File "/usr/share/paperless/src/documents/parsers.py", line 262, in __process_match
    date = __parser(date_string, date_order)
  File "/usr/share/paperless/src/documents/parsers.py", line 235, in __parser
    return dateparser.parse(
  File "/usr/lib/python3.10/site-packages/dateparser/conf.py", line 92, in wrapper
    return f(*args, **kwargs)
  File "/usr/lib/python3.10/site-packages/dateparser/__init__.py", line 61, in parse
    data = parser.get_date_data(date_string, date_formats)
  File "/usr/lib/python3.10/site-packages/dateparser/date.py", line 456, in get_date_data
    parsed_date = _DateLocaleParser.parse(
  File "/usr/lib/python3.10/site-packages/dateparser/date.py", line 200, in parse
    return instance._parse()
  File "/usr/lib/python3.10/site-packages/dateparser/date.py", line 204, in _parse
    date_data = self._parsers[parser_name]()
  File "/usr/lib/python3.10/site-packages/dateparser/date.py", line 224, in _try_freshness_parser
    return freshness_date_parser.get_date_data(self._get_translated_date(), self._settings)
  File "/usr/lib/python3.10/site-packages/dateparser/date.py", line 262, in _get_translated_date
    self._translated_date = self.locale.translate(
  File "/usr/lib/python3.10/site-packages/dateparser/languages/locale.py", line 131, in translate
    relative_translations = self._get_relative_translations(settings=settings)
  File "/usr/lib/python3.10/site-packages/dateparser/languages/locale.py", line 159, in _get_relative_translations
    self._generate_relative_translations(normalize=True))
  File "/usr/lib/python3.10/site-packages/dateparser/languages/locale.py", line 173, in _generate_relative_translations
    pattern = DIGIT_GROUP_PATTERN.sub(r'?P<n>\d+', pattern)
  File "/usr/lib/python3.10/site-packages/regex/regex.py", line 710, in _compile_replacement_helper
    is_group, items = _compile_replacement(source, pattern, is_unicode)
  File "/usr/lib/python3.10/site-packages/regex/_regex_core.py", line 1737, in _compile_replacement
    raise error("bad escape \\%s" % ch, source.string, source.pos)
regex._regex_core.error: bad escape \d at position 7
- [BUG] regex._regex_core.error: bad escape \d at position 7 #1684
- [BUG] Paperless fails import at date parsing stage #1201
- [BUG] Paperless fails import at date parsing stage #1200
- [BUG] Upload fails due to date parsing errors #1188
They mostly blame ArchLinux packaging, which does not follow python's requirements.txt. In my opinion, pinning dependency to a specific version is not the solution.
The underlying problem is incompatibility of two or more python packages - they should have already open issues about it and hopefully it will be fixed soon.
UPDATE: Problem is fixed with python-dateparser v1.1.4.
Bug
As described in AUR/paperless-ngx, if you see following error:
Mar 10 21:36:21 ark systemd[1]: Started Paperless Celery Workers.
Mar 10 21:36:22 ark celery[284848]: Traceback (most recent call last):
Mar 10 21:36:22 ark celery[284848]:   File "/usr/bin/celery", line 33, in <module>
Mar 10 21:36:22 ark celery[284848]:     sys.exit(load_entry_point('celery==5.2.7', 'console_scripts', 'celery')())
Mar 10 21:36:22 ark celery[284848]:   File "/usr/lib/python3.10/site-packages/celery/__main__.py", line 15, in main
Mar 10 21:36:22 ark celery[284848]:     sys.exit(_main())
Mar 10 21:36:22 ark celery[284848]:   File "/usr/lib/python3.10/site-packages/celery/bin/celery.py", line 217, in main
Mar 10 21:36:22 ark celery[284848]:     return celery(auto_envvar_prefix="CELERY")
Mar 10 21:36:22 ark celery[284848]:   File "/usr/lib/python3.10/site-packages/click/core.py", line 1130, in __call__
Mar 10 21:36:22 ark celery[284848]:     return self.main(*args, **kwargs)
Mar 10 21:36:22 ark celery[284848]:   File "/usr/lib/python3.10/site-packages/click/core.py", line 1055, in main
Mar 10 21:36:22 ark celery[284848]:     rv = self.invoke(ctx)
Mar 10 21:36:22 ark celery[284848]:   File "/usr/lib/python3.10/site-packages/click/core.py", line 1655, in invoke
Mar 10 21:36:22 ark celery[284848]:     sub_ctx = cmd.make_context(cmd_name, args, parent=ctx)
Mar 10 21:36:22 ark celery[284848]:   File "/usr/lib/python3.10/site-packages/click/core.py", line 920, in make_context
Mar 10 21:36:22 ark celery[284848]:     self.parse_args(ctx, args)
Mar 10 21:36:22 ark celery[284848]:   File "/usr/lib/python3.10/site-packages/click/core.py", line 1378, in parse_args
Mar 10 21:36:22 ark celery[284848]:     value, args = param.handle_parse_result(ctx, opts, args)
Mar 10 21:36:22 ark celery[284848]:   File "/usr/lib/python3.10/site-packages/click/core.py", line 2360, in handle_parse_result
Mar 10 21:36:22 ark celery[284848]:     value = self.process_value(ctx, value)
Mar 10 21:36:22 ark celery[284848]:   File "/usr/lib/python3.10/site-packages/click/core.py", line 2316, in process_value
Mar 10 21:36:22 ark celery[284848]:     value = self.type_cast_value(ctx, value)
Mar 10 21:36:22 ark celery[284848]:   File "/usr/lib/python3.10/site-packages/click/core.py", line 2304, in type_cast_value
Mar 10 21:36:22 ark celery[284848]:     return convert(value)
Mar 10 21:36:22 ark celery[284848]:   File "/usr/lib/python3.10/site-packages/click/types.py", line 82, in __call__
Mar 10 21:36:22 ark celery[284848]:     return self.convert(value, param, ctx)
Mar 10 21:36:22 ark celery[284848]:   File "/usr/lib/python3.10/site-packages/celery/bin/worker.py", line 58, in convert
Mar 10 21:36:22 ark celery[284848]:     value = concurrency.get_implementation(worker_pool)
Mar 10 21:36:22 ark celery[284848]:   File "/usr/lib/python3.10/site-packages/celery/concurrency/__init__.py", line 28, in get_implementation
Mar 10 21:36:22 ark celery[284848]:     return symbol_by_name(cls, ALIASES)
Mar 10 21:36:22 ark celery[284848]:   File "/usr/lib/python3.10/site-packages/kombu/utils/imports.py", line 56, in symbol_by_name
Mar 10 21:36:22 ark celery[284848]:     module = imp(module_name, package=package, **kwargs)
Mar 10 21:36:22 ark celery[284848]:   File "/usr/lib/python3.10/importlib/__init__.py", line 126, in import_module
Mar 10 21:36:22 ark celery[284848]:     return _bootstrap._gcd_import(name[level:], package, level)
Mar 10 21:36:22 ark celery[284848]:   File "<frozen importlib._bootstrap>", line 1050, in _gcd_import
Mar 10 21:36:22 ark celery[284848]:   File "<frozen importlib._bootstrap>", line 1027, in _find_and_load
Mar 10 21:36:22 ark celery[284848]:   File "<frozen importlib._bootstrap>", line 1006, in _find_and_load_unlocked
Mar 10 21:36:22 ark celery[284848]:   File "<frozen importlib._bootstrap>", line 688, in _load_unlocked
Mar 10 21:36:22 ark celery[284848]:   File "<frozen importlib._bootstrap_external>", line 883, in exec_module
Mar 10 21:36:22 ark celery[284848]:   File "<frozen importlib._bootstrap>", line 241, in _call_with_frames_removed
Mar 10 21:36:22 ark celery[284848]:   File "/usr/lib/python3.10/site-packages/celery/concurrency/prefork.py", line 19, in <module>
Mar 10 21:36:22 ark celery[284848]:     from .asynpool import AsynPool
Mar 10 21:36:22 ark celery[284848]:   File "/usr/lib/python3.10/site-packages/celery/concurrency/asynpool.py", line 29, in <module>
Mar 10 21:36:22 ark celery[284848]:     from billiard.compat import buf_t, isblocking, setblocking
Mar 10 21:36:22 ark celery[284848]: ImportError: cannot import name 'buf_t' from 'billiard.compat' (/usr/lib/python3.10/site-packages/billiard/compat.py)
Mar 10 21:36:22 ark systemd[1]: paperless-task-queue.service: Main process exited, code=exited, status=1/FAILURE
Mar 10 21:36:22 ark systemd[1]: paperless-task-queue.service: Failed with result 'exit-code'.
The problem is that paperless-ngx requires python-billiard v3.x.x, and in Arch Linux there is already python-billiard v4.x.x. To fix this, you have to manually install the old python-billiard version.
The do
# systemctl restart paperless.target
Installation
The package itself comes from AUR. I have added it into my personal repository to be built.
Unfortunately there are many dependencies which are also in AUR, and I had to add them all manually :/
wht_server_paperless/PKGBUILD
# Maintainer: Vojtech Vesely <vojtech.vesely@protonmail.com>

pkgname=wht_server_paperless
pkgver=1.0.0
pkgrel=1
pkgdesc='archlinux meta package - set of multiple meta packages for paperless server'
arch=('x86_64')
url='https://git.sr.ht/~atomicfs/atomicfs-repo-arch'
license=('MIT')
depends=(
  # Other meta packages
  'wht_server_https'
  'wht_server_mariadb'

  # Services
  'paperless-ngx'   # A supercharged version of paperless: scan, index and archive all your physical documents

  # tesseract-data
  #   mostly for paperless-ngx
  'tesseract-data-afr'
  'tesseract-data-amh'
  'tesseract-data-ara'
  'tesseract-data-asm'
  'tesseract-data-aze'
  'tesseract-data-aze_cyrl'
  'tesseract-data-bel'
  'tesseract-data-ben'
  'tesseract-data-bod'
  'tesseract-data-bos'
  'tesseract-data-bre'
  'tesseract-data-bul'
  'tesseract-data-cat'
  'tesseract-data-ceb'
  'tesseract-data-ces'
  'tesseract-data-chi_sim'
  'tesseract-data-chi_tra'
  'tesseract-data-chr'
  'tesseract-data-cos'
  'tesseract-data-cym'
  'tesseract-data-dan'
  'tesseract-data-dan_frak'
  'tesseract-data-deu'
  'tesseract-data-deu_frak'
  'tesseract-data-div'
  'tesseract-data-dzo'
  'tesseract-data-ell'
  'tesseract-data-eng'
  'tesseract-data-enm'
  'tesseract-data-epo'
  'tesseract-data-equ'
  'tesseract-data-est'
  'tesseract-data-eus'
  'tesseract-data-fao'
  'tesseract-data-fas'
  'tesseract-data-fil'
  'tesseract-data-fin'
  'tesseract-data-fra'
  'tesseract-data-frk'
  'tesseract-data-frm'
  'tesseract-data-fry'
  'tesseract-data-gla'
  'tesseract-data-gle'
  'tesseract-data-glg'
  'tesseract-data-grc'
  'tesseract-data-guj'
  'tesseract-data-hat'
  'tesseract-data-heb'
  'tesseract-data-hin'
  'tesseract-data-hrv'
  'tesseract-data-hun'
  'tesseract-data-hye'
  'tesseract-data-iku'
  'tesseract-data-ind'
  'tesseract-data-isl'
  'tesseract-data-ita'
  'tesseract-data-ita_old'
  'tesseract-data-jav'
  'tesseract-data-jpn'
  'tesseract-data-jpn_vert'
  'tesseract-data-kan'
  'tesseract-data-kat'
  'tesseract-data-kat_old'
  'tesseract-data-kaz'
  'tesseract-data-khm'
  'tesseract-data-kir'
  'tesseract-data-kmr'
  'tesseract-data-kor'
  'tesseract-data-kor_vert'
  'tesseract-data-lao'
  'tesseract-data-lat'
  'tesseract-data-lav'
  'tesseract-data-lit'
  'tesseract-data-ltz'
  'tesseract-data-mal'
  'tesseract-data-mar'
  'tesseract-data-mkd'
  'tesseract-data-mlt'
  'tesseract-data-mon'
  'tesseract-data-mri'
  'tesseract-data-msa'
  'tesseract-data-mya'
  'tesseract-data-nep'
  'tesseract-data-nld'
  'tesseract-data-nor'
  'tesseract-data-oci'
  'tesseract-data-ori'
  'tesseract-data-pan'
  'tesseract-data-pol'
  'tesseract-data-por'
  'tesseract-data-pus'
  'tesseract-data-que'
  'tesseract-data-ron'
  'tesseract-data-rus'
  'tesseract-data-san'
  'tesseract-data-sin'
  'tesseract-data-slk'
  'tesseract-data-slk_frak'
  'tesseract-data-slv'
  'tesseract-data-snd'
  'tesseract-data-spa'
  'tesseract-data-spa_old'
  'tesseract-data-sqi'
  'tesseract-data-srp'
  'tesseract-data-srp_latn'
  'tesseract-data-sun'
  'tesseract-data-swa'
  'tesseract-data-swe'
  'tesseract-data-syr'
  'tesseract-data-tam'
  'tesseract-data-tat'
  'tesseract-data-tel'
  'tesseract-data-tgk'
  'tesseract-data-tgl'
  'tesseract-data-tha'
  'tesseract-data-tir'
  'tesseract-data-ton'
  'tesseract-data-tur'
  'tesseract-data-uig'
  'tesseract-data-ukr'
  'tesseract-data-urd'
  'tesseract-data-uzb'
  'tesseract-data-uzb_cyrl'
  'tesseract-data-vie'
  'tesseract-data-yid'
  'tesseract-data-yor'
)
Paperless will not allow symlinks to persistent storage! Since I run this on NAS with RAID (system disk is separate), my first thought was to create symlinks. That is not possible.
You can change the location of persistent storage for paperless, but I prefer to keep it default.
Since I use btrfs, I just created a new subvolume and mounted it at /var/lib/paperless.
Configuration
As for the configuration, most of it is default, I have just changed few things (mostly secrets, passwords and stuff). Importantly I have change PAPERLESS_DBPORT to what my MariaDB database is configured.
/etc/paperless.conf##template
This is a yadm template. I used template so that I can store passwords separatly in encrypted files.
# WARNING: Do not edit this file.
# It was generated by processing {{ yadm.source }}

# Have a look at the docs for documentation.
# https://paperless-ngx.readthedocs.io/en/latest/configuration.html

# Debug. Only enable this for development.

#PAPERLESS_DEBUG=false

# Required services

#PAPERLESS_REDIS=redis://localhost:6379
PAPERLESS_DBHOST=localhost
PAPERLESS_DBPORT=3306
#PAPERLESS_DBNAME=paperless
#PAPERLESS_DBUSER=paperless
#PAPERLESS_DBPASS=paperless
{% include "paperless.passwd" %}
#PAPERLESS_DBSSLMODE=prefer
PAPERLESS_DBENGINE=mariadb

# Paths and folders

PAPERLESS_CONSUMPTION_DIR=/var/lib/paperless/consume
PAPERLESS_DATA_DIR=/var/lib/paperless/data
#PAPERLESS_TRASH_DIR=
PAPERLESS_MEDIA_ROOT=/var/lib/paperless/media
PAPERLESS_STATICDIR=/usr/share/paperless/static
PAPERLESS_FILENAME_FORMAT={created_year}/{correspondent}/{created}__{title}
PAPERLESS_FILENAME_FORMAT_REMOVE_NONE=True

# Security and hosting

#PAPERLESS_SECRET_KEY=change-me
{% include "paperless.key" %}
#PAPERLESS_URL=https://example.com
#PAPERLESS_CSRF_TRUSTED_ORIGINS=https://example.com # can be set using PAPERLESS_URL
#PAPERLESS_ALLOWED_HOSTS=example.com,www.example.com # can be set using PAPERLESS_URL
#PAPERLESS_CORS_ALLOWED_HOSTS=https://localhost:8080,https://example.com # can be set using PAPERLESS_URL
#PAPERLESS_FORCE_SCRIPT_NAME=
#PAPERLESS_STATIC_URL=/static/
#PAPERLESS_AUTO_LOGIN_USERNAME=
#PAPERLESS_COOKIE_PREFIX=
#PAPERLESS_ENABLE_HTTP_REMOTE_USER=false

# OCR settings

#PAPERLESS_OCR_LANGUAGE=eng
#PAPERLESS_OCR_MODE=skip
#PAPERLESS_OCR_OUTPUT_TYPE=pdfa
#PAPERLESS_OCR_PAGES=1
#PAPERLESS_OCR_IMAGE_DPI=300
#PAPERLESS_OCR_CLEAN=clean
#PAPERLESS_OCR_DESKEW=true
#PAPERLESS_OCR_ROTATE_PAGES=true
#PAPERLESS_OCR_ROTATE_PAGES_THRESHOLD=12.0
#PAPERLESS_OCR_USER_ARGS={}
#PAPERLESS_CONVERT_MEMORY_LIMIT=0
PAPERLESS_CONVERT_TMPDIR=/var/lib/paperless/tmp

# Software tweaks

#PAPERLESS_TASK_WORKERS=1
#PAPERLESS_THREADS_PER_WORKER=1
#PAPERLESS_TIME_ZONE=UTC
#PAPERLESS_CONSUMER_POLLING=10
#PAPERLESS_CONSUMER_DELETE_DUPLICATES=false
#PAPERLESS_CONSUMER_RECURSIVE=false
#PAPERLESS_CONSUMER_IGNORE_PATTERNS=[".DS_STORE/*", "._*", ".stfolder/*", ".stversions/*", ".localized/*", "desktop.ini"]
#PAPERLESS_CONSUMER_SUBDIRS_AS_TAGS=false
#PAPERLESS_CONSUMER_ENABLE_BARCODES=false
#PAPERLESS_CONSUMER_BARCODE_STRING=PATCHT
#PAPERLESS_PRE_CONSUME_SCRIPT=/path/to/an/arbitrary/script.sh
#PAPERLESS_POST_CONSUME_SCRIPT=/path/to/an/arbitrary/script.sh
#PAPERLESS_FILENAME_DATE_ORDER=YMD
#PAPERLESS_FILENAME_PARSE_TRANSFORMS=[]
#PAPERLESS_NUMBER_OF_SUGGESTED_DATES=5
#PAPERLESS_THUMBNAIL_FONT_NAME=
#PAPERLESS_IGNORE_DATES=
#PAPERLESS_ENABLE_UPDATE_CHECK=

# Tika settings

#PAPERLESS_TIKA_ENABLED=false
#PAPERLESS_TIKA_ENDPOINT=http://localhost:9998
#PAPERLESS_TIKA_GOTENBERG_ENDPOINT=http://localhost:3000

# Binaries

#PAPERLESS_CONVERT_BINARY=/usr/bin/convert
#PAPERLESS_GS_BINARY=/usr/bin/gs

# Uploads

PAPERLESS_SCRATCH_DIR=/var/lib/paperless/uploads

# Webserver

GUNICORN_CMD_ARGS='--bind=127.0.0.1:7998'
Next, create paperless database (as defined in PAPERLESS_DBNAME). Also a user paperless (as defined in PAPERLESS_DBUSER) in the MariaDB and give it the password that you set in PAPERLESS_DBPASS. Do not forget to give this user access to the database.
# mariadb -u root -p
> CREATE DATABASE paperless;
> CREATE USER 'paperless'@'localhost' IDENTIFIED BY '<password>';
> GRANT ALL PRIVILEGES ON paperless.* TO 'paperless'@'localhost';
> FLUSH PRIVILEGES;
> quit
To list all databases:
SHOW DATABASES;
To list all users:
SELECT User FROM mysql.user;
Show user permissions:
SHOW GRANTS FOR 'user'@'localhost';
After initial setup (and also after updates), run database migration:
# sudo -u paperless paperless-manage migrate
Create admin:
# sudo -u paperless paperless-manage createsuperuser
At this point the paperless server should be available at localhost:7998 (I have change the default port!). Now let's set up nginx as a reverse proxy.
nginx
For HTTPS chek out Self-signed certificates for local network.
The /etc/nginx/nginx.conf is not that interesting.
/etc/nginx/nginx.conf
user http http;
worker_processes  1;

#error_log  logs/error.log;
#error_log  logs/error.log  notice;
#error_log  logs/error.log  info;

#pid        logs/nginx.pid;

events {
    multi_accept on;
    worker_connections  1024;
}

http {
    # MIME
    include       mime.types;
    default_type  application/octet-stream;

    # logging
    #log_format  main  '$remote_addr - $remote_user [$time_local] "$request" '
    #                  '$status $body_bytes_sent "$http_referer" '
    #                  '"$http_user_agent" "$http_x_forwarded_for"';
    access_log /var/log/nginx/access.log;
    error_log /var/log/nginx/error.log warn;

    charset utf-8;
    sendfile on;
    tcp_nopush on;
    tcp_nodelay on;
    server_tokens off;
    log_not_found off;
    types_hash_max_size 4096;
    client_max_body_size 100M;

    keepalive_timeout  65;

    # GZip
    gzip            on;
    gzip_min_length 1000;
    gzip_proxied    expired no-cache no-store private auth;
    gzip_types      text/plain;
    gzip_types      application/xml;
    gzip_types      application/json;
    gzip_types      application/javascript;
    gzip_types      application/octet-stream;
    gzip_types      text/css;

    # load configs
    include /etc/nginx/conf.d/*.conf;
    include /etc/nginx/sites-enabled/*;
}
However the /etc/nginx/sites-available/paperless.conf might give you a headache.
I looked at ArchLinux wiki / nginx / TLS, tried the Mozilla SSL Configuration Generator and I was still getting odd behavior. And when I finally got the login srceen for paperless, I got error after login CSRF verification failed.
Thankfully with a bit of searching the internets, I found a simple solution: add proxy_set_header X-Forwarded-Proto https;.
/etc/nginx/sites-available/paperless.conf
/etc/nginx/sites-available/paperless.conf
server {
	# generated 2022-12-02, Mozilla Guideline v5.6, nginx 1.17.7, OpenSSL 1.1.1k, modern configuration, no HSTS, no OCSP
	# https://ssl-config.mozilla.org/#server=nginx&version=1.17.7&config=modern&openssl=1.1.1k&hsts=false&ocsp=false&guideline=5.6

	listen 443 ssl http2;
	listen [::]:443 ssl http2;
	server_name paperless.ark;
	include private.conf;

	# SSL
	ssl_certificate /etc/ssl/private/ark.crt;
	ssl_certificate_key /etc/ssl/private/ark.key;
	ssl_session_timeout 1d;
	ssl_session_cache shared:MozSSL:10m;  # about 40000 sessions
	ssl_session_tickets off;

	# modern configuration
	ssl_protocols TLSv1.3;
	ssl_prefer_server_ciphers off;

	location / {
		# Adjust host and port as required.
		proxy_pass http://localhost:7998/;
		proxy_set_header X-Forwarded-Proto https;

		# These configuration options are required for WebSockets to work.
		proxy_http_version 1.1;
		proxy_set_header Upgrade $http_upgrade;
		proxy_set_header Connection "upgrade";

		proxy_redirect off;
		proxy_set_header Host $host;
		proxy_set_header X-Real-IP $remote_addr;
		proxy_set_header X-Forwarded-For $proxy_add_x_forwarded_for;
		proxy_set_header X-Forwarded-Host $server_name;
	}
}
So now you should be able to go to the paperless over HTTPS :D
I will likely see this error:
That is simply because you are using self-signed certificates. It is possible to fix this, but I am too lazy right now (maybe later).
Usage
I highly recommend to read the documentation / usage overview section.
Last modified: 2023-03-29
Pi-Hole
A black hole for Internet advertisements
Follow guide at ArchLinux wiki.
In essence install pi-hole-server from AUR and start pihole-FTL.service.
Configuration
/etc/nginx/sites-available/pihole.conf
/etc/nginx/sites-available/pihole.conf
# https://github.com/pi-hole/pi-hole/wiki/Nginx-Configuration

# generated 2023-03-08, Mozilla Guideline v5.6, nginx 1.17.7, OpenSSL 1.1.1k, modern configuration, no OCSP
# https://ssl-config.mozilla.org/#server=nginx&version=1.17.7&config=modern&openssl=1.1.1k&ocsp=false&guideline=5.6

server {
	listen 443 ssl http2 default_server;
	listen [::]:443 ssl http2 default_server;
	server_name pihole.falcon;
	include private.conf;

	root /srv/http/pihole;
	index pihole/index.php index.php index.html index.htm;
	autoindex off;

	# SSL
	ssl_certificate /etc/ssl/private/falcon.crt;
	ssl_certificate_key /etc/ssl/private/falcon_openssl_rsa.key;
	ssl_session_timeout 1d;
	ssl_session_cache shared:MozSSL:10m;  # about 40000 sessions
	ssl_session_tickets off;

	# modern configuration
	ssl_protocols TLSv1.3;
	ssl_prefer_server_ciphers off;

	# HSTS (ngx_http_headers_module is required) (63072000 seconds)
	add_header Strict-Transport-Security "max-age=63072000" always;

	proxy_intercept_errors on;
	error_page 404 /pihole/index.php;

	location / {
		expires max;
		try_files $uri $uri/ =404;
		add_header X-Pi-hole "A black hole for Internet advertisements";
	}

	location ~ \.php$ {
		include fastcgi.conf;
		fastcgi_intercept_errors on;
		fastcgi_pass  unix:/run/php-fpm/php-fpm.sock;
		fastcgi_param SERVER_NAME $host;
	}

	location /admin {
		root /srv/http/pihole;
		index index.php index.html index.htm;
		add_header X-Pi-hole "The Pi-hole Web interface is working!";
		add_header X-Frame-Options "DENY";
	}

	location ~ /\.ttf {
		add_header Access-Control-Allow-Origin "*";
	}

	location ~ /admin/\. {
		deny all;
	}

	location ~ /\.ht {
		deny all;
	}
}
/etc/php/php.ini
[PHP]
;;;;;;;;;;;;;;;;;;;
; About php.ini ;
;;;;;;;;;;;;;;;;;;;
; PHP's initialization file, generally called php.ini, is responsible for
; configuring many of the aspects of PHP's behavior.
; PHP attempts to find and load this configuration from a number of locations.
; The following is a summary of its search order:
; 1. SAPI module specific location.
; 2. The PHPRC environment variable. (As of PHP 5.2.0)
; 3. A number of predefined registry keys on Windows (As of PHP 5.2.0)
; 4. Current working directory (except CLI)
; 5. The web server's directory (for SAPI modules), or directory of PHP
; (otherwise in Windows)
; 6. The directory from the --with-config-file-path compile time option, or the
; Windows directory (usually C:\windows)
; See the PHP docs for more specific information.
; https://php.net/configuration.file
; The syntax of the file is extremely simple. Whitespace and lines
; beginning with a semicolon are silently ignored (as you probably guessed).
; Section headers (e.g. [Foo]) are also silently ignored, even though
; they might mean something in the future.
; Directives following the section heading [PATH=/www/mysite] only
; apply to PHP files in the /www/mysite directory. Directives
; following the section heading [HOST=www.example.com] only apply to
; PHP files served from www.example.com. Directives set in these
; special sections cannot be overridden by user-defined INI files or
; at runtime. Currently, [PATH=] and [HOST=] sections only work under
; CGI/FastCGI.
; https://php.net/ini.sections
; Directives are specified using the following syntax:
; directive = value
; Directive names are *case sensitive* - foo=bar is different from FOO=bar.
; Directives are variables used to configure PHP or PHP extensions.
; There is no name validation. If PHP can't find an expected
; directive because it is not set or is mistyped, a default value will be used.
; The value can be a string, a number, a PHP constant (e.g. E_ALL or M_PI), one
; of the INI constants (On, Off, True, False, Yes, No and None) or an expression
; (e.g. E_ALL & ~E_NOTICE), a quoted string ("bar"), or a reference to a
; previously set variable or directive (e.g. ${foo})
; Expressions in the INI file are limited to bitwise operators and parentheses:
; | bitwise OR
; ^ bitwise XOR
; & bitwise AND
; ~ bitwise NOT
; ! boolean NOT
; Boolean flags can be turned on using the values 1, On, True or Yes.
; They can be turned off using the values 0, Off, False or No.
; An empty string can be denoted by simply not writing anything after the equal
; sign, or by using the None keyword:
; foo = ; sets foo to an empty string
; foo = None ; sets foo to an empty string
; foo = "None" ; sets foo to the string 'None'
; If you use constants in your value, and these constants belong to a
; dynamically loaded extension (either a PHP extension or a Zend extension),
; you may only use these constants *after* the line that loads the extension.
;;;;;;;;;;;;;;;;;;;
; About this file ;
;;;;;;;;;;;;;;;;;;;
; PHP comes packaged with two INI files. One that is recommended to be used
; in production environments and one that is recommended to be used in
; development environments.
; php.ini-production contains settings which hold security, performance and
; best practices at its core. But please be aware, these settings may break
; compatibility with older or less security conscience applications. We
; recommending using the production ini in production and testing environments.
; php.ini-development is very similar to its production variant, except it is
; much more verbose when it comes to errors. We recommend using the
; development version only in development environments, as errors shown to
; application users can inadvertently leak otherwise secure information.
; This is the php.ini-production INI file.
;;;;;;;;;;;;;;;;;;;
; Quick Reference ;
;;;;;;;;;;;;;;;;;;;
; The following are all the settings which are different in either the production
; or development versions of the INIs with respect to PHP's default behavior.
; Please see the actual settings later in the document for more details as to why
; we recommend these changes in PHP's behavior.
; display_errors
; Default Value: On
; Development Value: On
; Production Value: Off
; display_startup_errors
; Default Value: On
; Development Value: On
; Production Value: Off
; error_reporting
; Default Value: E_ALL
; Development Value: E_ALL
; Production Value: E_ALL & ~E_DEPRECATED & ~E_STRICT
; log_errors
; Default Value: Off
; Development Value: On
; Production Value: On
; max_input_time
; Default Value: -1 (Unlimited)
; Development Value: 60 (60 seconds)
; Production Value: 60 (60 seconds)
; output_buffering
; Default Value: Off
; Development Value: 4096
; Production Value: 4096
; register_argc_argv
; Default Value: On
; Development Value: Off
; Production Value: Off
; request_order
; Default Value: None
; Development Value: "GP"
; Production Value: "GP"
; session.gc_divisor
; Default Value: 100
; Development Value: 1000
; Production Value: 1000
; session.sid_bits_per_character
; Default Value: 4
; Development Value: 5
; Production Value: 5
; short_open_tag
; Default Value: On
; Development Value: Off
; Production Value: Off
; variables_order
; Default Value: "EGPCS"
; Development Value: "GPCS"
; Production Value: "GPCS"
; zend.exception_ignore_args
; Default Value: Off
; Development Value: Off
; Production Value: On
; zend.exception_string_param_max_len
; Default Value: 15
; Development Value: 15
; Production Value: 0
;;;;;;;;;;;;;;;;;;;;
; php.ini Options ;
;;;;;;;;;;;;;;;;;;;;
; Name for user-defined php.ini (.htaccess) files. Default is ".user.ini"
;user_ini.filename = ".user.ini"
; To disable this feature set this option to an empty value
;user_ini.filename =
; TTL for user-defined php.ini files (time-to-live) in seconds. Default is 300 seconds (5 minutes)
;user_ini.cache_ttl = 300
;;;;;;;;;;;;;;;;;;;;
; Language Options ;
;;;;;;;;;;;;;;;;;;;;
; Enable the PHP scripting language engine under Apache.
; https://php.net/engine
engine = On
; This directive determines whether or not PHP will recognize code between
; <? and ?> tags as PHP source which should be processed as such. It is
; generally recommended that <?php and ?> should be used and that this feature
; should be disabled, as enabling it may result in issues when generating XML
; documents, however this remains supported for backward compatibility reasons.
; Note that this directive does not control the <?= shorthand tag, which can be
; used regardless of this directive.
; Default Value: On
; Development Value: Off
; Production Value: Off
; https://php.net/short-open-tag
short_open_tag = Off
; The number of significant digits displayed in floating point numbers.
; https://php.net/precision
precision = 14
; Output buffering is a mechanism for controlling how much output data
; (excluding headers and cookies) PHP should keep internally before pushing that
; data to the client. If your application's output exceeds this setting, PHP
; will send that data in chunks of roughly the size you specify.
; Turning on this setting and managing its maximum buffer size can yield some
; interesting side-effects depending on your application and web server.
; You may be able to send headers and cookies after you've already sent output
; through print or echo. You also may see performance benefits if your server is
; emitting less packets due to buffered output versus PHP streaming the output
; as it gets it. On production servers, 4096 bytes is a good setting for performance
; reasons.
; Note: Output buffering can also be controlled via Output Buffering Control
; functions.
; Possible Values:
; On = Enabled and buffer is unlimited. (Use with caution)
; Off = Disabled
; Integer = Enables the buffer and sets its maximum size in bytes.
; Note: This directive is hardcoded to Off for the CLI SAPI
; Default Value: Off
; Development Value: 4096
; Production Value: 4096
; https://php.net/output-buffering
output_buffering = 4096
; You can redirect all of the output of your scripts to a function. For
; example, if you set output_handler to "mb_output_handler", character
; encoding will be transparently converted to the specified encoding.
; Setting any output handler automatically turns on output buffering.
; Note: People who wrote portable scripts should not depend on this ini
; directive. Instead, explicitly set the output handler using ob_start().
; Using this ini directive may cause problems unless you know what script
; is doing.
; Note: You cannot use both "mb_output_handler" with "ob_iconv_handler"
; and you cannot use both "ob_gzhandler" and "zlib.output_compression".
; Note: output_handler must be empty if this is set 'On' !!!!
; Instead you must use zlib.output_handler.
; https://php.net/output-handler
;output_handler =
; URL rewriter function rewrites URL on the fly by using
; output buffer. You can set target tags by this configuration.
; "form" tag is special tag. It will add hidden input tag to pass values.
; Refer to session.trans_sid_tags for usage.
; Default Value: "form="
; Development Value: "form="
; Production Value: "form="
;url_rewriter.tags
; URL rewriter will not rewrite absolute URL nor form by default. To enable
; absolute URL rewrite, allowed hosts must be defined at RUNTIME.
; Refer to session.trans_sid_hosts for more details.
; Default Value: ""
; Development Value: ""
; Production Value: ""
;url_rewriter.hosts
; Transparent output compression using the zlib library
; Valid values for this option are 'off', 'on', or a specific buffer size
; to be used for compression (default is 4KB)
; Note: Resulting chunk size may vary due to nature of compression. PHP
; outputs chunks that are few hundreds bytes each as a result of
; compression. If you prefer a larger chunk size for better
; performance, enable output_buffering in addition.
; Note: You need to use zlib.output_handler instead of the standard
; output_handler, or otherwise the output will be corrupted.
; https://php.net/zlib.output-compression
zlib.output_compression = Off
; https://php.net/zlib.output-compression-level
;zlib.output_compression_level = -1
; You cannot specify additional output handlers if zlib.output_compression
; is activated here. This setting does the same as output_handler but in
; a different order.
; https://php.net/zlib.output-handler
;zlib.output_handler =
; Implicit flush tells PHP to tell the output layer to flush itself
; automatically after every output block. This is equivalent to calling the
; PHP function flush() after each and every call to print() or echo() and each
; and every HTML block. Turning this option on has serious performance
; implications and is generally recommended for debugging purposes only.
; https://php.net/implicit-flush
; Note: This directive is hardcoded to On for the CLI SAPI
implicit_flush = Off
; The unserialize callback function will be called (with the undefined class'
; name as parameter), if the unserializer finds an undefined class
; which should be instantiated. A warning appears if the specified function is
; not defined, or if the function doesn't include/implement the missing class.
; So only set this entry, if you really want to implement such a
; callback-function.
unserialize_callback_func =
; The unserialize_max_depth specifies the default depth limit for unserialized
; structures. Setting the depth limit too high may result in stack overflows
; during unserialization. The unserialize_max_depth ini setting can be
; overridden by the max_depth option on individual unserialize() calls.
; A value of 0 disables the depth limit.
;unserialize_max_depth = 4096
; When floats & doubles are serialized, store serialize_precision significant
; digits after the floating point. The default value ensures that when floats
; are decoded with unserialize, the data will remain the same.
; The value is also used for json_encode when encoding double values.
; If -1 is used, then dtoa mode 0 is used which automatically select the best
; precision.
serialize_precision = -1
; open_basedir, if set, limits all file operations to the defined directory
; and below. This directive makes most sense if used in a per-directory
; or per-virtualhost web server configuration file.
; Note: disables the realpath cache
; https://php.net/open-basedir
;open_basedir =
; This directive allows you to disable certain functions.
; It receives a comma-delimited list of function names.
; https://php.net/disable-functions
disable_functions =
; This directive allows you to disable certain classes.
; It receives a comma-delimited list of class names.
; https://php.net/disable-classes
disable_classes =
; Colors for Syntax Highlighting mode. Anything that's acceptable in
; <span style="color: ???????"> would work.
; https://php.net/syntax-highlighting
;highlight.string = #DD0000
;highlight.comment = #FF9900
;highlight.keyword = #007700
;highlight.default = #0000BB
;highlight.html = #000000
; If enabled, the request will be allowed to complete even if the user aborts
; the request. Consider enabling it if executing long requests, which may end up
; being interrupted by the user or a browser timing out. PHP's default behavior
; is to disable this feature.
; https://php.net/ignore-user-abort
;ignore_user_abort = On
; Determines the size of the realpath cache to be used by PHP. This value should
; be increased on systems where PHP opens many files to reflect the quantity of
; the file operations performed.
; Note: if open_basedir is set, the cache is disabled
; https://php.net/realpath-cache-size
;realpath_cache_size = 4096k
; Duration of time, in seconds for which to cache realpath information for a given
; file or directory. For systems with rarely changing files, consider increasing this
; value.
; https://php.net/realpath-cache-ttl
;realpath_cache_ttl = 120
; Enables or disables the circular reference collector.
; https://php.net/zend.enable-gc
zend.enable_gc = On
; If enabled, scripts may be written in encodings that are incompatible with
; the scanner. CP936, Big5, CP949 and Shift_JIS are the examples of such
; encodings. To use this feature, mbstring extension must be enabled.
;zend.multibyte = Off
; Allows to set the default encoding for the scripts. This value will be used
; unless "declare(encoding=...)" directive appears at the top of the script.
; Only affects if zend.multibyte is set.
;zend.script_encoding =
; Allows to include or exclude arguments from stack traces generated for exceptions.
; In production, it is recommended to turn this setting on to prohibit the output
; of sensitive information in stack traces
; Default Value: Off
; Development Value: Off
; Production Value: On
zend.exception_ignore_args = On
; Allows setting the maximum string length in an argument of a stringified stack trace
; to a value between 0 and 1000000.
; This has no effect when zend.exception_ignore_args is enabled.
; Default Value: 15
; Development Value: 15
; Production Value: 0
; In production, it is recommended to set this to 0 to reduce the output
; of sensitive information in stack traces.
zend.exception_string_param_max_len = 0
;;;;;;;;;;;;;;;;;
; Miscellaneous ;
;;;;;;;;;;;;;;;;;
; Decides whether PHP may expose the fact that it is installed on the server
; (e.g. by adding its signature to the Web server header). It is no security
; threat in any way, but it makes it possible to determine whether you use PHP
; on your server or not.
; https://php.net/expose-php
expose_php = On
;;;;;;;;;;;;;;;;;;;
; Resource Limits ;
;;;;;;;;;;;;;;;;;;;
; Maximum execution time of each script, in seconds
; https://php.net/max-execution-time
; Note: This directive is hardcoded to 0 for the CLI SAPI
max_execution_time = 30
; Maximum amount of time each script may spend parsing request data. It's a good
; idea to limit this time on productions servers in order to eliminate unexpectedly
; long running scripts.
; Note: This directive is hardcoded to -1 for the CLI SAPI
; Default Value: -1 (Unlimited)
; Development Value: 60 (60 seconds)
; Production Value: 60 (60 seconds)
; https://php.net/max-input-time
max_input_time = 60
; Maximum input variable nesting level
; https://php.net/max-input-nesting-level
;max_input_nesting_level = 64
; How many GET/POST/COOKIE input variables may be accepted
;max_input_vars = 1000
; Maximum amount of memory a script may consume
; https://php.net/memory-limit
memory_limit = 128M
;;;;;;;;;;;;;;;;;;;;;;;;;;;;;;
; Error handling and logging ;
;;;;;;;;;;;;;;;;;;;;;;;;;;;;;;
; This directive informs PHP of which errors, warnings and notices you would like
; it to take action for. The recommended way of setting values for this
; directive is through the use of the error level constants and bitwise
; operators. The error level constants are below here for convenience as well as
; some common settings and their meanings.
; By default, PHP is set to take action on all errors, notices and warnings EXCEPT
; those related to E_NOTICE and E_STRICT, which together cover best practices and
; recommended coding standards in PHP. For performance reasons, this is the
; recommend error reporting setting. Your production server shouldn't be wasting
; resources complaining about best practices and coding standards. That's what
; development servers and development settings are for.
; Note: The php.ini-development file has this setting as E_ALL. This
; means it pretty much reports everything which is exactly what you want during
; development and early testing.
;
; Error Level Constants:
; E_ALL - All errors and warnings (includes E_STRICT as of PHP 5.4.0)
; E_ERROR - fatal run-time errors
; E_RECOVERABLE_ERROR - almost fatal run-time errors
; E_WARNING - run-time warnings (non-fatal errors)
; E_PARSE - compile-time parse errors
; E_NOTICE - run-time notices (these are warnings which often result
; from a bug in your code, but it's possible that it was
; intentional (e.g., using an uninitialized variable and
; relying on the fact it is automatically initialized to an
; empty string)
; E_STRICT - run-time notices, enable to have PHP suggest changes
; to your code which will ensure the best interoperability
; and forward compatibility of your code
; E_CORE_ERROR - fatal errors that occur during PHP's initial startup
; E_CORE_WARNING - warnings (non-fatal errors) that occur during PHP's
; initial startup
; E_COMPILE_ERROR - fatal compile-time errors
; E_COMPILE_WARNING - compile-time warnings (non-fatal errors)
; E_USER_ERROR - user-generated error message
; E_USER_WARNING - user-generated warning message
; E_USER_NOTICE - user-generated notice message
; E_DEPRECATED - warn about code that will not work in future versions
; of PHP
; E_USER_DEPRECATED - user-generated deprecation warnings
;
; Common Values:
; E_ALL (Show all errors, warnings and notices including coding standards.)
; E_ALL & ~E_NOTICE (Show all errors, except for notices)
; E_ALL & ~E_NOTICE & ~E_STRICT (Show all errors, except for notices and coding standards warnings.)
; E_COMPILE_ERROR|E_RECOVERABLE_ERROR|E_ERROR|E_CORE_ERROR (Show only errors)
; Default Value: E_ALL
; Development Value: E_ALL
; Production Value: E_ALL & ~E_DEPRECATED & ~E_STRICT
; https://php.net/error-reporting
error_reporting = E_ALL & ~E_DEPRECATED & ~E_STRICT
; This directive controls whether or not and where PHP will output errors,
; notices and warnings too. Error output is very useful during development, but
; it could be very dangerous in production environments. Depending on the code
; which is triggering the error, sensitive information could potentially leak
; out of your application such as database usernames and passwords or worse.
; For production environments, we recommend logging errors rather than
; sending them to STDOUT.
; Possible Values:
; Off = Do not display any errors
; stderr = Display errors to STDERR (affects only CGI/CLI binaries!)
; On or stdout = Display errors to STDOUT
; Default Value: On
; Development Value: On
; Production Value: Off
; https://php.net/display-errors
display_errors = Off
; The display of errors which occur during PHP's startup sequence are handled
; separately from display_errors. We strongly recommend you set this to 'off'
; for production servers to avoid leaking configuration details.
; Default Value: On
; Development Value: On
; Production Value: Off
; https://php.net/display-startup-errors
display_startup_errors = Off
; Besides displaying errors, PHP can also log errors to locations such as a
; server-specific log, STDERR, or a location specified by the error_log
; directive found below. While errors should not be displayed on productions
; servers they should still be monitored and logging is a great way to do that.
; Default Value: Off
; Development Value: On
; Production Value: On
; https://php.net/log-errors
log_errors = On
; Do not log repeated messages. Repeated errors must occur in same file on same
; line unless ignore_repeated_source is set true.
; https://php.net/ignore-repeated-errors
ignore_repeated_errors = Off
; Ignore source of message when ignoring repeated messages. When this setting
; is On you will not log errors with repeated messages from different files or
; source lines.
; https://php.net/ignore-repeated-source
ignore_repeated_source = Off
; If this parameter is set to Off, then memory leaks will not be shown (on
; stdout or in the log). This is only effective in a debug compile, and if
; error reporting includes E_WARNING in the allowed list
; https://php.net/report-memleaks
report_memleaks = On
; This setting is off by default.
;report_zend_debug = 0
; Turn off normal error reporting and emit XML-RPC error XML
; https://php.net/xmlrpc-errors
;xmlrpc_errors = 0
; An XML-RPC faultCode
;xmlrpc_error_number = 0
; When PHP displays or logs an error, it has the capability of formatting the
; error message as HTML for easier reading. This directive controls whether
; the error message is formatted as HTML or not.
; Note: This directive is hardcoded to Off for the CLI SAPI
; https://php.net/html-errors
;html_errors = On
; If html_errors is set to On *and* docref_root is not empty, then PHP
; produces clickable error messages that direct to a page describing the error
; or function causing the error in detail.
; You can download a copy of the PHP manual from https://php.net/docs
; and change docref_root to the base URL of your local copy including the
; leading '/'. You must also specify the file extension being used including
; the dot. PHP's default behavior is to leave these settings empty, in which
; case no links to documentation are generated.
; Note: Never use this feature for production boxes.
; https://php.net/docref-root
; Examples
;docref_root = "/phpmanual/"
; https://php.net/docref-ext
;docref_ext = .html
; String to output before an error message. PHP's default behavior is to leave
; this setting blank.
; https://php.net/error-prepend-string
; Example:
;error_prepend_string = "<span style='color: #ff0000'>"
; String to output after an error message. PHP's default behavior is to leave
; this setting blank.
; https://php.net/error-append-string
; Example:
;error_append_string = "</span>"
; Log errors to specified file. PHP's default behavior is to leave this value
; empty.
; https://php.net/error-log
; Example:
;error_log = php_errors.log
; Log errors to syslog (Event Log on Windows).
;error_log = syslog
; The syslog ident is a string which is prepended to every message logged
; to syslog. Only used when error_log is set to syslog.
;syslog.ident = php
; The syslog facility is used to specify what type of program is logging
; the message. Only used when error_log is set to syslog.
;syslog.facility = user
; Set this to disable filtering control characters (the default).
; Some loggers only accept NVT-ASCII, others accept anything that's not
; control characters. If your logger accepts everything, then no filtering
; is needed at all.
; Allowed values are:
; ascii (all printable ASCII characters and NL)
; no-ctrl (all characters except control characters)
; all (all characters)
; raw (like "all", but messages are not split at newlines)
; https://php.net/syslog.filter
;syslog.filter = ascii
;windows.show_crt_warning
; Default value: 0
; Development value: 0
; Production value: 0
;;;;;;;;;;;;;;;;;
; Data Handling ;
;;;;;;;;;;;;;;;;;
; The separator used in PHP generated URLs to separate arguments.
; PHP's default setting is "&".
; https://php.net/arg-separator.output
; Example:
;arg_separator.output = "&"
; List of separator(s) used by PHP to parse input URLs into variables.
; PHP's default setting is "&".
; NOTE: Every character in this directive is considered as separator!
; https://php.net/arg-separator.input
; Example:
;arg_separator.input = ";&"
; This directive determines which super global arrays are registered when PHP
; starts up. G,P,C,E & S are abbreviations for the following respective super
; globals: GET, POST, COOKIE, ENV and SERVER. There is a performance penalty
; paid for the registration of these arrays and because ENV is not as commonly
; used as the others, ENV is not recommended on productions servers. You
; can still get access to the environment variables through getenv() should you
; need to.
; Default Value: "EGPCS"
; Development Value: "GPCS"
; Production Value: "GPCS";
; https://php.net/variables-order
variables_order = "GPCS"
; This directive determines which super global data (G,P & C) should be
; registered into the super global array REQUEST. If so, it also determines
; the order in which that data is registered. The values for this directive
; are specified in the same manner as the variables_order directive,
; EXCEPT one. Leaving this value empty will cause PHP to use the value set
; in the variables_order directive. It does not mean it will leave the super
; globals array REQUEST empty.
; Default Value: None
; Development Value: "GP"
; Production Value: "GP"
; https://php.net/request-order
request_order = "GP"
; This directive determines whether PHP registers $argv & $argc each time it
; runs. $argv contains an array of all the arguments passed to PHP when a script
; is invoked. $argc contains an integer representing the number of arguments
; that were passed when the script was invoked. These arrays are extremely
; useful when running scripts from the command line. When this directive is
; enabled, registering these variables consumes CPU cycles and memory each time
; a script is executed. For performance reasons, this feature should be disabled
; on production servers.
; Note: This directive is hardcoded to On for the CLI SAPI
; Default Value: On
; Development Value: Off
; Production Value: Off
; https://php.net/register-argc-argv
register_argc_argv = Off
; When enabled, the ENV, REQUEST and SERVER variables are created when they're
; first used (Just In Time) instead of when the script starts. If these
; variables are not used within a script, having this directive on will result
; in a performance gain. The PHP directive register_argc_argv must be disabled
; for this directive to have any effect.
; https://php.net/auto-globals-jit
auto_globals_jit = On
; Whether PHP will read the POST data.
; This option is enabled by default.
; Most likely, you won't want to disable this option globally. It causes $_POST
; and $_FILES to always be empty; the only way you will be able to read the
; POST data will be through the php://input stream wrapper. This can be useful
; to proxy requests or to process the POST data in a memory efficient fashion.
; https://php.net/enable-post-data-reading
;enable_post_data_reading = Off
; Maximum size of POST data that PHP will accept.
; Its value may be 0 to disable the limit. It is ignored if POST data reading
; is disabled through enable_post_data_reading.
; https://php.net/post-max-size
post_max_size = 8M
; Automatically add files before PHP document.
; https://php.net/auto-prepend-file
auto_prepend_file =
; Automatically add files after PHP document.
; https://php.net/auto-append-file
auto_append_file =
; By default, PHP will output a media type using the Content-Type header. To
; disable this, simply set it to be empty.
;
; PHP's built-in default media type is set to text/html.
; https://php.net/default-mimetype
default_mimetype = "text/html"
; PHP's default character set is set to UTF-8.
; https://php.net/default-charset
default_charset = "UTF-8"
; PHP internal character encoding is set to empty.
; If empty, default_charset is used.
; https://php.net/internal-encoding
;internal_encoding =
; PHP input character encoding is set to empty.
; If empty, default_charset is used.
; https://php.net/input-encoding
;input_encoding =
; PHP output character encoding is set to empty.
; If empty, default_charset is used.
; See also output_buffer.
; https://php.net/output-encoding
;output_encoding =
;;;;;;;;;;;;;;;;;;;;;;;;;
; Paths and Directories ;
;;;;;;;;;;;;;;;;;;;;;;;;;
; UNIX: "/path1:/path2"
;include_path = ".:/php/includes"
;
; Windows: "\path1;\path2"
;include_path = ".;c:\php\includes"
;
; PHP's default setting for include_path is ".;/path/to/php/pear"
; https://php.net/include-path
; The root of the PHP pages, used only if nonempty.
; if PHP was not compiled with FORCE_REDIRECT, you SHOULD set doc_root
; if you are running php as a CGI under any web server (other than IIS)
; see documentation for security issues. The alternate is to use the
; cgi.force_redirect configuration below
; https://php.net/doc-root
doc_root =
; The directory under which PHP opens the script using /~username used only
; if nonempty.
; https://php.net/user-dir
user_dir =
; Directory in which the loadable extensions (modules) reside.
; https://php.net/extension-dir
extension_dir = "/usr/lib/php/modules/"
; On windows:
;extension_dir = "ext"
; Directory where the temporary files should be placed.
; Defaults to the system default (see sys_get_temp_dir)
;sys_temp_dir = "/tmp"
; Whether or not to enable the dl() function. The dl() function does NOT work
; properly in multithreaded servers, such as IIS or Zeus, and is automatically
; disabled on them.
; https://php.net/enable-dl
enable_dl = Off
; cgi.force_redirect is necessary to provide security running PHP as a CGI under
; most web servers. Left undefined, PHP turns this on by default. You can
; turn it off here AT YOUR OWN RISK
; **You CAN safely turn this off for IIS, in fact, you MUST.**
; https://php.net/cgi.force-redirect
;cgi.force_redirect = 1
; if cgi.nph is enabled it will force cgi to always sent Status: 200 with
; every request. PHP's default behavior is to disable this feature.
;cgi.nph = 1
; if cgi.force_redirect is turned on, and you are not running under Apache or Netscape
; (iPlanet) web servers, you MAY need to set an environment variable name that PHP
; will look for to know it is OK to continue execution. Setting this variable MAY
; cause security issues, KNOW WHAT YOU ARE DOING FIRST.
; https://php.net/cgi.redirect-status-env
;cgi.redirect_status_env =
; cgi.fix_pathinfo provides *real* PATH_INFO/PATH_TRANSLATED support for CGI. PHP's
; previous behaviour was to set PATH_TRANSLATED to SCRIPT_FILENAME, and to not grok
; what PATH_INFO is. For more information on PATH_INFO, see the cgi specs. Setting
; this to 1 will cause PHP CGI to fix its paths to conform to the spec. A setting
; of zero causes PHP to behave as before. Default is 1. You should fix your scripts
; to use SCRIPT_FILENAME rather than PATH_TRANSLATED.
; https://php.net/cgi.fix-pathinfo
;cgi.fix_pathinfo=1
; if cgi.discard_path is enabled, the PHP CGI binary can safely be placed outside
; of the web tree and people will not be able to circumvent .htaccess security.
;cgi.discard_path=1
; FastCGI under IIS supports the ability to impersonate
; security tokens of the calling client. This allows IIS to define the
; security context that the request runs under. mod_fastcgi under Apache
; does not currently support this feature (03/17/2002)
; Set to 1 if running under IIS. Default is zero.
; https://php.net/fastcgi.impersonate
;fastcgi.impersonate = 1
; Disable logging through FastCGI connection. PHP's default behavior is to enable
; this feature.
;fastcgi.logging = 0
; cgi.rfc2616_headers configuration option tells PHP what type of headers to
; use when sending HTTP response code. If set to 0, PHP sends Status: header that
; is supported by Apache. When this option is set to 1, PHP will send
; RFC2616 compliant header.
; Default is zero.
; https://php.net/cgi.rfc2616-headers
;cgi.rfc2616_headers = 0
; cgi.check_shebang_line controls whether CGI PHP checks for line starting with #!
; (shebang) at the top of the running script. This line might be needed if the
; script support running both as stand-alone script and via PHP CGI<. PHP in CGI
; mode skips this line and ignores its content if this directive is turned on.
; https://php.net/cgi.check-shebang-line
;cgi.check_shebang_line=1
;;;;;;;;;;;;;;;;
; File Uploads ;
;;;;;;;;;;;;;;;;
; Whether to allow HTTP file uploads.
; https://php.net/file-uploads
file_uploads = On
; Temporary directory for HTTP uploaded files (will use system default if not
; specified).
; https://php.net/upload-tmp-dir
;upload_tmp_dir =
; Maximum allowed size for uploaded files.
; https://php.net/upload-max-filesize
upload_max_filesize = 2M
; Maximum number of files that can be uploaded via a single request
max_file_uploads = 20
;;;;;;;;;;;;;;;;;;
; Fopen wrappers ;
;;;;;;;;;;;;;;;;;;
; Whether to allow the treatment of URLs (like http:// or ftp://) as files.
; https://php.net/allow-url-fopen
allow_url_fopen = On
; Whether to allow include/require to open URLs (like https:// or ftp://) as files.
; https://php.net/allow-url-include
allow_url_include = Off
; Define the anonymous ftp password (your email address). PHP's default setting
; for this is empty.
; https://php.net/from
;from="john@doe.com"
; Define the User-Agent string. PHP's default setting for this is empty.
; https://php.net/user-agent
;user_agent="PHP"
; Default timeout for socket based streams (seconds)
; https://php.net/default-socket-timeout
default_socket_timeout = 60
; If your scripts have to deal with files from Macintosh systems,
; or you are running on a Mac and need to deal with files from
; unix or win32 systems, setting this flag will cause PHP to
; automatically detect the EOL character in those files so that
; fgets() and file() will work regardless of the source of the file.
; https://php.net/auto-detect-line-endings
;auto_detect_line_endings = Off
;;;;;;;;;;;;;;;;;;;;;;
; Dynamic Extensions ;
;;;;;;;;;;;;;;;;;;;;;;
; If you wish to have an extension loaded automatically, use the following
; syntax:
;
; extension=modulename
;
; For example:
;
; extension=mysqli
;
; When the extension library to load is not located in the default extension
; directory, You may specify an absolute path to the library file:
;
; extension=/path/to/extension/mysqli.so
;
; Note : The syntax used in previous PHP versions ('extension=<ext>.so' and
; 'extension='php_<ext>.dll') is supported for legacy reasons and may be
; deprecated in a future PHP major version. So, when it is possible, please
; move to the new ('extension=<ext>) syntax.
;
;extension=bcmath
;extension=bz2
;extension=calendar
extension=curl
;extension=dba
;extension=enchant
;extension=exif
;extension=ffi
;extension=ftp
;extension=gd
;extension=gettext
;extension=gmp
;extension=iconv
;extension=intl
;extension=ldap
;extension=mysqli
;extension=odbc
;zend_extension=opcache
;extension=pdo_dblib
;extension=pdo_mysql
;extension=pdo_odbc
;extension=pdo_pgsql
extension=pdo_sqlite
;extension=pgsql
;extension=pspell
;extension=shmop
;extension=snmp
;extension=soap
extension=sockets
;extension=sodium
extension=sqlite3
;extension=sysvmsg
;extension=sysvsem
;extension=sysvshm
;extension=tidy
;extension=xsl
extension=zip
;;;;;;;;;;;;;;;;;;;
; Module Settings ;
;;;;;;;;;;;;;;;;;;;
[CLI Server]
; Whether the CLI web server uses ANSI color coding in its terminal output.
cli_server.color = On
[Date]
; Defines the default timezone used by the date functions
; https://php.net/date.timezone
;date.timezone =
; https://php.net/date.default-latitude
;date.default_latitude = 31.7667
; https://php.net/date.default-longitude
;date.default_longitude = 35.2333
; https://php.net/date.sunrise-zenith
;date.sunrise_zenith = 90.833333
; https://php.net/date.sunset-zenith
;date.sunset_zenith = 90.833333
[filter]
; https://php.net/filter.default
;filter.default = unsafe_raw
; https://php.net/filter.default-flags
;filter.default_flags =
[iconv]
; Use of this INI entry is deprecated, use global input_encoding instead.
; If empty, default_charset or input_encoding or iconv.input_encoding is used.
; The precedence is: default_charset < input_encoding < iconv.input_encoding
;iconv.input_encoding =
; Use of this INI entry is deprecated, use global internal_encoding instead.
; If empty, default_charset or internal_encoding or iconv.internal_encoding is used.
; The precedence is: default_charset < internal_encoding < iconv.internal_encoding
;iconv.internal_encoding =
; Use of this INI entry is deprecated, use global output_encoding instead.
; If empty, default_charset or output_encoding or iconv.output_encoding is used.
; The precedence is: default_charset < output_encoding < iconv.output_encoding
; To use an output encoding conversion, iconv's output handler must be set
; otherwise output encoding conversion cannot be performed.
;iconv.output_encoding =
[imap]
; rsh/ssh logins are disabled by default. Use this INI entry if you want to
; enable them. Note that the IMAP library does not filter mailbox names before
; passing them to rsh/ssh command, thus passing untrusted data to this function
; with rsh/ssh enabled is insecure.
;imap.enable_insecure_rsh=0
[intl]
;intl.default_locale =
; This directive allows you to produce PHP errors when some error
; happens within intl functions. The value is the level of the error produced.
; Default is 0, which does not produce any errors.
;intl.error_level = E_WARNING
;intl.use_exceptions = 0
[sqlite3]
; Directory pointing to SQLite3 extensions
; https://php.net/sqlite3.extension-dir
;sqlite3.extension_dir =
; SQLite defensive mode flag (only available from SQLite 3.26+)
; When the defensive flag is enabled, language features that allow ordinary
; SQL to deliberately corrupt the database file are disabled. This forbids
; writing directly to the schema, shadow tables (eg. FTS data tables), or
; the sqlite_dbpage virtual table.
; https://www.sqlite.org/c3ref/c_dbconfig_defensive.html
; (for older SQLite versions, this flag has no use)
;sqlite3.defensive = 1
[Pcre]
; PCRE library backtracking limit.
; https://php.net/pcre.backtrack-limit
;pcre.backtrack_limit=100000
; PCRE library recursion limit.
; Please note that if you set this value to a high number you may consume all
; the available process stack and eventually crash PHP (due to reaching the
; stack size limit imposed by the Operating System).
; https://php.net/pcre.recursion-limit
;pcre.recursion_limit=100000
; Enables or disables JIT compilation of patterns. This requires the PCRE
; library to be compiled with JIT support.
;pcre.jit=1
[Pdo]
; Whether to pool ODBC connections. Can be one of "strict", "relaxed" or "off"
; https://php.net/pdo-odbc.connection-pooling
;pdo_odbc.connection_pooling=strict
[Pdo_mysql]
; Default socket name for local MySQL connects. If empty, uses the built-in
; MySQL defaults.
pdo_mysql.default_socket=
[Phar]
; https://php.net/phar.readonly
;phar.readonly = On
; https://php.net/phar.require-hash
;phar.require_hash = On
;phar.cache_list =
[mail function]
; For Win32 only.
; https://php.net/smtp
SMTP = localhost
; https://php.net/smtp-port
smtp_port = 25
; For Win32 only.
; https://php.net/sendmail-from
;sendmail_from = me@example.com
; For Unix only. You may supply arguments as well (default: "sendmail -t -i").
; https://php.net/sendmail-path
;sendmail_path =
; Force the addition of the specified parameters to be passed as extra parameters
; to the sendmail binary. These parameters will always replace the value of
; the 5th parameter to mail().
;mail.force_extra_parameters =
; Add X-PHP-Originating-Script: that will include uid of the script followed by the filename
mail.add_x_header = Off
; The path to a log file that will log all mail() calls. Log entries include
; the full path of the script, line number, To address and headers.
;mail.log =
; Log mail to syslog (Event Log on Windows).
;mail.log = syslog
[ODBC]
; https://php.net/odbc.default-db
;odbc.default_db = Not yet implemented
; https://php.net/odbc.default-user
;odbc.default_user = Not yet implemented
; https://php.net/odbc.default-pw
;odbc.default_pw = Not yet implemented
; Controls the ODBC cursor model.
; Default: SQL_CURSOR_STATIC (default).
;odbc.default_cursortype
; Allow or prevent persistent links.
; https://php.net/odbc.allow-persistent
odbc.allow_persistent = On
; Check that a connection is still valid before reuse.
; https://php.net/odbc.check-persistent
odbc.check_persistent = On
; Maximum number of persistent links. -1 means no limit.
; https://php.net/odbc.max-persistent
odbc.max_persistent = -1
; Maximum number of links (persistent + non-persistent). -1 means no limit.
; https://php.net/odbc.max-links
odbc.max_links = -1
; Handling of LONG fields. Returns number of bytes to variables. 0 means
; passthru.
; https://php.net/odbc.defaultlrl
odbc.defaultlrl = 4096
; Handling of binary data. 0 means passthru, 1 return as is, 2 convert to char.
; See the documentation on odbc_binmode and odbc_longreadlen for an explanation
; of odbc.defaultlrl and odbc.defaultbinmode
; https://php.net/odbc.defaultbinmode
odbc.defaultbinmode = 1
[MySQLi]
; Maximum number of persistent links. -1 means no limit.
; https://php.net/mysqli.max-persistent
mysqli.max_persistent = -1
; Allow accessing, from PHP's perspective, local files with LOAD DATA statements
; https://php.net/mysqli.allow_local_infile
;mysqli.allow_local_infile = On
; It allows the user to specify a folder where files that can be sent via LOAD DATA
; LOCAL can exist. It is ignored if mysqli.allow_local_infile is enabled.
;mysqli.local_infile_directory =
; Allow or prevent persistent links.
; https://php.net/mysqli.allow-persistent
mysqli.allow_persistent = On
; Maximum number of links. -1 means no limit.
; https://php.net/mysqli.max-links
mysqli.max_links = -1
; Default port number for mysqli_connect(). If unset, mysqli_connect() will use
; the $MYSQL_TCP_PORT or the mysql-tcp entry in /etc/services or the
; compile-time value defined MYSQL_PORT (in that order). Win32 will only look
; at MYSQL_PORT.
; https://php.net/mysqli.default-port
mysqli.default_port = 3306
; Default socket name for local MySQL connects. If empty, uses the built-in
; MySQL defaults.
; https://php.net/mysqli.default-socket
mysqli.default_socket =
; Default host for mysqli_connect() (doesn't apply in safe mode).
; https://php.net/mysqli.default-host
mysqli.default_host =
; Default user for mysqli_connect() (doesn't apply in safe mode).
; https://php.net/mysqli.default-user
mysqli.default_user =
; Default password for mysqli_connect() (doesn't apply in safe mode).
; Note that this is generally a *bad* idea to store passwords in this file.
; *Any* user with PHP access can run 'echo get_cfg_var("mysqli.default_pw")
; and reveal this password! And of course, any users with read access to this
; file will be able to reveal the password as well.
; https://php.net/mysqli.default-pw
mysqli.default_pw =
; Allow or prevent reconnect
mysqli.reconnect = Off
; If this option is enabled, closing a persistent connection will rollback
; any pending transactions of this connection, before it is put back
; into the persistent connection pool.
;mysqli.rollback_on_cached_plink = Off
[mysqlnd]
; Enable / Disable collection of general statistics by mysqlnd which can be
; used to tune and monitor MySQL operations.
mysqlnd.collect_statistics = On
; Enable / Disable collection of memory usage statistics by mysqlnd which can be
; used to tune and monitor MySQL operations.
mysqlnd.collect_memory_statistics = Off
; Records communication from all extensions using mysqlnd to the specified log
; file.
; https://php.net/mysqlnd.debug
;mysqlnd.debug =
; Defines which queries will be logged.
;mysqlnd.log_mask = 0
; Default size of the mysqlnd memory pool, which is used by result sets.
;mysqlnd.mempool_default_size = 16000
; Size of a pre-allocated buffer used when sending commands to MySQL in bytes.
;mysqlnd.net_cmd_buffer_size = 2048
; Size of a pre-allocated buffer used for reading data sent by the server in
; bytes.
;mysqlnd.net_read_buffer_size = 32768
; Timeout for network requests in seconds.
;mysqlnd.net_read_timeout = 31536000
; SHA-256 Authentication Plugin related. File with the MySQL server public RSA
; key.
;mysqlnd.sha256_server_public_key =
[OCI8]
; Connection: Enables privileged connections using external
; credentials (OCI_SYSOPER, OCI_SYSDBA)
; https://php.net/oci8.privileged-connect
;oci8.privileged_connect = Off
; Connection: The maximum number of persistent OCI8 connections per
; process. Using -1 means no limit.
; https://php.net/oci8.max-persistent
;oci8.max_persistent = -1
; Connection: The maximum number of seconds a process is allowed to
; maintain an idle persistent connection. Using -1 means idle
; persistent connections will be maintained forever.
; https://php.net/oci8.persistent-timeout
;oci8.persistent_timeout = -1
; Connection: The number of seconds that must pass before issuing a
; ping during oci_pconnect() to check the connection validity. When
; set to 0, each oci_pconnect() will cause a ping. Using -1 disables
; pings completely.
; https://php.net/oci8.ping-interval
;oci8.ping_interval = 60
; Connection: Set this to a user chosen connection class to be used
; for all pooled server requests with Oracle 11g Database Resident
; Connection Pooling (DRCP). To use DRCP, this value should be set to
; the same string for all web servers running the same application,
; the database pool must be configured, and the connection string must
; specify to use a pooled server.
;oci8.connection_class =
; High Availability: Using On lets PHP receive Fast Application
; Notification (FAN) events generated when a database node fails. The
; database must also be configured to post FAN events.
;oci8.events = Off
; Tuning: This option enables statement caching, and specifies how
; many statements to cache. Using 0 disables statement caching.
; https://php.net/oci8.statement-cache-size
;oci8.statement_cache_size = 20
; Tuning: Enables statement prefetching and sets the default number of
; rows that will be fetched automatically after statement execution.
; https://php.net/oci8.default-prefetch
;oci8.default_prefetch = 100
; Compatibility. Using On means oci_close() will not close
; oci_connect() and oci_new_connect() connections.
; https://php.net/oci8.old-oci-close-semantics
;oci8.old_oci_close_semantics = Off
[PostgreSQL]
; Allow or prevent persistent links.
; https://php.net/pgsql.allow-persistent
pgsql.allow_persistent = On
; Detect broken persistent links always with pg_pconnect().
; Auto reset feature requires a little overheads.
; https://php.net/pgsql.auto-reset-persistent
pgsql.auto_reset_persistent = Off
; Maximum number of persistent links. -1 means no limit.
; https://php.net/pgsql.max-persistent
pgsql.max_persistent = -1
; Maximum number of links (persistent+non persistent). -1 means no limit.
; https://php.net/pgsql.max-links
pgsql.max_links = -1
; Ignore PostgreSQL backends Notice message or not.
; Notice message logging require a little overheads.
; https://php.net/pgsql.ignore-notice
pgsql.ignore_notice = 0
; Log PostgreSQL backends Notice message or not.
; Unless pgsql.ignore_notice=0, module cannot log notice message.
; https://php.net/pgsql.log-notice
pgsql.log_notice = 0
[bcmath]
; Number of decimal digits for all bcmath functions.
; https://php.net/bcmath.scale
bcmath.scale = 0
[browscap]
; https://php.net/browscap
;browscap = extra/browscap.ini
[Session]
; Handler used to store/retrieve data.
; https://php.net/session.save-handler
session.save_handler = files
; Argument passed to save_handler. In the case of files, this is the path
; where data files are stored. Note: Windows users have to change this
; variable in order to use PHP's session functions.
;
; The path can be defined as:
;
; session.save_path = "N;/path"
;
; where N is an integer. Instead of storing all the session files in
; /path, what this will do is use subdirectories N-levels deep, and
; store the session data in those directories. This is useful if
; your OS has problems with many files in one directory, and is
; a more efficient layout for servers that handle many sessions.
;
; NOTE 1: PHP will not create this directory structure automatically.
; You can use the script in the ext/session dir for that purpose.
; NOTE 2: See the section on garbage collection below if you choose to
; use subdirectories for session storage
;
; The file storage module creates files using mode 600 by default.
; You can change that by using
;
; session.save_path = "N;MODE;/path"
;
; where MODE is the octal representation of the mode. Note that this
; does not overwrite the process's umask.
; https://php.net/session.save-path
;session.save_path = "/tmp"
; Whether to use strict session mode.
; Strict session mode does not accept an uninitialized session ID, and
; regenerates the session ID if the browser sends an uninitialized session ID.
; Strict mode protects applications from session fixation via a session adoption
; vulnerability. It is disabled by default for maximum compatibility, but
; enabling it is encouraged.
; https://wiki.php.net/rfc/strict_sessions
session.use_strict_mode = 0
; Whether to use cookies.
; https://php.net/session.use-cookies
session.use_cookies = 1
; https://php.net/session.cookie-secure
;session.cookie_secure =
; This option forces PHP to fetch and use a cookie for storing and maintaining
; the session id. We encourage this operation as it's very helpful in combating
; session hijacking when not specifying and managing your own session id. It is
; not the be-all and end-all of session hijacking defense, but it's a good start.
; https://php.net/session.use-only-cookies
session.use_only_cookies = 1
; Name of the session (used as cookie name).
; https://php.net/session.name
session.name = PHPSESSID
; Initialize session on request startup.
; https://php.net/session.auto-start
session.auto_start = 0
; Lifetime in seconds of cookie or, if 0, until browser is restarted.
; https://php.net/session.cookie-lifetime
session.cookie_lifetime = 0
; The path for which the cookie is valid.
; https://php.net/session.cookie-path
session.cookie_path = /
; The domain for which the cookie is valid.
; https://php.net/session.cookie-domain
session.cookie_domain =
; Whether or not to add the httpOnly flag to the cookie, which makes it
; inaccessible to browser scripting languages such as JavaScript.
; https://php.net/session.cookie-httponly
session.cookie_httponly =
; Add SameSite attribute to cookie to help mitigate Cross-Site Request Forgery (CSRF/XSRF)
; Current valid values are "Strict", "Lax" or "None". When using "None",
; make sure to include the quotes, as `none` is interpreted like `false` in ini files.
; https://tools.ietf.org/html/draft-west-first-party-cookies-07
session.cookie_samesite =
; Handler used to serialize data. php is the standard serializer of PHP.
; https://php.net/session.serialize-handler
session.serialize_handler = php
; Defines the probability that the 'garbage collection' process is started on every
; session initialization. The probability is calculated by using gc_probability/gc_divisor,
; e.g. 1/100 means there is a 1% chance that the GC process starts on each request.
; Default Value: 1
; Development Value: 1
; Production Value: 1
; https://php.net/session.gc-probability
session.gc_probability = 1
; Defines the probability that the 'garbage collection' process is started on every
; session initialization. The probability is calculated by using gc_probability/gc_divisor,
; e.g. 1/100 means there is a 1% chance that the GC process starts on each request.
; For high volume production servers, using a value of 1000 is a more efficient approach.
; Default Value: 100
; Development Value: 1000
; Production Value: 1000
; https://php.net/session.gc-divisor
session.gc_divisor = 1000
; After this number of seconds, stored data will be seen as 'garbage' and
; cleaned up by the garbage collection process.
; https://php.net/session.gc-maxlifetime
session.gc_maxlifetime = 1440
; NOTE: If you are using the subdirectory option for storing session files
; (see session.save_path above), then garbage collection does *not*
; happen automatically. You will need to do your own garbage
; collection through a shell script, cron entry, or some other method.
; For example, the following script is the equivalent of setting
; session.gc_maxlifetime to 1440 (1440 seconds = 24 minutes):
; find /path/to/sessions -cmin +24 -type f | xargs rm
; Check HTTP Referer to invalidate externally stored URLs containing ids.
; HTTP_REFERER has to contain this substring for the session to be
; considered as valid.
; https://php.net/session.referer-check
session.referer_check =
; Set to {nocache,private,public,} to determine HTTP caching aspects
; or leave this empty to avoid sending anti-caching headers.
; https://php.net/session.cache-limiter
session.cache_limiter = nocache
; Document expires after n minutes.
; https://php.net/session.cache-expire
session.cache_expire = 180
; trans sid support is disabled by default.
; Use of trans sid may risk your users' security.
; Use this option with caution.
; - User may send URL contains active session ID
; to other person via. email/irc/etc.
; - URL that contains active session ID may be stored
; in publicly accessible computer.
; - User may access your site with the same session ID
; always using URL stored in browser's history or bookmarks.
; https://php.net/session.use-trans-sid
session.use_trans_sid = 0
; Set session ID character length. This value could be between 22 to 256.
; Shorter length than default is supported only for compatibility reason.
; Users should use 32 or more chars.
; https://php.net/session.sid-length
; Default Value: 32
; Development Value: 26
; Production Value: 26
session.sid_length = 26
; The URL rewriter will look for URLs in a defined set of HTML tags.
; <form> is special; if you include them here, the rewriter will
; add a hidden <input> field with the info which is otherwise appended
; to URLs. <form> tag's action attribute URL will not be modified
; unless it is specified.
; Note that all valid entries require a "=", even if no value follows.
; Default Value: "a=href,area=href,frame=src,form="
; Development Value: "a=href,area=href,frame=src,form="
; Production Value: "a=href,area=href,frame=src,form="
; https://php.net/url-rewriter.tags
session.trans_sid_tags = "a=href,area=href,frame=src,form="
; URL rewriter does not rewrite absolute URLs by default.
; To enable rewrites for absolute paths, target hosts must be specified
; at RUNTIME. i.e. use ini_set()
; <form> tags is special. PHP will check action attribute's URL regardless
; of session.trans_sid_tags setting.
; If no host is defined, HTTP_HOST will be used for allowed host.
; Example value: php.net,www.php.net,wiki.php.net
; Use "," for multiple hosts. No spaces are allowed.
; Default Value: ""
; Development Value: ""
; Production Value: ""
;session.trans_sid_hosts=""
; Define how many bits are stored in each character when converting
; the binary hash data to something readable.
; Possible values:
; 4 (4 bits: 0-9, a-f)
; 5 (5 bits: 0-9, a-v)
; 6 (6 bits: 0-9, a-z, A-Z, "-", ",")
; Default Value: 4
; Development Value: 5
; Production Value: 5
; https://php.net/session.hash-bits-per-character
session.sid_bits_per_character = 5
; Enable upload progress tracking in $_SESSION
; Default Value: On
; Development Value: On
; Production Value: On
; https://php.net/session.upload-progress.enabled
;session.upload_progress.enabled = On
; Cleanup the progress information as soon as all POST data has been read
; (i.e. upload completed).
; Default Value: On
; Development Value: On
; Production Value: On
; https://php.net/session.upload-progress.cleanup
;session.upload_progress.cleanup = On
; A prefix used for the upload progress key in $_SESSION
; Default Value: "upload_progress_"
; Development Value: "upload_progress_"
; Production Value: "upload_progress_"
; https://php.net/session.upload-progress.prefix
;session.upload_progress.prefix = "upload_progress_"
; The index name (concatenated with the prefix) in $_SESSION
; containing the upload progress information
; Default Value: "PHP_SESSION_UPLOAD_PROGRESS"
; Development Value: "PHP_SESSION_UPLOAD_PROGRESS"
; Production Value: "PHP_SESSION_UPLOAD_PROGRESS"
; https://php.net/session.upload-progress.name
;session.upload_progress.name = "PHP_SESSION_UPLOAD_PROGRESS"
; How frequently the upload progress should be updated.
; Given either in percentages (per-file), or in bytes
; Default Value: "1%"
; Development Value: "1%"
; Production Value: "1%"
; https://php.net/session.upload-progress.freq
;session.upload_progress.freq = "1%"
; The minimum delay between updates, in seconds
; Default Value: 1
; Development Value: 1
; Production Value: 1
; https://php.net/session.upload-progress.min-freq
;session.upload_progress.min_freq = "1"
; Only write session data when session data is changed. Enabled by default.
; https://php.net/session.lazy-write
;session.lazy_write = On
[Assertion]
; Switch whether to compile assertions at all (to have no overhead at run-time)
; -1: Do not compile at all
; 0: Jump over assertion at run-time
; 1: Execute assertions
; Changing from or to a negative value is only possible in php.ini! (For turning assertions on and off at run-time, see assert.active, when zend.assertions = 1)
; Default Value: 1
; Development Value: 1
; Production Value: -1
; https://php.net/zend.assertions
zend.assertions = -1
; Assert(expr); active by default.
; https://php.net/assert.active
;assert.active = On
; Throw an AssertionError on failed assertions
; https://php.net/assert.exception
;assert.exception = On
; Issue a PHP warning for each failed assertion. (Overridden by assert.exception if active)
; https://php.net/assert.warning
;assert.warning = On
; Don't bail out by default.
; https://php.net/assert.bail
;assert.bail = Off
; User-function to be called if an assertion fails.
; https://php.net/assert.callback
;assert.callback = 0
[COM]
; path to a file containing GUIDs, IIDs or filenames of files with TypeLibs
; https://php.net/com.typelib-file
;com.typelib_file =
; allow Distributed-COM calls
; https://php.net/com.allow-dcom
;com.allow_dcom = true
; autoregister constants of a component's typelib on com_load()
; https://php.net/com.autoregister-typelib
;com.autoregister_typelib = true
; register constants casesensitive
; https://php.net/com.autoregister-casesensitive
;com.autoregister_casesensitive = false
; show warnings on duplicate constant registrations
; https://php.net/com.autoregister-verbose
;com.autoregister_verbose = true
; The default character set code-page to use when passing strings to and from COM objects.
; Default: system ANSI code page
;com.code_page=
; The version of the .NET framework to use. The value of the setting are the first three parts
; of the framework's version number, separated by dots, and prefixed with "v", e.g. "v4.0.30319".
;com.dotnet_version=
[mbstring]
; language for internal character representation.
; This affects mb_send_mail() and mbstring.detect_order.
; https://php.net/mbstring.language
;mbstring.language = Japanese
; Use of this INI entry is deprecated, use global internal_encoding instead.
; internal/script encoding.
; Some encoding cannot work as internal encoding. (e.g. SJIS, BIG5, ISO-2022-*)
; If empty, default_charset or internal_encoding or iconv.internal_encoding is used.
; The precedence is: default_charset < internal_encoding < iconv.internal_encoding
;mbstring.internal_encoding =
; Use of this INI entry is deprecated, use global input_encoding instead.
; http input encoding.
; mbstring.encoding_translation = On is needed to use this setting.
; If empty, default_charset or input_encoding or mbstring.input is used.
; The precedence is: default_charset < input_encoding < mbstring.http_input
; https://php.net/mbstring.http-input
;mbstring.http_input =
; Use of this INI entry is deprecated, use global output_encoding instead.
; http output encoding.
; mb_output_handler must be registered as output buffer to function.
; If empty, default_charset or output_encoding or mbstring.http_output is used.
; The precedence is: default_charset < output_encoding < mbstring.http_output
; To use an output encoding conversion, mbstring's output handler must be set
; otherwise output encoding conversion cannot be performed.
; https://php.net/mbstring.http-output
;mbstring.http_output =
; enable automatic encoding translation according to
; mbstring.internal_encoding setting. Input chars are
; converted to internal encoding by setting this to On.
; Note: Do _not_ use automatic encoding translation for
; portable libs/applications.
; https://php.net/mbstring.encoding-translation
;mbstring.encoding_translation = Off
; automatic encoding detection order.
; "auto" detect order is changed according to mbstring.language
; https://php.net/mbstring.detect-order
;mbstring.detect_order = auto
; substitute_character used when character cannot be converted
; one from another
; https://php.net/mbstring.substitute-character
;mbstring.substitute_character = none
; Enable strict encoding detection.
;mbstring.strict_detection = Off
; This directive specifies the regex pattern of content types for which mb_output_handler()
; is activated.
; Default: mbstring.http_output_conv_mimetypes=^(text/|application/xhtml\+xml)
;mbstring.http_output_conv_mimetypes=
; This directive specifies maximum stack depth for mbstring regular expressions. It is similar
; to the pcre.recursion_limit for PCRE.
;mbstring.regex_stack_limit=100000
; This directive specifies maximum retry count for mbstring regular expressions. It is similar
; to the pcre.backtrack_limit for PCRE.
;mbstring.regex_retry_limit=1000000
[gd]
; Tell the jpeg decode to ignore warnings and try to create
; a gd image. The warning will then be displayed as notices
; disabled by default
; https://php.net/gd.jpeg-ignore-warning
;gd.jpeg_ignore_warning = 1
[exif]
; Exif UNICODE user comments are handled as UCS-2BE/UCS-2LE and JIS as JIS.
; With mbstring support this will automatically be converted into the encoding
; given by corresponding encode setting. When empty mbstring.internal_encoding
; is used. For the decode settings you can distinguish between motorola and
; intel byte order. A decode setting cannot be empty.
; https://php.net/exif.encode-unicode
;exif.encode_unicode = ISO-8859-15
; https://php.net/exif.decode-unicode-motorola
;exif.decode_unicode_motorola = UCS-2BE
; https://php.net/exif.decode-unicode-intel
;exif.decode_unicode_intel = UCS-2LE
; https://php.net/exif.encode-jis
;exif.encode_jis =
; https://php.net/exif.decode-jis-motorola
;exif.decode_jis_motorola = JIS
; https://php.net/exif.decode-jis-intel
;exif.decode_jis_intel = JIS
[Tidy]
; The path to a default tidy configuration file to use when using tidy
; https://php.net/tidy.default-config
;tidy.default_config = /usr/local/lib/php/default.tcfg
; Should tidy clean and repair output automatically?
; WARNING: Do not use this option if you are generating non-html content
; such as dynamic images
; https://php.net/tidy.clean-output
tidy.clean_output = Off
[soap]
; Enables or disables WSDL caching feature.
; https://php.net/soap.wsdl-cache-enabled
soap.wsdl_cache_enabled=1
; Sets the directory name where SOAP extension will put cache files.
; https://php.net/soap.wsdl-cache-dir
soap.wsdl_cache_dir="/tmp"
; (time to live) Sets the number of second while cached file will be used
; instead of original one.
; https://php.net/soap.wsdl-cache-ttl
soap.wsdl_cache_ttl=86400
; Sets the size of the cache limit. (Max. number of WSDL files to cache)
soap.wsdl_cache_limit = 5
[sysvshm]
; A default size of the shared memory segment
;sysvshm.init_mem = 10000
[ldap]
; Sets the maximum number of open links or -1 for unlimited.
ldap.max_links = -1
[dba]
;dba.default_handler=
[opcache]
; Determines if Zend OPCache is enabled
;opcache.enable=1
; Determines if Zend OPCache is enabled for the CLI version of PHP
;opcache.enable_cli=0
; The OPcache shared memory storage size.
;opcache.memory_consumption=128
; The amount of memory for interned strings in Mbytes.
;opcache.interned_strings_buffer=8
; The maximum number of keys (scripts) in the OPcache hash table.
; Only numbers between 200 and 1000000 are allowed.
;opcache.max_accelerated_files=10000
; The maximum percentage of "wasted" memory until a restart is scheduled.
;opcache.max_wasted_percentage=5
; When this directive is enabled, the OPcache appends the current working
; directory to the script key, thus eliminating possible collisions between
; files with the same name (basename). Disabling the directive improves
; performance, but may break existing applications.
;opcache.use_cwd=1
; When disabled, you must reset the OPcache manually or restart the
; webserver for changes to the filesystem to take effect.
;opcache.validate_timestamps=1
; How often (in seconds) to check file timestamps for changes to the shared
; memory storage allocation. ("1" means validate once per second, but only
; once per request. "0" means always validate)
;opcache.revalidate_freq=2
; Enables or disables file search in include_path optimization
;opcache.revalidate_path=0
; If disabled, all PHPDoc comments are dropped from the code to reduce the
; size of the optimized code.
;opcache.save_comments=1
; If enabled, compilation warnings (including notices and deprecations) will
; be recorded and replayed each time a file is included. Otherwise, compilation
; warnings will only be emitted when the file is first cached.
;opcache.record_warnings=0
; Allow file existence override (file_exists, etc.) performance feature.
;opcache.enable_file_override=0
; A bitmask, where each bit enables or disables the appropriate OPcache
; passes
;opcache.optimization_level=0x7FFFBFFF
;opcache.dups_fix=0
; The location of the OPcache blacklist file (wildcards allowed).
; Each OPcache blacklist file is a text file that holds the names of files
; that should not be accelerated. The file format is to add each filename
; to a new line. The filename may be a full path or just a file prefix
; (i.e., /var/www/x blacklists all the files and directories in /var/www
; that start with 'x'). Line starting with a ; are ignored (comments).
;opcache.blacklist_filename=
; Allows exclusion of large files from being cached. By default all files
; are cached.
;opcache.max_file_size=0
; Check the cache checksum each N requests.
; The default value of "0" means that the checks are disabled.
;opcache.consistency_checks=0
; How long to wait (in seconds) for a scheduled restart to begin if the cache
; is not being accessed.
;opcache.force_restart_timeout=180
; OPcache error_log file name. Empty string assumes "stderr".
;opcache.error_log=
; All OPcache errors go to the Web server log.
; By default, only fatal errors (level 0) or errors (level 1) are logged.
; You can also enable warnings (level 2), info messages (level 3) or
; debug messages (level 4).
;opcache.log_verbosity_level=1
; Preferred Shared Memory back-end. Leave empty and let the system decide.
;opcache.preferred_memory_model=
; Protect the shared memory from unexpected writing during script execution.
; Useful for internal debugging only.
;opcache.protect_memory=0
; Allows calling OPcache API functions only from PHP scripts which path is
; started from specified string. The default "" means no restriction
;opcache.restrict_api=
; Mapping base of shared memory segments (for Windows only). All the PHP
; processes have to map shared memory into the same address space. This
; directive allows to manually fix the "Unable to reattach to base address"
; errors.
;opcache.mmap_base=
; Facilitates multiple OPcache instances per user (for Windows only). All PHP
; processes with the same cache ID and user share an OPcache instance.
;opcache.cache_id=
; Enables and sets the second level cache directory.
; It should improve performance when SHM memory is full, at server restart or
; SHM reset. The default "" disables file based caching.
;opcache.file_cache=
; Enables or disables opcode caching in shared memory.
;opcache.file_cache_only=0
; Enables or disables checksum validation when script loaded from file cache.
;opcache.file_cache_consistency_checks=1
; Implies opcache.file_cache_only=1 for a certain process that failed to
; reattach to the shared memory (for Windows only). Explicitly enabled file
; cache is required.
;opcache.file_cache_fallback=1
; Enables or disables copying of PHP code (text segment) into HUGE PAGES.
; This should improve performance, but requires appropriate OS configuration.
;opcache.huge_code_pages=1
; Validate cached file permissions.
;opcache.validate_permission=0
; Prevent name collisions in chroot'ed environment.
;opcache.validate_root=0
; If specified, it produces opcode dumps for debugging different stages of
; optimizations.
;opcache.opt_debug_level=0
; Specifies a PHP script that is going to be compiled and executed at server
; start-up.
; https://php.net/opcache.preload
;opcache.preload=
; Preloading code as root is not allowed for security reasons. This directive
; facilitates to let the preloading to be run as another user.
; https://php.net/opcache.preload_user
;opcache.preload_user=
; Prevents caching files that are less than this number of seconds old. It
; protects from caching of incompletely updated files. In case all file updates
; on your site are atomic, you may increase performance by setting it to "0".
;opcache.file_update_protection=2
; Absolute path used to store shared lockfiles (for *nix only).
;opcache.lockfile_path=/tmp
[curl]
; A default value for the CURLOPT_CAINFO option. This is required to be an
; absolute path.
;curl.cainfo =
[openssl]
; The location of a Certificate Authority (CA) file on the local filesystem
; to use when verifying the identity of SSL/TLS peers. Most users should
; not specify a value for this directive as PHP will attempt to use the
; OS-managed cert stores in its absence. If specified, this value may still
; be overridden on a per-stream basis via the "cafile" SSL stream context
; option.
;openssl.cafile=
; If openssl.cafile is not specified or if the CA file is not found, the
; directory pointed to by openssl.capath is searched for a suitable
; certificate. This value must be a correctly hashed certificate directory.
; Most users should not specify a value for this directive as PHP will
; attempt to use the OS-managed cert stores in its absence. If specified,
; this value may still be overridden on a per-stream basis via the "capath"
; SSL stream context option.
;openssl.capath=
[ffi]
; FFI API restriction. Possible values:
; "preload" - enabled in CLI scripts and preloaded files (default)
; "false" - always disabled
; "true" - always enabled
;ffi.enable=preload
; List of headers files to preload, wildcard patterns allowed.
;ffi.preload=
It might be a good idea to restrict the access to the web GUI only to local network. This is super easy to do. I have created a /etc/nginx/private.conf file which then can be simply included in the site where you need it.
allow 192.168.0.0/16;
deny all;
Do not forget to add the DNS into DHCP options. If you have OpenWRT, then go to Network -> Interfaces -> LAN -> DHCP server -> Advanced Settings and into DHCP-Options type 6,<IP> where <IP> is the IP address of Pi-hole. For example 6,192.168.1.12.
Consider adding secondary DNS server as fallback when your pi-hol is down. Such as 6,192.168.1.12,9.9.9.9.
Consider setting up a password.
Consider securing the server with HTTPS, see section nginx.
Gotchas
If starting pihole-FTL.service fails, add following into /etc/systemd/resolved.conf and restart systemd-resolved.service:
[Resolve]
DNSStubListener=no
While executing: attempt to write a readonly database error
This error happened to me the because I did not follow the instructions:
Updating... this may take a while. Please do not navigate away from or close this page.
Solution is to re-run the gravity update of blacklists.
If running on SSD, check out Optimise for solid state drives.
You might see this error:
There was a problem applying your settings.
Debugging information:
PHP error (2): file_exists(): open_basedir restriction in effect. File(/var/log/apache2/error.log) is not within the allowed path(s): ...
If the path is added in the allowed paths, the check if the file exists, it not:
\$ mkdir -p /var/log/apache2
\$ touch /var/log/apache2/error.log
\$ chown pihole:pihole /var/log/apache2/error.log
I did have problems when I tried to use the open_basedir option, the site would not work. In the end I just did not used it.
It is not really feasible to version control the pi-hole dotfiles. But you can at least export and import the settings in the web UI.
Additional blacklists
- hagezi
- nice list of blacklists (you can selectively pick what to block)
- really good starting point
- contains one list for Windows-specific junk
- oisd
- one big list :/
- lightswitch05
- contains lists for Facebook and dating sites
- anudeepND
- ads and Facebook
- firebog.net
- collection of lists
- blocklistproject
- crazy-max/WindowsSpyBlocker
- StevenBlack
For more take a look at reddit.com/r/pihole
The more blocklists you add, the more likely you'll come across a false positive. Consider adding whitelists.
Whitelists
Test your setup
Last modified: 2023-03-29
Tiny Tiny RSS (tt-rss)
I had so much pain getting this up and running.
When following the ArchLinux guide, I have got following error:
2023/02/06 19:24:34 [error] 53880#53880: *1 "/usr/share/nginx/html/tt-rss/index.php" is forbidden (13: Permission denied), client: <REDACTED>, server: tt-rss.white-hat-hacker.icu, request: "GET / HTTP/2.0", host: "tt-rss.white-hat-hacker.icu"
The solution is actually to change the location of hosted files - instead of
# ln -s /usr/share/webapps/tt-rss /usr/share/nginx/html/tt-rss
use this:
# ln -s /usr/share/webapps/tt-rss /srv/http/tt-rss
Another problem I have seen appeared when I access the URL:
Exception while creating PDO object:could not find driver
Last modified: 2023-03-29
nginx
Self-signed certificates for local network
- Generate a private key (set permission mask to
077!)- it will be placed in
/etc/ssl/privateby default (unless you change configuration)
- it will be placed in
# cd /etc/ssl/private
# openssl genpkey -algorithm RSA -pkeyopt rsa_keygen_bits:4096 -out server.key
# chmod 400 falcon_openssl.key
- Create CSR
# openssl req -new -sha256 -key server.key -out server.csr
- Create certificate
# openssl x509 -req -days 1095 -in server.csr -signkey server.key -out server.crt
I usually leave everything as default, only change the Common Name (e.g. server FQDN or YOUR name) []: option to whatever the server_name will be set in nginx configuration.
Certbot
- Create and host
hello worldhtml document. certbot --nginx
Last modified: 2023-03-29
phpMyAdmin
I got this error when trying to login.
Failed to set session cookie. Maybe you are using HTTP instead of HTTPS to access phpMyAdmin.
In the end, the problem was caused by my extension DarkReader! Workaround was to disable it and install dark theme right into phpMyAdmin (I chose darkwolf).
Last modified: 2023-03-29
tmate
You can host your own tmate server. As usual, I am handling the installation and dependencies via meta package.
Installation
wht_server/PKGBUILD
# Maintainer: Vojtech Vesely <vojtech.vesely@protonmail.com>

pkgname=wht_server
pkgver=1.0.5
pkgrel=1
pkgdesc='archlinux meta package - set of multiple meta packages for server'
arch=('x86_64')
url='https://git.sr.ht/~atomicfs/atomicfs-repo-arch'
license=('MIT')
depends=(
  # Other meta packages
  'wht_system'
)
The package itself comes from AUR. I have added it into my personal repository to be built.
Now comes the fun part :D
Here is the PKGBUILD file from the AUR:
tmate-ssh-server-git/PKGBUILD
{{#include ../../submodules/atomicfs-repo-arch/packages/archlinux/x86_64/tmate-ssh-server-git/PKGBUILD}}
According to the instructions, you are supposed to generate SSH keys via ./create_keys.sh. When looking into the upstream repository into the create_keys.sh script, it is just a simple wrapper for ssh-keygen.
Thankfully, the maintainer of the AUR package created these handy systemd services which do the exact same thing - they will create SSH keys in /etc/tmate-ssh-server:
tmate-ssh-server-genkeys-ed25519.servicetmate-ssh-server-genkeys-rsa.service
Configuration
As for the configuration of the server, it is rater simple.
/etc/tmate-ssh-server/tmate-ssh-server.conf
HOSTNAME=tmate.white-hat-hacker.icu
PORT=405
Now you can start and enable the services:
# systemctl start tmate-ssh-server-genkeys-ed25519.service
# systemctl start tmate-ssh-server-genkeys-rsa.service
# systemctl enable --now tmate-ssh-server.service
Now you will need to get SHA256 fingerprint. To do that run commands:
# journalctl -eu tmate-ssh-server-genkeys-ed25519.service
# journalctl -eu tmate-ssh-server-genkeys-rsa.service
Here is the example output for tmate-ssh-server-genkeys-ed25519.service:
Dec 02 10:55:06 falcon systemd[1]: Starting tmate ed25519 key generation...
Dec 02 10:55:06 falcon ssh-keygen[2641]: Generating public/private ed25519 key pair.
Dec 02 10:55:06 falcon ssh-keygen[2641]: Your identification has been saved in /etc/tmate-ssh-server/ssh_host_ed25519_key
Dec 02 10:55:06 falcon ssh-keygen[2641]: Your public key has been saved in /etc/tmate-ssh-server/ssh_host_ed25519_key.pub
Dec 02 10:55:06 falcon ssh-keygen[2641]: The key fingerprint is:
Dec 02 10:55:06 falcon ssh-keygen[2641]: SHA256:wT+1dUSJNxJ/9b82RzvPeThZicv4g2VJPG+0xgc1Wac root@falcon
Dec 02 10:55:06 falcon ssh-keygen[2641]: The key's randomart image is:
Dec 02 10:55:06 falcon ssh-keygen[2641]: +--[ED25519 256]--+
Dec 02 10:55:06 falcon ssh-keygen[2641]: |             .o.X|
Dec 02 10:55:06 falcon ssh-keygen[2641]: |       .     o.O=|
Dec 02 10:55:06 falcon ssh-keygen[2641]: |        o   o Eo*|
Dec 02 10:55:06 falcon ssh-keygen[2641]: |         o . *.oo|
Dec 02 10:55:06 falcon ssh-keygen[2641]: |        S o o B.=|
Dec 02 10:55:06 falcon ssh-keygen[2641]: |           . = O=|
Dec 02 10:55:06 falcon ssh-keygen[2641]: |            * +Xo|
Dec 02 10:55:06 falcon ssh-keygen[2641]: |           o +=.B|
Dec 02 10:55:06 falcon ssh-keygen[2641]: |            ...o+|
Dec 02 10:55:06 falcon ssh-keygen[2641]: +----[SHA256]-----+
Dec 02 10:55:06 falcon systemd[1]: Finished tmate ed25519 key generation.
Take a not of that SHA256:wT+1dUSJNxJ/9b82RzvPeThZicv4g2VJPG+0xgc1Wac, you need it for client configuration.
Surprise surprise, the last thing is to configure clients.
# https://github.com/tmate-io/tmate/blob/master/example_tmux.conf

# Self-hosted server specifics
set -g tmate-server-host "tmate.white-hat-hacker.icu"
set -g tmate-server-port 405
set -g tmate-server-ed25519-fingerprint "SHA256:wT+1dUSJNxJ/9b82RzvPeThZicv4g2VJPG+0xgc1Wac"
#set -g tmate-server-rsa-fingerprint     "SHA256:b0OHXYgWZRkTbefwB9OFlpARxMd6N36bhaBWAe8z6gw"

# No bells at all
set -g bell-action none
I use firewalld, and I simply added a config for the tmate server.
/etc/firewalld/services/tmate.xml
<?xml version="1.0" encoding="utf-8"?>
<service>
  <short>tmate</short>
  <description>Instant terminal sharing</description>
  <port protocol="tcp" port="405"/>
</service>
If you are on the same network as the machine hosting the tmate server, you might come across problem where the tmate client will refuse to work with error:
Error connecting: Connection refused
Reconnecting... (Error connecting: Connection refused)
I have public IP address at home and domain. tmate.white-hat-hacker.icu is sub-domain pointing to my public IP address. And when on the same network, and tmate-server-host set to tmate.white-hat-hacker.icu, I see this error.
Since I also run my own DNS, I simply added a entry to fix this. Now when resolving the tmate.white-hat-hacker.icu I get local IP address of the machine instead of my public IP address.
Notes
Sessions
On the server, sessions create sockets in:
/tmp/systemd-private-<RANDOM_STRING>-tmate-ssh-server.service-<RANDOM_STRING>/tmp/tmate/sessions/<SESSION_ID>
This can be useful when providing remote support to less tech-savy people. If you have already configured their tmate to connect to your server, you can easily find out what is the session ID and connect to it.
The session ID can be guessed (especially since you can name the session yourself - see documentation, section named sessions).
To deal with this problem, you can use pass authorized_keys to tmate!
See documentation, section access control.
Last modified: 2023-03-29
Baud rate
Baud is unit to express speed of communication.
| Baud rates |
|---|
| 50 |
| 75 |
| 110 |
| 134 |
| 150 |
| 200 |
| 300 |
| 600 |
| 1200 |
| 1800 |
| * 2400 |
| 4800 |
| * 9600 |
| * 19200 |
| 28800 |
| 38400 |
| 57600 |
| 76800 |
| * 115200 |
| 230400 |
| 460800 |
| 576000 |
| 921600 |
Those with * are very common.
Last modified: 2023-03-29
Markdown
Markdown is a lightweight markup language for creating formatted text using a plain-text editor.
Last modified: 2023-03-29
Markdown syntax highlighting
- Cucumber (
*.feature) - abap (
*.abap) - ada (
*.adb,*.ads,*.ada) - ahk (
*.ahk,*.ahkl) - apacheconf (
.htaccess,apache.conf,apache2.conf) - applescript (
*.applescript) - as (
*.as) - as3 (
*.as) - asy (
*.asy) - bash (
*.sh,*.ksh,*.bash,*.ebuild,*.eclass) - bat (
*.bat,*.cmd) - befunge (
*.befunge) - blitzmax (
*.bmx) - boo (
*.boo) - brainfuck (
*.bf,*.b) - c (
*.c,*.h) - cfm (
*.cfm,*.cfml,*.cfc) - cheetah (
*.tmpl,*.spt) - cl (
*.cl,*.lisp,*.el) - clojure (
*.clj,*.cljs) - cmake (
*.cmake,CMakeLists.txt) - coffeescript (
*.coffee) - console (
*.sh-session) - control (
control) - cpp (
*.cpp,*.hpp,*.c++,*.h++,*.cc,*.hh,*.cxx,*.hxx,*.pde) - csharp (
*.cs) - css (
*.css) - cython (
*.pyx,*.pxd,*.pxi) - d (
*.d,*.di) - delphi (
*.pas) - diff (
*.diff,*.patch) - dpatch (
*.dpatch,*.darcspatch) - duel (
*.duel,*.jbst) - dylan (
*.dylan,*.dyl) - erb (
*.erb) - erl (
*.erl-sh) - erlang (
*.erl,*.hrl) - evoque (
*.evoque) - factor (
*.factor) - felix (
*.flx,*.flxh) - fortran (
*.f,*.f90) - gas (
*.s,*.S) - genshi (
*.kid) - glsl (
*.vert,*.frag,*.geo) - gnuplot (
*.plot,*.plt) - go (
*.go) - groff (
*.(1234567),*.man) - haml (
*.haml) - haskell (
*.hs) - html (
*.html,*.htm,*.xhtml,*.xslt) - hx (
*.hx) - hybris (
*.hy,*.hyb) - ini (
*.ini,*.cfg) - io (
*.io) - ioke (
*.ik) - irc (
*.weechatlog) - jade (
*.jade) - java (
*.java) - js (
*.js) - jsp (
*.jsp) - lhs (
*.lhs) - llvm (
*.ll) - logtalk (
*.lgt) - lua (
*.lua,*.wlua) - make (
*.mak,Makefile,makefile,Makefile.*,GNUmakefile) - mako (
*.mao) - maql (
*.maql) - mason (
*.mhtml,*.mc,*.mi,autohandler,dhandler) - markdown (
*.md) - modelica (
*.mo) - modula2 (
*.def,*.mod) - moocode (
*.moo) - mupad (
*.mu) - mxml (
*.mxml) - myghty (
*.myt,autodelegate) - nasm (
*.asm,*.ASM) - newspeak (
*.ns2) - objdump (
*.objdump) - objectivec (
*.m) - objectivej (
*.j) - ocaml (
*.ml,*.mli,*.mll,*.mly) - ooc (
*.ooc) - perl (
*.pl,*.pm) - php (
*.php,*.php(345)) - postscript (
*.ps,*.eps) - pot (
*.pot,*.po) - pov (
*.pov,*.inc) - prolog (
*.prolog,*.pro,*.pl) - properties (
*.properties) - protobuf (
*.proto) - py3tb (
*.py3tb) - pytb (
*.pytb) - python (
*.py,*.pyw,*.sc,SConstruct,SConscript,*.tac) - rb (
*.rb,*.rbw,Rakefile,*.rake,*.gemspec,*.rbx,*.duby) - rconsole (
*.Rout) - rebol (
*.r,*.r3) - redcode (
*.cw) - rhtml (
*.rhtml) - rst (
*.rst,*.rest) - sass (
*.sass) - scala (
*.scala) - scaml (
*.scaml) - scheme (
*.scm) - scss (
*.scss) - smalltalk (
*.st) - smarty (
*.tpl) - sourceslist (
sources.list) - splus (
*.S,*.R) - sql (
*.sql) - sqlite3 (
*.sqlite3-console) - squidconf (
squid.conf) - ssp (
*.ssp) - tcl (
*.tcl) - tcsh (
*.tcsh,*.csh) - tex (
*.tex,*.aux,*.toc) - text (
*.txt) - v (
*.v,*.sv) - vala (
*.vala,*.vapi) - vbnet (
*.vb,*.bas) - velocity (
*.vm,*.fhtml) - vim (
*.vim,.vimrc) - xml (
*.xml,*.xsl,*.rss,*.xslt,*.xsd,*.wsdl) - xquery (
*.xqy,*.xquery) - xslt (
*.xsl,*.xslt) - yaml (
*.yaml,*.yml)
Last modified: 2023-03-29
mdbook
Below are few of my favorite plugins.
mdbook-admonish
Adds support for Material Design admonishments, based on the mkdocs-material implementation.
mdbook-katex
A preprocessor rendering LaTex equations to HTML.
mdbook-linkcheck
Checks for broken links.
Last modified: 2023-03-29
Mailto links
Mailto link has following format:
mailto:<email_address>,<email_address2>?<parameter>&<parameter2>
Recipients are separated by comma (,). You can have more than 2 recipients ;).
Additional parameters are possible, such as:
- cc (carbon copy)
- bcc (blind carbon copy)
- subject
- body
These additional arguments must be separated from the to field with question mark (?).
You are rather limited in the characters you can put into a HTML link.
At least according to stackoverflow.com and this Uniform Resource Identifier (URI): Generic Syntax document, following characters are allowed in HTML link:
ABCDEFGHIJKLMNOPQRSTUVWXYZabcdefghijklmnopqrstuvwxyz0123456789-._~:/?#[]@!&'()*+,;=
If you want other characters, or perhaps you would like to have a reserved character in the subject field, you have to encode the character into %<hex_code>.
Here is a short table of the most used hex codes (full table at HTML URL Encoding Reference):
| Hex code | Character |
|---|---|
%20 | |
%21 | ! |
%2D | - |
%2E | . |
%3A | : |
%3F | ? |
Last modified: 2023-03-29
Audio / Noise levels
Entire spectrum of possible noise level is show in table below, along with permissible exposure for some of the levels.
Sources:
- Decibel exposure time guidelines
- Noise level chart (archive.org)
- Comparitive examples of noise levels (archive.org)
There is no cure for hearing loss caused by excessive noise. Such type of damage is permanent damage.
| dB | Example | Effects | Permissible exposure |
|---|---|---|---|
| 0 | |||
| 10 | Pin drop | ||
| 20 | Rustling leaves | ||
| 30 | Whisper | ||
| 40 | Bird calls | ||
| 60 | Conversation | ||
| 70 | Shower | Safe threshold | |
| 80 | Alarm clock | Annoyingly loud | 8 hours |
| 90 | Squeeze toy | Possible damage | 2 hours |
| 100 | Motorcycle | Serious damage possible | 15 minutes |
| 110 | Rock band | Pain threshold | 2 minutes |
| 120 | Thunderclap | Painful | less than 7 seconds |
| 130 | Stadium crowd | no exposure | |
| 140 | Aircraft carrier deck | Immediate nerve damage | |
| 150 | Jet-engine (at 25 meters) | Eardrum rupture | |
| 160 | Shotgun | ||
| 170 | Safety airbag | ||
| 180 | Rocket launch | ||
| 194 | Sound waves become shock waves |
Agency (EPA) determined in 1974 that a 24-hour average noise exposure level of 70 dB or less prevented measurable hearing loss over a lifetime.
To protect yourself, avoid any exposure exceeding 85 dB. Sounds above 85 dB are considered harmful.
If you find yourself near any of these without hearing protection, use your fingers to plug your ears and move away from the source of noise. Every meter of distance counts.
For every 3 dB over 85 dB, the permissible exposure time before possible damage can occur is cut in half.
| dB | Permissible Exposure |
|---|---|
| 85 | 8 hours |
| 88 | 4 hours |
| 91 | 2 hours |
| 94 | 1 hour |
| 97 | 30 minutes |
| 100 | 15 minutes |
| 103 | 7.5 minutes |
| 106 | 3.7 minutes |
| 109 | 1.8 minutes |
| 112 | 56 seconds |
| 115 | 28 seconds |
Last modified: 2023-06-03
My favorite quotes
Archimedes of Syracuse
Give me the place to stand, and I shall move the earth.
George Carlin
Think of how stupid the average person is and then realise half of them are stupider than that.
Shakespeare
Macbeth:
When shall we three meet again in thunder, lightning, or in rain?
When the hurlyburly's done, when the battle's lost and won.
Tina Fey
Bossypants:
Don't waste time telling crazy people they are crazy.
Jan Samek
If you don't control it, you don't own it. Then you have to pwn it.
Multifunction is malfunction.
A polished shit is still a shit.
COBOL = Compiles Only By Odd Luck
Markiplier
In my defense, I was left unsupervised.
Linus Torvalds
Windows is an onion operating system. Layer upon layer of crap that never gets fixed.
We all know Linux is great ... it does infinite loops in 5 seconds.
Eleanor Roosevelt
Learn from the mistakes of others. You can't live long enough to make them all yourself.
Carl Sagan
Extraordinary claims require extraordinary evidence
Noam Chomsky
If we don't believe in freedom of expression for people we despise, we don't believe in it at all.
Thunderf00t
The only "get rich quick" scheme that works is selling "get rich quick" schemes that don't work.
Unknown
A friend is someone who will bail you out of jail. A best friend is the one sitting next to you.
Dance like Nobody's Watching; Encrypt like Everyone is
Every sensible security technician
Rule #1 in crypto: never write your own crypto.
There is nothing more permanent than temporary solution.
Misc
Mordin Solus, Mass Effect 3
Had to be me. Someone else might have gotten it wrong.
You Must Learn from the Mistakes of Others. You Will Never Live Long Enough to Make Them All Yourself.
Arguing with an idiot is like playing chess with a pidgeon. It'll just knock over all the pieces, shit on the board, and strut about like it's won anyway.
There are two kinds of teachers: the kind that fill you with so much quail shot that you can’t move, and the kind that just give you a little prod behind and you jump to the skies.
Bender, Futurama
Anything less than immortality is a complete waste of time.
Last modified: 2023-03-29
My favorite memes
Links to sources can be found in repository.

Command-line Tools can be 235x Faster than your Hadoop Cluster

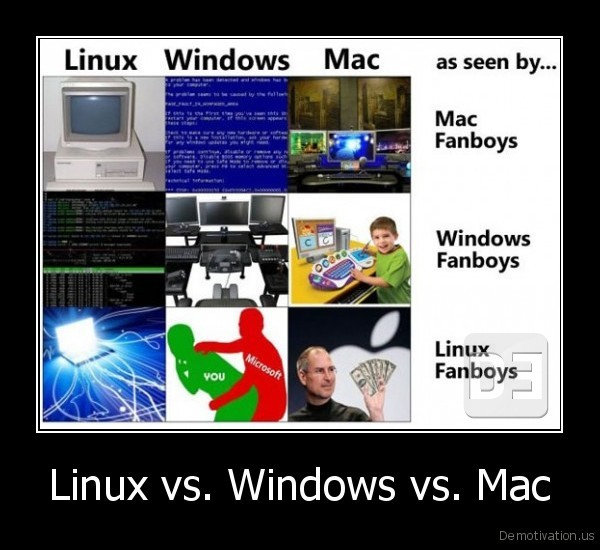
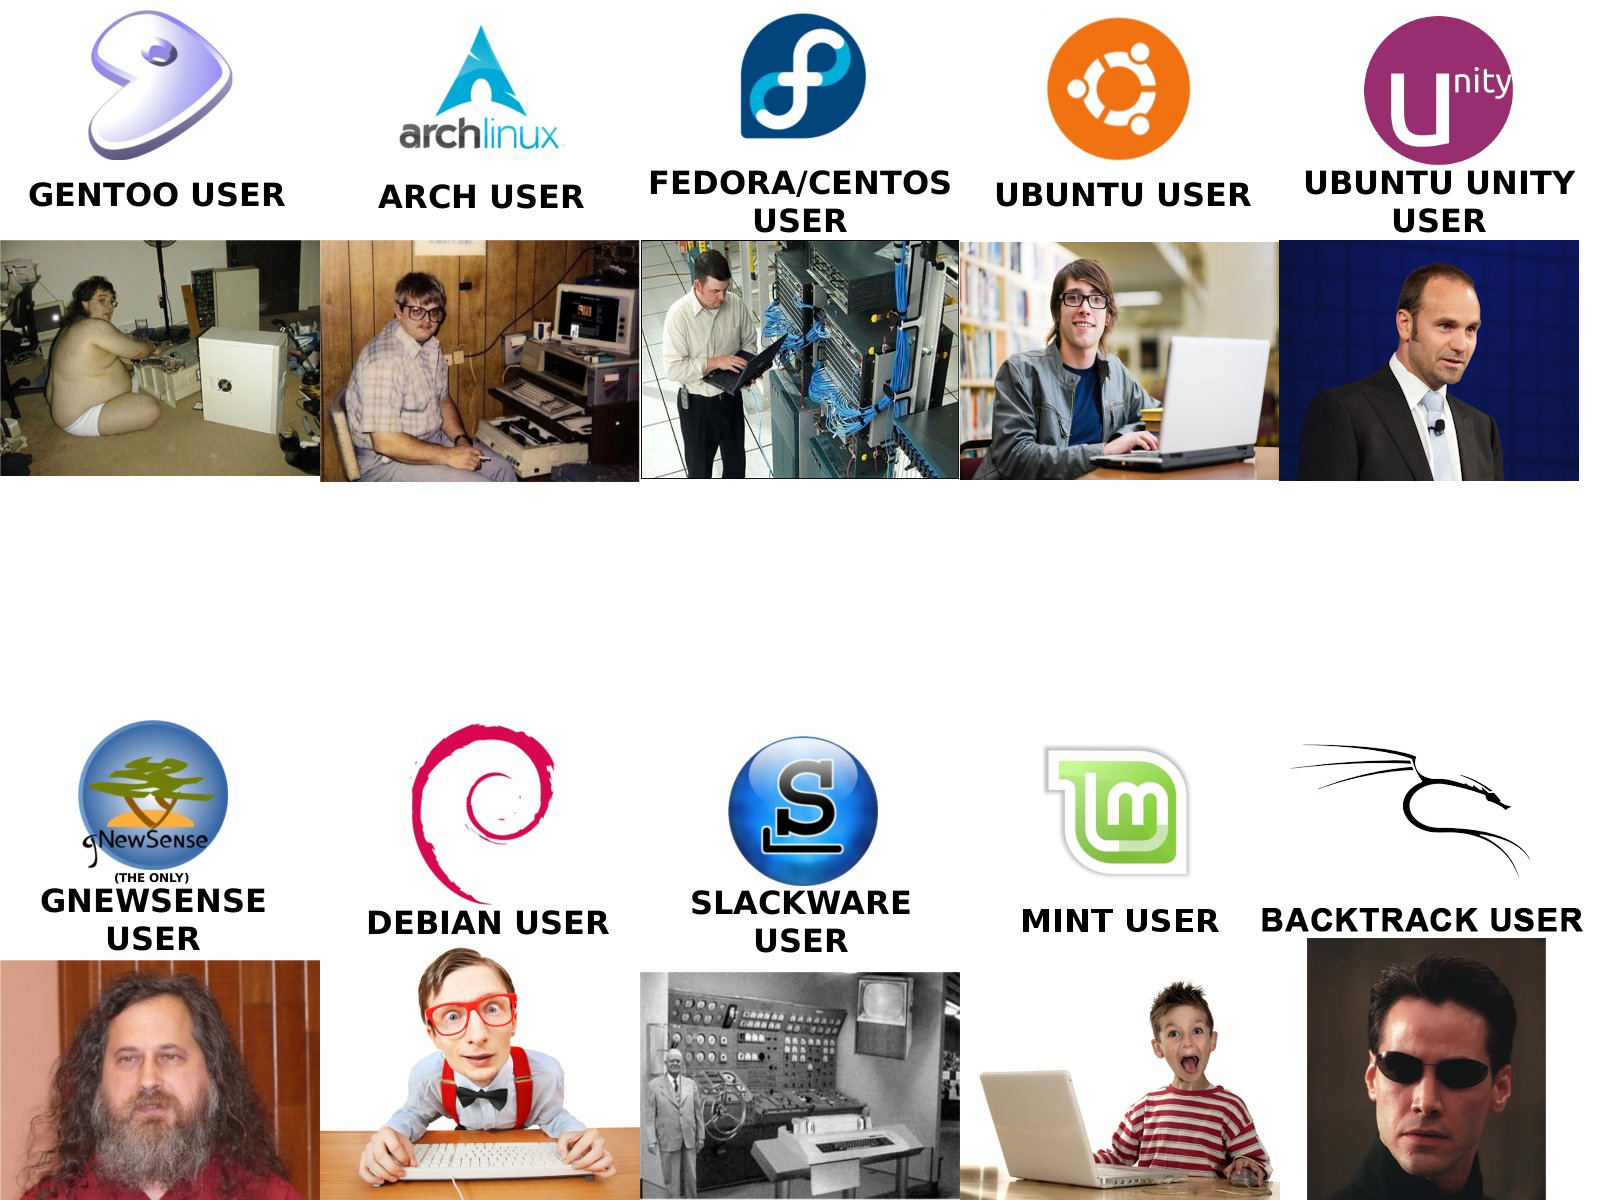
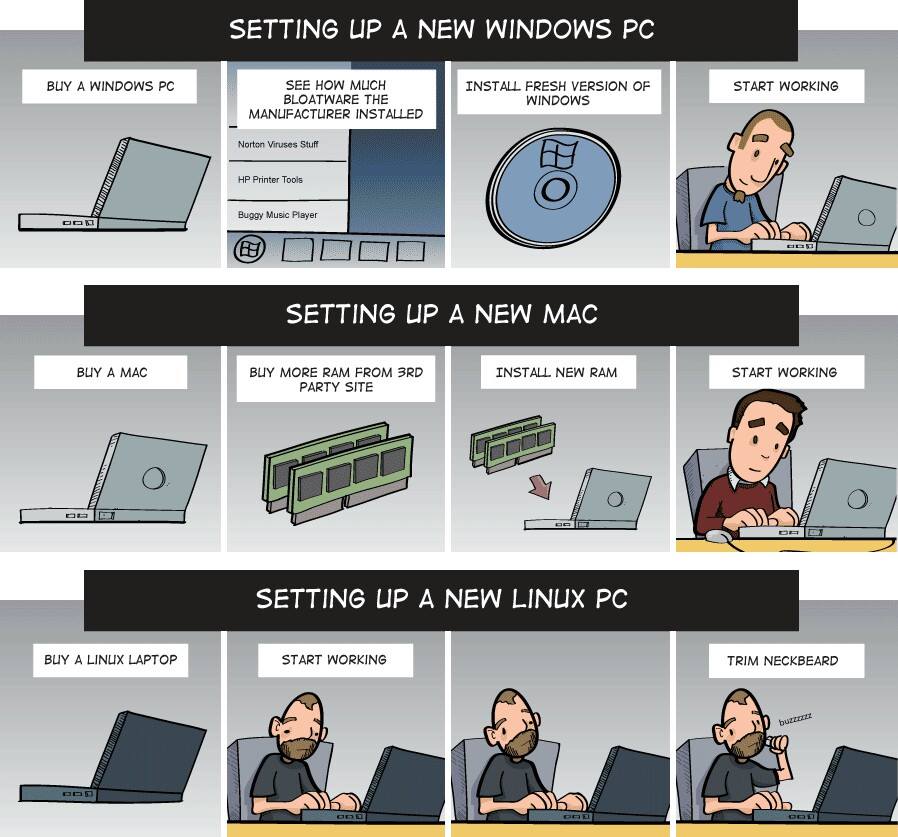

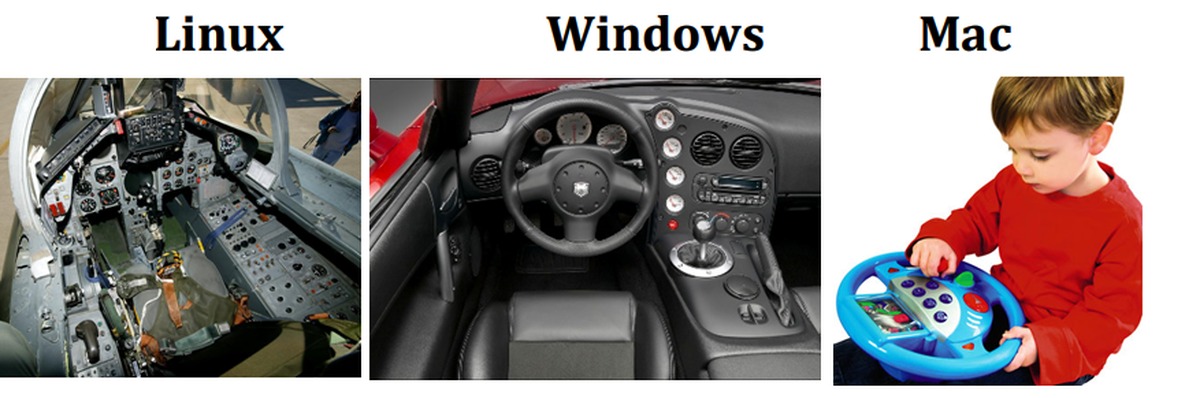


Last modified: 2023-03-29
Template
Warning, under construction

Notes
Fact
Some quoteted text here
Images without source

Images with source

Quote
Quoted text